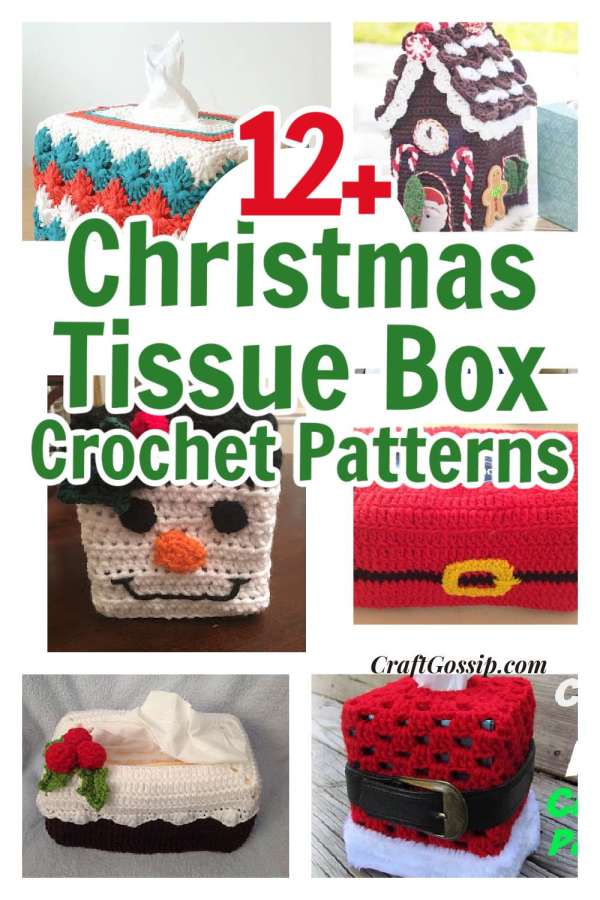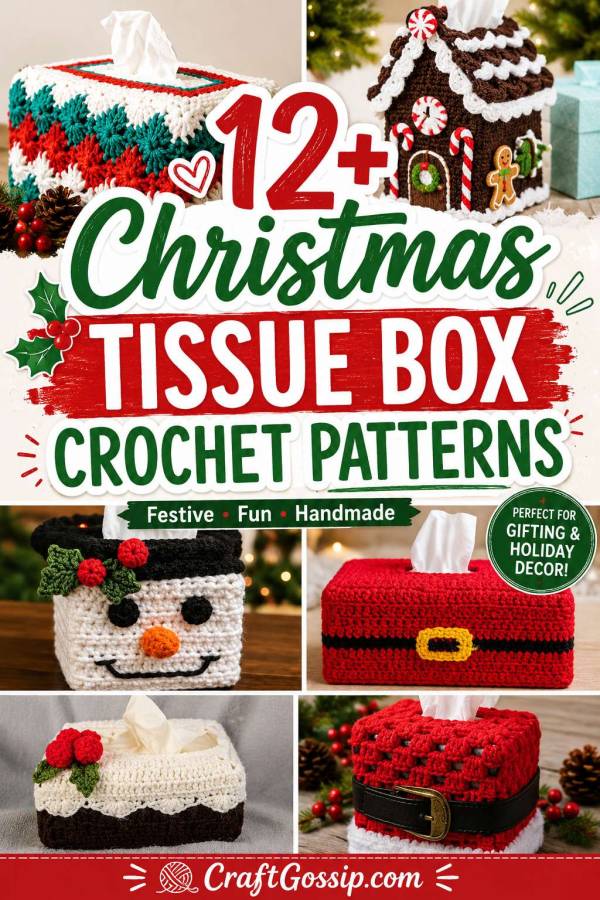
Get into the holiday spirit with these 12 crochet patterns for Christmas-themed tissue box covers! Not only are they a practical way to hide unsightly tissue boxes, but they also make great decorations for your home during the holiday season. And if you’re looking for a unique and thoughtful Christmas gift idea, these tissue box covers are a great option!
With a wide variety of patterns to choose from, you can easily find one that matches your holiday decor or personal style. Say goodbye to commercial branding on your tissue boxes and hello to festive and fun covers that will add a touch of holiday cheer to any room in your home.
These patterns are not only easy to follow, but they’re also a fun and relaxing way to get into the holiday spirit. So why not give it a try and add a homemade touch to your holiday decorations this year? Whether you’re an experienced crocheter or a beginner, there’s a pattern for everyone in this Christmas crochet roundup.
Gnome Tissue Box Cover Free Crochet Pattern – Nana’s Crafty Home
Crochet Gift Tissue Box Cover Pattern – Nicki’s Homemade Crafts
The Perfect Stitch…: Crochet Snowman Tissue Box Cover…
Ravelry: CamperVan Tissue Box Cover pattern by Sabrina Spice
Santa Tissue Box Cover Crochet Pattern | Jo to the World Creations
Blower The Tissue Box Cover Gnome
Ravelry: Santa Tissue Box Cover pattern by Selena Lazarus
If you’re looking for an easy and thoughtful gift to make for a loved one, look no further than crochet tissue box covers. These handmade covers make a great gift for any occasion, whether it’s a birthday, anniversary or just to say “I care”. Not only do they look beautiful, but they’re also practical and can be used in any room of the house.
Crochet tissue box covers are not only a great way to show someone you care, but they’re also surprisingly easy to make. All you need is some yarn and a crochet hook, and you’re ready to start. There are a variety of patterns available online for free, so you can take your pick. Whether you’re looking for a simple pattern or something more intricate, you’ll be able to find a pattern that’s just right for you.
Once you’ve chosen your pattern, it’s time to get started. Crochet tissue box covers don’t take too long to make and are relatively easy, even for beginner crocheters. Not to mention, they’re a great way to practice and gain confidence in your skills. After a few hours of crocheting, you’ll have a beautiful handmade gift ready to give.
Crochet tissue box covers make thoughtful and unique gifts that are sure to be appreciated. They can be used to store tissues, cotton balls, or whatever else you can think of. Plus, they’re easy to care for and can be washed without a problem. So, what are you waiting for? Get your crochet hook and yarn ready and start creating your very own crochet tissue box covers today!
Santa Tissue Box Cover Pattern! –
Bring some festive cheer to your home decor with this Santa Tissue Box Cover Pattern! Not only is it a practical way to conceal those unsightly tissue boxes, but it’s also a fun and creative way to add a touch of holiday spirit to any room. With this pattern, you’ll be able to crochet a jolly Santa Claus-inspired cover that will brighten up your space and put a smile on your face.
Easy Crochet Tissue Box Cover Pattern For Beginners

Make a simple crochet tissue box cover with this beginner-friendly free pattern. This quick handmade home decor project uses basic stitches, worsted weight yarn, and an easy rectangular shape that fits a standard tissue box.
There are some things around the house that are useful but not exactly pretty, and tissue boxes are right up there with remote controls, phone chargers, and that one mystery basket of things we all keep meaning to sort. A crochet tissue box cover is such a simple little fix, but it instantly makes a bathroom, bedroom, guest room, or office feel a bit more thoughtful and handmade.
This easy crochet tissue box cover pattern is designed for a standard rectangular tissue box and uses basic crochet stitches, simple shaping, and worsted weight yarn. It is a lovely beginner-friendly crochet home decor project, especially if you want something practical that does not take weeks to finish.
I’d use cotton yarn if you want a crisp, sturdy cover for a bathroom or kitchen, but acrylic works beautifully too if you are stash-busting or making several as quick handmade gifts. If you are new to making practical crochet pieces, a good set of stitch markers and a measuring tape from Amazon can save you from the old “why is this suddenly an inch too small?” problem we have all had at least once.
Why Make A Crochet Tissue Box Cover?
A handmade tissue box cover is one of those small crochet projects that is surprisingly useful. It hides the bright supermarket packaging, adds a soft handmade touch to your space, and makes a basic tissue box look like it belongs on purpose.
It is also a lovely gift idea. Add one to a care package with tissues, tea bags, handmade soap, lip balm, or a crocheted washcloth and you have a thoughtful “get well soon” gift that is actually practical.
This pattern is simple enough for confident beginners and satisfying enough for experienced crocheters who want a quick project between larger makes. It is also a nice one-skein crochet project if you have a lonely ball of yarn sitting in your stash waiting for a job.
Finished Size
This pattern is designed to fit a standard rectangular tissue box measuring approximately:
9 inches long
4.75 inches wide
3.5 inches high
The finished cover is made slightly larger so it slips neatly over the box.
Before you begin, measure your own tissue box. Tissue box sizes vary a little between brands, and it is much easier to adjust before you start than after you have lovingly crocheted the whole thing.
Skill Level
Beginner to easy
You should be comfortable with chain stitch, single crochet, half double crochet, slip stitch, and working evenly around an edge.
Supplies
Worsted weight yarn / medium weight yarn, approximately 130–150 yards
5 mm crochet hook
Yarn needle
Scissors
Measuring tape
Standard rectangular tissue box
Cotton yarn gives the cover a firmer, more structured finish. Acrylic yarn is a good budget-friendly option and works well if you want a soft, washable cover. Mary Maxim is a good place to look for yarn bundles if you are making several for gifts, and Amazon is handy for basic crochet hooks, stitch markers, yarn needles, and measuring tools.
Abbreviations
This pattern uses US crochet terms.
ch – chain
st / sts – stitch / stitches
sc – single crochet
hdc – half double crochet
sl st – slip stitch
Gauge
Approximately 15–16 single crochet stitches = 4 inches
Approximately 16 rows = 4 inches
Gauge is helpful, but measuring against your actual tissue box is more important for this project. The cover should sit neatly over the box without stretching tightly.
Pattern Notes
Chains at the beginning of rows do not count as stitches.
The top panel is worked flat first.
The centre opening is created while making the top panel.
The sides are worked down from the outer edge of the top panel.
Measure as you go and add or remove side rounds if your tissue box is taller or shorter.
Try not to work the outside edge too tightly or the cover may pull in at the corners.
Crochet Tissue Box Cover Pattern
Top Panel
Chain 19.
Row 1: Sc in the second ch from hook and in each ch across. Turn.
You should have 18 sc.
Rows 2–10: Ch 1, sc in each st across. Turn.
You should have 18 sc.
Rows 11–27: Ch 1, sc in the first 6 sts, ch 6, skip the next 6 sts, sc in the last 6 sts. Turn.
You should have 12 sc and one ch-6 opening.
Rows 28–37: Ch 1, sc in each st and ch across. Turn.
You should have 18 sc.
Do not fasten off.
You should now have a rectangular top panel with a long opening in the centre for the tissues.
Neaten The Tissue Opening
Working around the tissue opening only:
Round 1: Ch 1, work sc evenly around the opening, placing 2 sc in each corner to help keep the shape neat. Join with a sl st to the first sc.
Fasten off and weave in this end.
This edging helps the opening look tidier and stops it from stretching too much when tissues are pulled through. Keep your stitches relaxed so the top panel does not pucker.
Work Around The Outer Edge
Rejoin yarn at any corner of the top panel.
Round 1: Ch 1, sc evenly around the outside edge of the top panel. Work approximately 18 sc across each short end and 37 sc along each long side. Join with a sl st to the first sc.
You should have approximately 110 sc.
Your stitch count may vary slightly depending on your tension and how you space the stitches along the row ends. The important thing is that the edge sits flat. If it ripples, you have too many stitches. If it pulls in, add a few more stitches around the edge.
Sides
Round 2: Ch 1, hdc in each st around. Join with a sl st to the first hdc.
Round 3: Ch 1, sc in each st around. Join with a sl st to the first sc.
Repeat Rounds 2 and 3 until the side of the cover measures approximately 3.5 inches from the top panel.
For most worsted weight yarns, this will be around 9–11 side rounds.
Fasten off and weave in all ends.
Slip the cover over your tissue box and check the fit.
Optional Bottom Corner Straps
If your cover lifts up too easily or your tissue box is slightly smaller than expected, you can add simple corner straps underneath.
Make 4 straps.
Chain 10. Fasten off, leaving tails for sewing.
Sew one strap diagonally across each bottom corner on the inside of the cover. The straps help grip the bottom corners of the tissue box and keep the cover sitting neatly.
If your box is larger, chain 12 for each strap. If you want a tighter fit, chain 8.
Pattern Accuracy Notes
This pattern is written to fit a standard rectangular tissue box, but it is also easy to adjust. Because tissue box brands can vary slightly, measuring as you go is the safest way to get a good fit.
The top panel creates a centre opening that is wide enough for tissues to pull through without tearing. The side section is worked directly from the top panel, which means there is no awkward joining of separate side pieces.
If your cover looks too loose, try using a smaller hook or adding the optional corner straps. If it looks too tight, go up half a hook size or add a few extra stitches when working around the outer edge.
Easy Variations
For a clean bathroom look, use white, cream, oatmeal, sage green, soft grey, or navy cotton yarn.
For a cosy bedroom version, use warm neutrals or soft acrylic yarn.
For a Christmas tissue box cover, make the main cover red, green, or cream and add a fluffy white border around the bottom. You can also use this pattern as a plain base after browsing our Christmas crochet tissue box cover ideas
For a farmhouse-style cover, use natural cotton yarn and sew on a small wooden button or faux leather tag.
For a gift basket, pair the finished cover with handmade washcloths, tissues, soap, and a jar of tea bags. It is the kind of practical handmade gift that people actually use, which is always a win.
Helpful Yarn Tips
Cotton yarn gives the best structure and helps the cover hold its rectangular shape.
Acrylic yarn is softer and more flexible, making it a good choice for budget-friendly gift making.
Avoid very fuzzy yarn for your first version because it can make the stitches harder to see around the tissue opening.
If your cover feels too floppy, use a smaller hook or choose a firmer cotton yarn.
If your cover feels too stiff, go up half a hook size.
Handmade Gift Ideas
This crochet tissue box cover makes a sweet addition to a handmade care package. Add a box of tissues, a small crocheted washcloth, herbal tea, lip balm, and a little handwritten note.
It also works well for craft stalls, teacher gifts, nursing home gifts, and housewarming baskets. Neutral colours suit most homes, while bright colours are fun for kids’ rooms, holiday decor, or themed gift baskets.
Small crochet home decor projects like this are also perfect when you want to make something useful but do not want to commit to a blanket-sized project. Sometimes the tiny practical makes are the ones that get the most use.
Ravelry: Plum Pudding Tissue Box Cover pattern by Selena Lazarus – If you’re looking for a unique and whimsical way to decorate your home for the holidays, then you’ll love the Plum Pudding Tissue Box Cover pattern by Selena Lazarus. This adorable cover is designed to look like a Christmas pudding, complete with a sprig of holly on top! The pattern is available on Ravelry and comes with detailed instructions to guide you through the crochet process. It’s the perfect way to add some festive charm to your living room or bedroom.
Crochet Gingerbread House Tissue Box Cover – – Nicki’s Homemade Crafts – Do you love the sweet and spicy scent of gingerbread during the holidays? Then you’ll adore this Crochet Gingerbread House Tissue Box Cover pattern from Nicki’s Homemade Crafts! This charming cover is shaped like a gingerbread house and will add a touch of whimsy to any room. With easy-to-follow instructions, even a beginner crocheter can create this fun and festive piece. It’s a great way to bring some Christmas cheer into your home decor.
Free Crochet Pattern: Turkey Tissue Box Cozy with Roasted Veggies | Twinkie Chan Blog– If you’re hosting a Thanksgiving dinner, why not add some fun and creativity to your table decor with this Turkey Tissue Box Cozy with Roasted Veggies pattern from Twinkie Chan’s blog? This playful cover is designed to look like a roasted turkey with veggies on the side! It’s a great way to conceal your tissue box while adding a touch of humor to your holiday decor. The pattern is free and includes step-by-step instructions to guide you through the crochet process. Your guests will love this fun and festive addition to your table.