Having a Bad Hair Day? If you’ve got some yarn, a ponytail elastic, and 90 minutes, you’ve got the Fix! And, since I’m a very slow crocheter, you can probably make this in 60 minutes. So there!
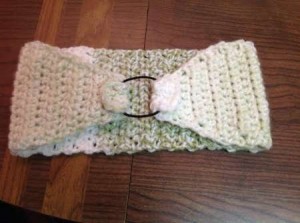
What you see here – the ponytail elastic – is the back, not the front of the headband. Well, of course, you can wear it however you want. If you use a better color for the elastic, you might want to wear it up front. Of course, if you flip it over, you’ll see the easy way that elastic fits onto the headband. Therein lies its magic!
I’ve never wanted to make one of these before because I didn’t want one that ties or one that I’d have to sew in a length of ugly waistband type elastic to the yarn. When I got the idea to use one of my daughter’s ponytail elastics and make it removeable, I was inspired to work up a headband using that idea.
You can choose to not use buttons to make the elastic removable. By crocheting over the sides of the elastic, rather than using a button to secure it, you can make the elastic permanent. In that event, I’d use 2 ponytail elastics in case one becomes stretched out or breaks.
You can use this idea with any headband pattern you like, but I’ll give you the details of the one shown here of my own design. I used some mystery acrylic yarn and an I (5.5mg) crochet hook.
1. Chain 8, hdc in 3rd chain from hook and in remaining chains = 5 hdc
2. Chain 2, turn, hdc in each hdc across = 5 hdc
3. Repeat Row 2, chain 2, turn
4. Increase by one hdc in each row for 6 rows until you have 14 hdc
5. Continue in hdc pattern for 30 rows (I have a large head so adjust these rows according to what fits your head)
6. Chain 2, turn, begin decreasing by one stitch in each row
7. Repeat Row 6 until you have a row of 5 hdc, chain 2, turn
8. Hdc in each stitch across = 5 hdc
9. Repeat Row 8 for 2 more rows. Do not fasten off.
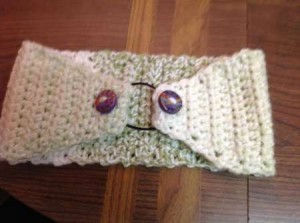
10. Using tail at beginning and end of project, weave tail through to second row. Using the tail and a blunt needle, sew button onto second row of hdc at each end of headband.
11. Place ponytail elastic around one button and push the button through the center of the third or fourth row of crochet. Do the same with the other button and elastic. Voila! You’re done.
This pattern is untested. I made it the length and width that I need, using buttons and yarn I had on hand. For a real bad hair day, I’d have one handy in a color that closely resembles your hair color, worked to the dimensions – width and length – that will fit snugly but comfortably for you. I purposely used a contrasting elastic and buttons to make it easier to be seen in this article. I’d be careful to match the buttons and elastic more closely to the yarn so nothing stands out. Of course, if you want it to stand out, add a big flower or other applique to the front of the headband. No one will think you’re trying to hide anything – rather that you’re making a fashion statement!
ADDENDUM: Sylvia P in MO pointed me to this similar headband. It’s really cute. I had not seen it before. Mine has the advantage of being able to easily replace the ponytail elastic if it loses its shape. Thanks, Sylvia!
Looking for more headbands to crochet check out these Crochet Headband patterns on Etsy.
Need Crochet supplies and Yarn? We highly recommend Lionbrand for quality yarn and ongoing yarn sales and discounts. Make sure to check out their free crochet patterns too.
Don’t forget to check out the free crochet patterns on our sister site too.


That’s a great idea :). Thank you, dear !
I seriously love this. I have a half dozen diy headbands that just don’t make the grade. Going to choose yarn right now!
Brilliant!!!!!
I used cotton yarn for this headband. So comfortable!
i just was going to comment that the other headbands were thread and your is yarn so that make them different anyway i think I am going to make some for me and for some of my little friends. I can never find a headband or hat that fits me just right. so here goes. and thanks so much.
Tracey,
Please let us know how your headbands turn out. I’d love to post a picture here!
jd