• Home
  • Suggest A DIY
  • DIY Newsletter

Crochet

Patterns, projects and techniques

  • About CraftGossip
  • Our Network
    • Bath & Body Crafts
    • Candle Making Ideas
    • Crochet Ideas
    • Cross Stitch
    • Edible Crafts
    • Felting Patterns
    • Glass Art
    • Home & Garden Ideas
    • Indie Crafts
    • Jewelry Making
    • Kids Crafts
    • Knitting Patterns
    • Lesson Plans
    • Needlework
    • Party Ideas
    • Polymer Clay
    • Quilting Ideas
    • Recycled Crafts
    • Scrapbooking
    • Sewing Patterns
    • Card Making
    • DIY Weddings
    • Not Craft Ideas
  • Giveaways
  • Roundups
  • Store
  • Search

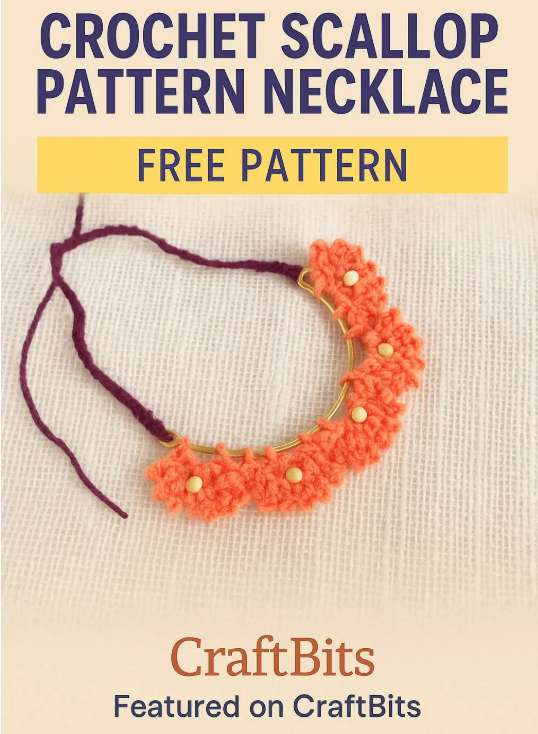
Crochet Necklace Pattern

October 10, 2018 by Shellie Wilson

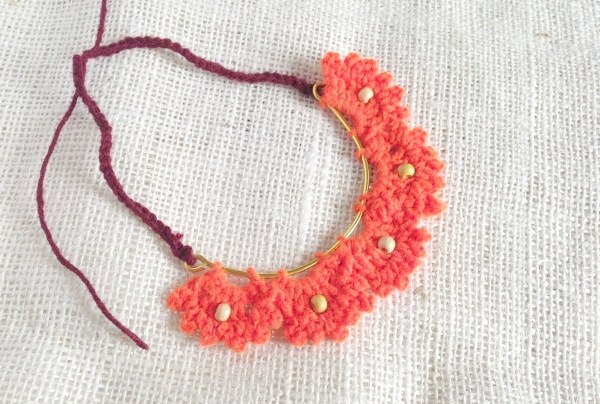
Some craft wire, a few beads, a little crochet threads and you can create a super cute necklace using this Free Crochet Pattern.

What you need

Materials:
1. Crochet yarn or thread
2. Crochet hook
3. Scissors
4. Craft wire 24 gauge
5. Jewellery closure.


Instructions


Take 24 gauge craft wire  and cut off the size appropriate for your neck. Create small loops at both ends of the wire.
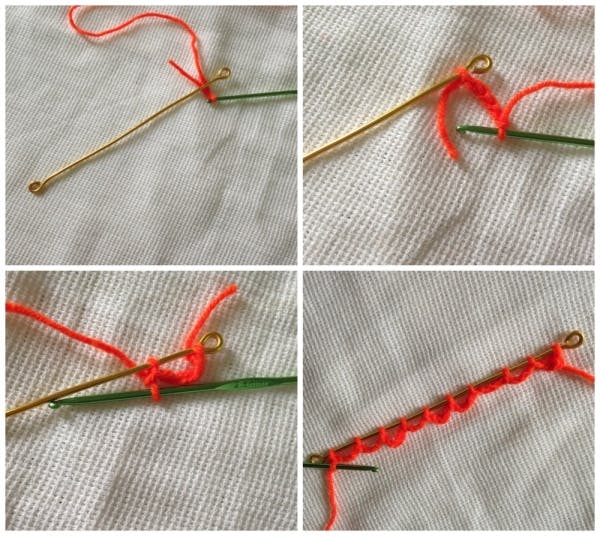


Round-1: Take your yarn or thread and start with a slip knot. Draw the slip knot around the wire and chain 4 from hook and then chain the 5th one around the wire. Repeat *ch4, ch1 around the wire* 9 times.


Round-2: Now chain 2 (counting 2 chains as dc) into the loop near hook. Work 6 dc into the same loop and  work 1 sc into the next loop. Repeat *dc6 into the same loop, sc1 into the next loop* until you reach the other end.

Round-3: For the next row chain 2 (counting 2 chains as dc) into the loop near hook. Work another dc into the same loop and chain 1 and skip the next chain stitch from the previous row. Repeat *dc2 into the same loop, ch1, skip 1 ch from the previous row* until reaching the other end.

Round-4: Chain 3 and work 1 single crochet into the 3rd chain from hook, slip stitch into the next chain and repeat *ch3, sc1, st st*  6 times. Slip stitch to the next pattern and repeat **ch3, sc1, st st*  6 times. Complete the pattern and work a sl st. Cut off extra thread.
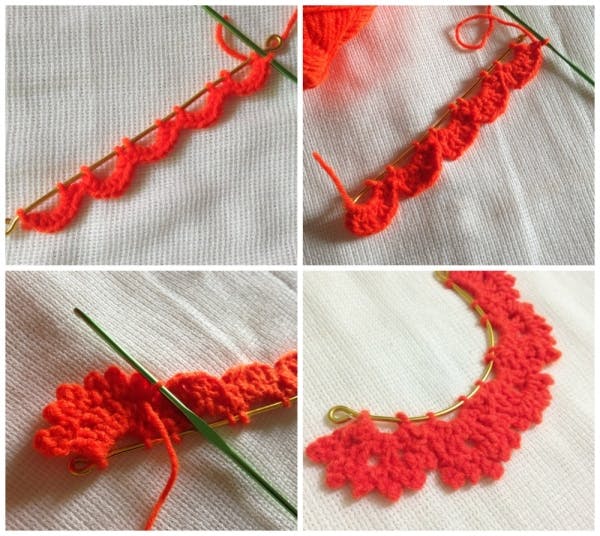
 

Bend the wire to a ‘U’ shape and glue small beads at the centre of each scallop pattern.

Work 2 same sized chain rows and attach them at both ends of the wire to complete the closure of the necklace.
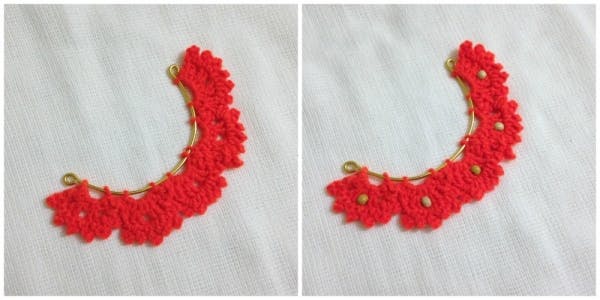
Try using different coloured yarns and beads for more variation!
 

«
»

Have you read?

Free Crochet Pattern – Wind Spinner

There is something wonderfully cheerful about a crochet project that uses up scraps, works up quickly, and then actually does something once it is finished. This free crochet wind spinner pattern from CraftBits is exactly that kind of make — bright, simple, stash-friendly, and perfect for adding a little handmade movement to your garden, porch, balcony, or craft room window.

The pattern uses 8 ply yarn, a 3.5 mm crochet hook, and just a few basic supplies, making it a lovely beginner-friendly crochet project for anyone who is comfortable with chaining and working simple stitches. The clever part is that the spiral shape forms naturally as the stitch count increases, so you are not doing anything complicated to create that lovely corkscrew twist. It is one of those satisfying “oh, that’s clever!” crochet projects that looks much more impressive than the effort involved.

I especially like that this project is flexible. You can make it with two, three, or four colours, depending on what is sitting in your yarn basket giving you the guilt stare. Bright rainbow colours would be gorgeous for a summer patio, while softer blues and greens would make a lovely coastal-style wind spinner. You could even make red, white, and green versions for Christmas, or orange, purple, and black for Halloween if you like your garden décor with a bit of seasonal drama.

The CraftBits pattern also suggests adding beads, tassels, pom-poms, charms, or another small hanging weight to the bottom, which is a nice practical touch. That little bit of weight helps the spinner hang properly and gives it more movement when the breeze catches it. If you are making this for outdoor use, I would choose acrylic yarn or another easy-care yarn that can cope with a bit of weather. Cotton would give a crisper look, but it may hold moisture longer if it gets rained on.

This is also a great project for group crafting, charity stalls, school holiday crafting with older kids, or quick handmade gifts. Once you have made one, it would be very easy to make a whole batch in different colour combinations. And we all know how dangerous “just one more” projects can be when there is leftover yarn involved.

For beginners, the only thing I would watch is the length of the starting chain. A longer chain gives you a longer wind spinner, but it also means many more stitches by the final row. Start with a manageable length for your first one so you can enjoy the process rather than wondering why your relaxing crochet project has suddenly turned into a yarn-eating marathon.

If you are looking for an easy scrap yarn crochet project, a quick garden crochet idea, or a beginner-friendly crochet decoration that feels fun and useful, this free crochet wind spinner pattern is well worth bookmarking. It is cheerful, inexpensive, and gives leftover yarn a second life — which is always a win in my craft room.

You can find the free pattern on CraftBits here: Free Crochet Pattern – Wind Spinner

This free crochet wind spinner pattern is a cheerful scrap yarn project that works up quickly and adds handmade colour to your garden, porch, balcony, or window.

This easy crochet wind spinner is made with 8 ply yarn and a 3.5 mm crochet hook. The spiral shape forms naturally through simple stitch increases, making it a beginner-friendly crochet project with lots of room for colour play. Add beads, tassels, charms, or pom-poms for extra weight and movement.

The CraftBits article is already targeting strong phrases such as “free crochet pattern,” “wind spinner,” “scrap yarn crochet project,” and “beginner-friendly crochet project.” To improve SEO further, I would add a few extra search-friendly phrases naturally into the post, such as “crochet garden decoration,” “easy crochet wind spinner for beginners,” “crochet patio décor,” and “quick crochet gift idea.”

Affiliate opportunities fit naturally here for 8 ply yarn, acrylic yarn bundles, crochet hooks, stitch markers, yarn needles, tassel makers, beads, and outdoor-safe hanging supplies. Mary Maxim, Amazon, and Etsy would all be suitable if linked gently inside the article body rather than as a hard-selling supply list.


More Articles

Afghans, Blankets & Throws amigurumi Baby Hat Baby Patterns bags Beanies Beginner Book Reviews Christmas CHRISTMAS Clothing Crochet Patterns Crochet Techniques & Ideas Free Crochet Patterns Granny Squares Halloween Patterns Quick Scarfs shawls

RSS More Articles

  • Wet Felted Scarf Tutorial by Natasha Smart Textiles
  • How To Sew a Throw Pillow
  • Sweet Apple Cross Stitch Patterns
  • How To Make A Stretch Bead Bracelet For Beginners
  • DIY Emotional Support Chicken Plush Pattern
  • Beautiful Brazilian Embroidery Flowers to Try
  • Vintage Knitted Coat Pattern PDF – Pembroke Coat
  • How to Tell the Difference Between Dry Scalp, Dandruff and Product Buildup
  • 12 Handmade Card Ideas with Summer and Tropical Drinks
  • 10 Fall Leaves Scrapbook Layout Templates for Cosy Autumn Memory Keeping

Pick Your Blog

  • Sewing
  • Knitting
  • Quilting
  • Crochet
  • Home & Garden
  • Recycled Crafts
  • Scrapbooking
  • Card Making
  • Polymer Clay
  • Cross-Stitch
  • Edible Crafts
  • Felting
  • Glass Art
  • Indie Crafts
  • Kids Crafts
  • Jewelry Making
  • Lesson Plans
  • Needlework
  • Bath & Body
  • Party Ideas
  • Candle Making
  • DIY Weddings
  • Not Craft
  • Free Craft Projects

Copyright © 2026 · CraftGossip | Start Here | Contact Us | Link to Us | Your Editors | Privacy and affiliate policy