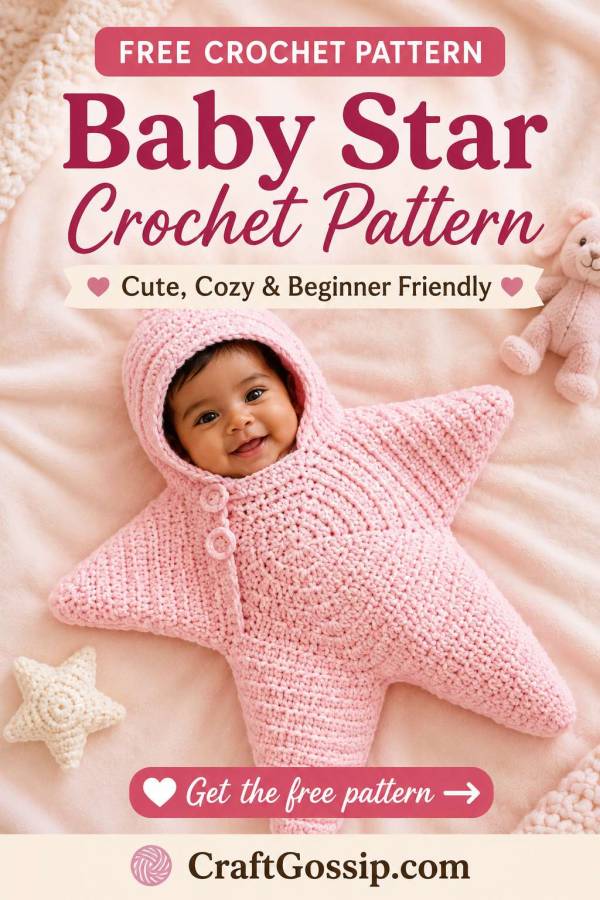
There are ordinary baby buntings, and then there are baby buntings that turn a tiny newborn into the sweetest little star you have ever seen.
This free baby star bunting crochet pattern creates a five-pointed, hooded cocoon with a practical side opening and button closure. It is made from two pentagon-shaped panels, with the star points, hood, sleeve and front opening worked separately before everything is joined with a decorative crochet seam.
It may look complicated when you first lay out all the pieces, but the shaping becomes quite repetitive once you understand how each point is formed. After the first couple of points, you will probably find yourself working through the rest without nearly as much pattern-checking—and that is always a good moment in any crochet project.
The finished crochet star bunting makes an adorable baby-shower gift, keepsake or supervised newborn photography prop.
This pattern uses US crochet terminology.
The star is constructed from:
- Two crocheted pentagons
- Four points worked directly onto the Back pentagon
- A hood point worked onto the Back pentagon
- Three points worked onto the Front pentagon
- One separate sleeve point
- One separate hat section
- A side opening finished with buttons
The beginning chain counts as a stitch where indicated.
When working the pentagons, each chain-one space separates one of the five sections.
The original first-row stitch count listed the stitches as double crochet. Because the row is worked in half double crochet, the corrected count is 10 hdc.
For the shaped points, continue decreasing in the established manner until four stitches remain unless a different instruction is given.
Finished Size
The finished size will depend on your yarn, tension and hook size.
Before using the bunting, compare the finished measurements with the baby for whom it is intended. The hood should not cover the baby’s face, and the garment should never feel tight around the neck or chest.
Skill Level
Adventurous beginner to intermediate
You should be comfortable with:
- Working in rounds
- Working along row ends
- Increasing and decreasing
- Double crochet shaping
- Joining crochet pieces
- Reverse single crochet or crab stitch
- Sewing on buttons securely
Materials
- Yellow worsted-weight yarn
- 5 mm crochet hook
- 2 buttons
- Yarn needle
- Scissors
- Locking stitch markers
A soft, washable yarn is best for this project. Baby-friendly acrylic or a smooth cotton blend will usually be easier to care for than a fuzzy yarn that sheds fibres.
Mary Maxim carries a good selection of soft baby yarns and washable worsted-weight yarns. A set of locking stitch markers is also extremely helpful for keeping track of the five pentagon sections—because counting the same section three times and getting three different answers is practically a crochet tradition.
Abbreviations – US Terms
ch – chain
dc – double crochet
hdc – half double crochet
sc – single crochet
dc dec – double crochet decrease; work two double crochet stitches together
st(s) – stitch or stitches
sp – space
sl st – slip stitch
rep – repeat
beg – beginning
Special Stitches
Double Crochet Decrease
Yarn over and insert the hook into the next stitch. Yarn over and pull up a loop. Yarn over and pull through two loops.
Yarn over and insert the hook into the following stitch. Yarn over and pull up a loop. Yarn over and pull through two loops.
Yarn over and pull through all three loops remaining on the hook.
Crab Stitch
Crab stitch is reverse single crochet.
Instead of working from right to left, insert the hook into the stitch immediately to the right. Yarn over, pull up a loop, yarn over again and pull through both loops.
Continue working from left to right across the edge.
Pentagon Panels
Make two pentagons.
Pentagon – Make 2
Round 1
Ch 3.
Work 9 hdc into the third ch from the hook.
Join with a sl st.
10 hdc
Round 2
Ch 4. The beginning ch counts as one dc and one ch.
Work 2 dc in each of the next 2 sts, ch 1.
Repeat the established sequence around until the final stitch.
Work 2 dc in the final stitch, then work 1 dc into the base of the beginning stitch.
Join with a sl st to the third ch of the beginning ch-4.
20 dc and 5 ch-1 spaces
Pentagon Construction Note
From this point onward, each round begins with ch 4.
Work each of the five pentagon sections in the same manner. Each section is separated by a ch-1 space.
At the end of the round, work the final dc into the base of the beginning stitch as established, then join to the third ch of the beginning ch-4.
Round 3
Ch 4.
Work 2 dc in the next dc, dc in each of the next 2 dc, 2 dc in the next dc, ch 1.
Repeat this sequence around all five sections, following the Pentagon Construction Note.
Round 4
Ch 4.
Work 2 dc in the next dc, dc in the next dc, 2 dc in each of the next 2 dc, dc in the next dc, 2 dc in the next dc, ch 1.
Repeat this sequence around all five sections, following the Pentagon Construction Note.
Round 5
Ch 4.
Work 2 dc in the next dc, dc in each of the next 2 dc, 2 dc in the next dc, dc in each of the next 2 dc, 2 dc in the next dc, dc in each of the next 2 dc, 2 dc in the next dc, ch 1.
Repeat this sequence around all five sections, following the Pentagon Construction Note.
Round 6
Ch 4.
Work 2 dc in the next dc, dc in each of the next 12 dc, 2 dc in each of the next 2 dc, ch 1.
Repeat this sequence around all five sections, following the Pentagon Construction Note.
Round 7
Ch 4.
Work 2 dc in the next dc, dc in each of the next 14 dc, 2 dc in each of the next 2 dc, ch 1.
Repeat this sequence around all five sections, following the Pentagon Construction Note.
Round 8
Ch 4.
Work 2 dc in the next dc, dc in each of the next 16 dc, 2 dc in each of the next 2 dc, ch 1.
Repeat this sequence around all five sections, following the Pentagon Construction Note.
Fasten off and weave in the ends.
Label one pentagon Front and the other Back.
Back Pentagon
Lay the Back pentagon flat with one straight edge positioned at the top.
Place a stitch marker in the top edge. This will become the hat or hood section.
The four remaining edges will become the other four star points.
Back Star Points
Work the following instructions across each of the four unmarked edges.
Join the yarn at the beginning of one edge.
Rows 1–2
Work dc evenly across the edge.
Turn at the end of each row.
The precise number of stitches may vary slightly depending on how you work into the row ends and chain spaces. The important thing is to distribute the stitches evenly without puckering or stretching the edge.
Shaping Rows
Continue in dc while decreasing once at each side of every row.
Work:
Dc in the first st, dc dec over the next 2 sts, dc across until 3 sts remain, dc dec over the next 2 sts, dc in the final st.
Turn.
Repeat the shaping row until 4 sts remain.
Fasten off.
Repeat these instructions across each of the other three unmarked edges.
Back Hat Point
Return to the marked upper edge of the Back pentagon.
Join the yarn in the end stitch.
Row 1
Dc in each of the next 3 sts, 2 dc in the next st.
Repeat once more.
Dc in each of the next 4 sts.
Work 2 dc in the next st, then dc in each of the next 3 sts.
Repeat once more.
Turn.
Row 2
Dc evenly across.
Turn.
Rows 3–5
Dc in the first st.
Dc dec over the next 2 sts.
Dc across until 3 sts remain.
Dc dec over the next 2 sts.
Dc in the final st.
Turn.
Row 6
Dc in the first st.
Dc dec over the next 2 sts.
Dc in each of the next 3 sts.
Dc dec over the next 2 sts.
Dc in each of the next 4 sts.
Dc dec over the next 2 sts.
Dc in each of the next 3 sts.
Dc dec over the next 2 sts.
Dc in the final st.
Turn.
Row 7
Dc in the first st.
Dc dec over the next 2 sts.
Dc in each of the next 3 sts.
Work 2 dc decreases.
Dc in each of the next 3 sts.
Dc dec over the next 2 sts.
Dc in the final st.
Turn.
Rows 8–11
Continue shaping the point in the same manner as the other star points.
Decrease once at each end of every row until 4 sts remain.
Fasten off and weave in the ends.
Front Pentagon
Lay the Front pentagon flat with one straight edge positioned at the top.
Mark the upper edge to keep the work correctly oriented.
As you look at the pentagon, work points onto:
- The two lower edges
- The edge immediately to the right of the marked upper edge
Work these three points in the same manner as the points on the Back pentagon.
For each point:
- Work two rows of dc evenly across the edge.
- Continue in dc while decreasing once at each end of every row.
- Stop when 4 sts remain.
- Fasten off and weave in the ends.
The remaining side edge becomes the opening.
Front Opening Edge
Join the yarn to the remaining open side edge.
Rows 1–2
Work 22 dc evenly across.
Turn.
22 dc per row
Fasten off and weave in the ends.
This section forms one side of the buttoned opening.
Separate Sleeve Point
Ch 24.
Row 1
Dc in the fourth ch from the hook and in each remaining ch across.
22 dc
Turn.
Row 2
Dc evenly across.
Turn.
Remaining Rows
Continue shaping the sleeve point as follows:
Dc in the first st, dc dec over the next 2 sts, dc across until 3 sts remain, dc dec over the next 2 sts, dc in the final st.
Turn.
Repeat until 4 sts remain.
Fasten off and weave in the ends.
Separate Hat Section
Ch 30.
Row 1
Dc in the fourth ch from the hook and in each remaining ch across.
28 dc
Turn.
Row 2
Dc in each st across.
28 dc
Turn.
Row 3
Dc in the first st.
Dc dec over the next 2 sts.
Dc across until 3 sts remain.
Dc dec over the next 2 sts.
Dc in the final st.
26 dc
Turn.
Rows 4–6
Work as for Row 3, decreasing once at each end of the row.
Also work one additional dc decrease near the centre of each row.
Turn after each row.
Row 7
Work as for Row 3, decreasing once at each end.
Work two additional dc decreases near the centre of the row.
Turn.
Row 8
Work as for Row 4.
Remaining Rows
Continue shaping as for the other star points.
Decrease once at each end of every row until 4 sts remain.
Fasten off and weave in the ends.
Assembling the Crochet Star Bunting
Lay all the pieces on a flat surface before beginning the joining.
Position the Back pentagon with the hood point at the top.
Arrange the Front pentagon over the Back, matching the corresponding points. Position the separate sleeve and hat pieces beside their matching Back sections.
The pieces are joined with sc. The visible single crochet seam adds definition to the outline of the star.
Begin joining at the right side of the hat section, as viewed from the front. Starting here allows you to finish at the same point before working the crab stitch edging across the hood.
Joining the Hat
Align the separate hat section with the hat point on the Back pentagon.
Working through both layers, join the corresponding edges with sc.
Keep the stitches evenly spaced so the seam lies flat.
Joining the Sleeve
Align the separate sleeve point with the adjoining section of the Back pentagon.
Join the corresponding edges with sc.
Adding the Front
Place the Front pentagon over the Back.
Match the remaining star points and outer edges.
Continue joining the layers with sc, working around the remaining points and leaving the designated side opening accessible.
Forming Sharp Star Points
At the tip of each star point, work 3 hdc into the centre stitch.
This helps the tip remain defined rather than becoming rounded.
Continue joining around the star until you return to the starting point.
Hood Edging
When you return to the beginning of the joining round, turn the work so you can crochet along the open hood edge.
Work crab stitch evenly across the hood opening.
Fasten off and weave in all remaining ends.
Adding the Buttons
Position two buttons evenly along the opening edge.
The original design does not use separately crocheted buttonholes. The spaces between the dc stitches allow suitably sized buttons to pass through the fabric.
Before sewing the buttons permanently:
- Close the overlapping edge.
- Check that the Front sits flat.
- Mark the best button positions.
- Confirm that each button passes securely through the crochet fabric.
- Sew each button on firmly using several passes of yarn or strong matching thread.
Choose buttons that are large enough not to slip accidentally through the crochet stitches.
Check the buttons before every use. Do not use the bunting if a button feels loose.
Finishing the Baby Star Bunting
Weave in every loose end securely.
Gently block the bunting according to the yarn manufacturer’s instructions. Pay particular attention to the five star points, the hood opening and the buttoned edge.
Do not aggressively stretch the fabric. The aim is to settle the stitches and straighten the seams while preserving the cosy shape.
Once dry, check:
- All seams are secure
- The star points match reasonably well
- The hood edging lies flat
- The opening overlaps correctly
- The buttons are firmly attached
- No loose yarn tails remain
Colour Ideas
Yellow gives the finished bunting a cheerful little-star look, but the pattern would also be beautiful in:
- Blush pink
- Soft cream
- Pale blue
- Lavender
- Mint green
- Oatmeal
- Dusty rose
- Warm caramel
You could also use a contrasting colour for the crab stitch edging and buttons.
A smooth solid-coloured yarn allows the five-pointed shape and visible crochet seams to stand out. Variegated yarn may also work, although very busy colour changes can disguise the shaping.
More Free Star and Baby Crochet Patterns
Crocheters who enjoy shaped baby projects may also like this vintage baby bunting cocoon crochet pattern. It has a more traditional cocoon shape but uses a similarly practical buttoned construction.
For a star-shaped project that can be used as a conventional blanket, try the 7 Day Star Point Baby Blanket crochet pattern. It is a lovely next project when you are still in the mood for points but would rather not assemble quite so many individual sections.
You can also browse the full collection of free crochet patterns on CraftBits, including baby gifts, blankets, hats, toys and quick handmade projects.
Baby Safety Notice
This crochet star bunting should be treated as a supervised photography prop or novelty garment only.
It is not a safe sleeping bag and should never be used for unattended sleep, naps, overnight sleeping, car-seat travel or any situation in which the supervising adult may fall asleep.
Red Nose Australia advises that a safe infant sleeping bag should have fitted neck and arm openings, leave the baby’s arms free and have no hood. A baby’s head and face should also remain uncovered during sleep. This hooded star bunting does not meet those safe-sleep design recommendations.
While using the bunting:
- Keep the baby under direct adult supervision.
- Keep the baby’s face and nose completely uncovered.
- Check that the hood cannot move over the face.
- Make sure the garment is not tight around the neck or chest.
- Check every button and seam before use.
- Remove the baby immediately if they become warm or unsettled.
- Remove the bunting before the baby sleeps.
- Never leave the baby unattended on a bed, sofa or raised surface.
This is the sort of crochet project that tends to become a family keepsake. It is cosy, whimsical and just a little bit cheeky—because dressing a baby as a five-pointed star is precisely the sort of thing handmade gifts were invented for.