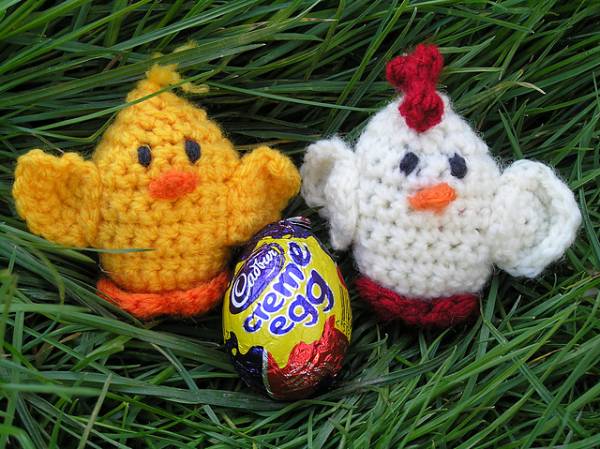
If receiving a Creme egg isn’t enough for your kidlets then how about wrapping it up or hiding it in these cute little Creme egg covers. These also make great little sellers on stalls. A basket of these little chicks will surely excite kids of all ages. Including those chocolate lovers that need to hide their chocolate. (This is me) The free Easter pattern is available here creme egg creatures spinstar creations.
Check out our NEW Facebook page for Crochet. This page is only about Crochet!! Free pattern links, tips tricks and tutorial videos. We will be sharing it all to the ONE SPOT.
Make sure you LIKE the new Crochet Facebook Page so you don’t miss out.
Looking for more Easter themed Crochet patterns? Check out some of our favorite places for Crochet patterns. Etsy. has lots of new patterns and the perfect place to find Crochet patterns that are trending or seasonal. We also love Anniescatalog for buying individual patterns and a great place to source vintage styled designs and last but not least, Leisure Arts for more traditional styled patterns and books.
These creatures are fairly forgiving, so many yarn/hook combinations will work – I used some
scraps of DK and a 3.5 mm hook. This pattern uses American crochet terminology.
Terminology:
Magic Ring
sl st Slip Stitch
ch Single chain stitch
sc Single crochet
hdc Half double crochet
dc Double crochet
tc Treble crochet
sc2tog Decrease by crocheting 2 sc together (photo tutorial within
pattern)
To get started:
Buy a creme egg. In fact, buy a pack with several in it because the temptation to eat them will
get to you at some point – just remember to wash your sticky fingers afterwards as creme egg
filling and yarn do not go well together!
BODY:
Step 1: Use a magic ring with 6 sc and pull it tight
Step 2: Chain 1 to start the round, then 2sc into each sc and join with a slip stitch – 12 sc
Step 3: Chain 1 to start the round, then repeat [1 sc, 2 sc into
the next sc] all the way round and join with a slip stitch
– 18 sc. Do one more increase round – chain 1 to start
the round, then repeat [1sc, 1sc, 2sc into the next sc]
around, but this time do not join to the start of the
round. 24 sc.
This picture shows the completed base, before starting
to work upwards to form the body.
Step 4: For the next few rows you need to work back
and forth, rather than continuing in the round.
This will create a slot in the back of the
creature into which you can push the creme
egg when you’re finished.
So, sc into each sc until you have run out of
stitches, then chain 1 and turn the work and sc
into each sc again. Repeat this until you are
about 2/3rds the way up the egg – I did 6 rows.
Step 5: Repeat Step 4 to work one more row, but this
time don’t turn the work, join across the gap by continuing to sc for a couple of
stitches.
Step 6: Now you need to begin decreasing to shape the
top of the creature, which will involve crocheting
2 sc together:
• hook through next sc, yarn over and pull through as
normal, but then
• hook through the next sc, yarn over and pull through
(you should have 3 stitches on your hook)
• yarn over again and pull through all 3 stitches
Repeat [sc2tog, sc] until you have completed a round and gone past the point at which you
joined the gap together on the last round. Now change to repeating the sc2tog decrease over
again and again.
Check against the creme egg to see how the sizing compares – if
you think it is getting too small too quickly you could switch to
alternating the decrease with a sc for a while. When it is too
fiddly to continue decreasing any more, pull the yarn tightly
through the remaining stitches and sew in the ends.
BASE:
Some sort of base is useful to stop the creature falling over.
You could either make a nest or some feet.
Nest: Using a slightly larger hook than you used for the body,
follow the instructions for making the bottom of the body
and keep working up a few rows in rounds. The nest
should be big enough to put the chick inside.
Feet: Step 1: Use a magic ring with 6 sc and pull it tight
Step 2: Chain 1 to start the round, then 2sc into each
sc and join with a slip stitch – 12 sc
Step 3: Chain 3, tc into next sc, tc into next sc, chain
3, slip stitch into the same sc as the tc you have just
made, slip stitch in the next sc – repeat again to make
the second foot and fasten off.
WINGS:
Step 1: Use a magic ring with 6 sc and pull it tight
Step 2: Chain 1 to start the round, then 2sc into each sc and join
with a slip stitch – 12 sc
Step 3: Chain 1 to start the round, then sc, 2 x hdc into next sc,
2 x dc into next sc, 2 x tc into next sc, 2 x dc into next sc, 2 x hdc
into next sc, sc and fasten off.
BEAK:
I found this the hardest bit to get right – my early attempts kept coming out far too large! If you
have a smaller hook and some thinner yarn it might be useful for this.
Step 1: Chain 4
Step 2: Pull a loop through second chain from the hook, and pull another loop through the third
(last) chain – you have three loops on the hook. Yarn over the hook again and pull through all
three loops. Fasten off.
COMB:
Step 1: Chain 4
Step 2: Sc in second chain from hook, sc in each chain = 3 sc
Repeat the above 2 steps twice more (you should end up with
something like the picture)!
You could omit the comb and create a duckling by sewing a
few strands of yarn to the top of the head instead.
Finishing touches:
Use pins to position all the various extra parts and keep
adjusting until it looks right, then attach them to the body.
Again, use pins to work out where the eyes look best and then
take care not to pull too tightly when embroidering.
Gently push the creme egg through the hole in the back – voila!


Leave a Reply