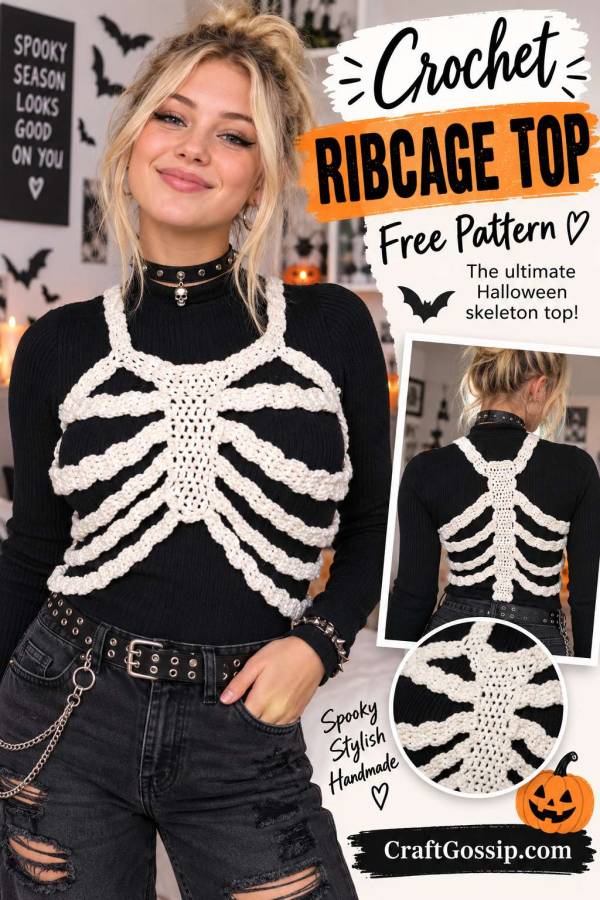
If you are looking for a Halloween costume that says, “Yes, I made this myself,” without requiring three weeks of sewing, face paint and questionable decisions involving a hot glue gun, this crochet ribcage top is such a fun one.
The design is basically a wearable crochet skeleton. A central sternum sits across the front, a crocheted spine runs down the back, and individual crochet ribs wrap around the body to create that wonderfully creepy skeleton shape.
Wear it over a plain black long-sleeved top, dress or bodysuit and suddenly you have a handmade Halloween costume that looks far more complicated than it actually is.
It also happens to be a brilliant stash project if you have some white or cream cotton yarn sitting around waiting for a suitably spooky purpose.
If Halloween crochet is your happy place, you might also want to save our collection of free Halloween crochet patterns you can make in a day. There are plenty of smaller projects in there for using up the yarn left over from this one.
Crochet Ribcage Top Pattern
This is a made-to-measure crochet pattern, rather than a traditionally sized garment pattern.
That is actually quite useful here because everyone’s torso, shoulder width and ribcage proportions are different. Instead of trying to force the pattern into standard small, medium and large sizes, you crochet the shoulder straps and ribs until they comfortably fit the person who will be wearing it.
The centre sternum and spine remain approximately the same size.
Skill Level
Intermediate
This pattern is suitable for crocheters comfortable with working basic stitches, increases, decreases and joining separate crochet pieces together.
Crochet Terminology
This pattern uses US crochet terminology.
Materials
- Cotton or cotton-blend yarn in white, cream or bone
- 5 mm crochet hook
- Yarn needle
- Scissors
- Stitch markers, optional
A medium-weight cotton yarn is ideal because it gives the crochet ribs enough structure to hold their shape.
You could certainly use acrylic if that is what you already have in your stash, but cotton tends to give the skeleton a slightly firmer, more defined finish.
Abbreviations
ch – chain
dc – double crochet
hdc – half double crochet
sc – single crochet
sl st – slip stitch
st/sts – stitch/stitches
MC – magic circle
inc – work 2 dc into the same stitch
dc2tog – double crochet 2 stitches together
Pattern Notes
Turning chains do not count as stitches unless otherwise stated.
The sternum is worked first.
One collarbone strap is crocheted directly from the sternum.
The spine is then crocheted separately, followed by the second collarbone strap.
The two sections are joined together at the shoulders.
The ribs are made separately and sewn between the sternum and spine.
Because this is a fitted costume piece, I strongly recommend pinning everything together and trying it on before permanently sewing the ribs into place.
Ask me how many times I have confidently sewn something together only to discover that my body apparently did not receive the same measurement memo as my crochet hook.
Sternum
Make a magic circle.
Row 1
Work 3 dc into the MC.
Ch 3, turn.
3 sts
Row 2
Work 2 dc into each stitch across.
Ch 3, turn.
6 sts
Rows 3-7
Dc in each stitch across.
Ch 3, turn.
6 sts
Work five rows in total with 6 dc.
Row 8
Dc in next 2 sts, dc2tog, dc in final 2 sts.
Ch 3, turn.
5 sts
Row 9
Dc across.
Ch 3, turn.
5 sts
Row 10
Inc in first st, dc in next st, inc in next st, dc in next st, inc in final st.
Ch 3, turn.
8 sts
Row 11
Dc across.
Ch 3, turn.
8 sts
Row 12
Dc in next 2 sts, hdc in next st, sc in next 2 sts, hdc in next st, dc in final 2 sts.
8 sts
This shaping forms the upper section of the sternum.
Do not fasten off.
First Collarbone Strap
Ch 1.
Turn the work so you are crocheting along the side of the upper sternum.
Work 4 sc evenly along the side edge.
Ch 3, turn.
Rows 1-4
Dc across.
Ch 3, turn.
4 sts
Row 5
Dc in first st, dc2tog, dc in final st.
Ch 3, turn.
3 sts
Remaining Collarbone Rows
Dc across all 3 sts.
Ch 3, turn.
Continue working rows of 3 dc until the strap comfortably reaches over the shoulder toward the upper back.
Do not stretch the crochet while measuring.
Once the strap reaches comfortably:
Ch 1.
Sc across all 3 sts.
Fasten off, leaving a long tail for sewing.
Crochet Spine
Make a magic circle.
Row 1
Work 2 dc into the MC.
Ch 3, turn.
2 sts
Row 2
Dc in first st, inc in next st.
Ch 3, turn.
3 sts
Now begin shaping the vertebrae.
First Vertebra
Row 3
Work 2 dc into each stitch across.
Ch 3, turn.
6 sts
Row 4
Inc in first st, dc in next 4 sts, inc in final st.
Ch 3, turn.
8 sts
Row 5
Dc across.
Ch 1, turn.
8 sts
Row 6
Sl st across the first 3 sts.
Ch 3.
Dc into the same stitch as the final sl st.
Dc in each of the next 2 sts.
Leave the remaining stitches unworked.
3 dc
This narrowing creates the space between the vertebrae.
Second Vertebra
Row 7
Work 2 dc into each of the 3 dc.
Ch 3, turn.
6 sts
Row 8
Inc in first st, dc in next 4 sts, inc in final st.
Ch 3, turn.
8 sts
Row 9
Dc across.
Ch 1, turn.
8 sts
Row 10
Sl st across the first 3 sts.
Ch 3.
Dc into the same stitch as the final sl st.
Dc in each of the next 2 sts.
3 dc
Third Vertebra
Row 11
Work 2 dc into each stitch across.
Ch 3, turn.
6 sts
Row 12
Inc in first st, dc in next 4 sts, inc in final st.
Ch 3, turn.
8 sts
Row 13
Dc across.
Ch 1, turn.
8 sts
Row 14
Sl st across the first 3 sts.
Ch 3.
Dc into the same stitch as the final sl st.
Dc in each of the next 2 sts.
3 dc
You should now be able to see three distinct vertebra sections forming down the spine.
Upper Spine
Row 15
Work 2 dc into each stitch across.
Ch 3, turn.
6 sts
Row 16
Inc in first st, dc in next 4 sts, inc in final st.
Ch 3, turn.
8 sts
Row 17
Dc across.
8 sts
Do not fasten off.
Second Collarbone Strap
Ch 1.
Turn the work and work 3 sc evenly along the side edge of the upper spine.
Ch 3, turn.
Strap Rows
Dc across the 3 sts.
Ch 3, turn.
Continue working rows of 3 dc until this narrow portion is approximately the same length as the corresponding section of the first collarbone strap.
Increase Row
Dc in first st, inc in next st, dc in final st.
Ch 3, turn.
4 sts
Next 3 Rows
Dc across.
Ch 3 and turn after the first two rows.
4 sts
After the final row:
Ch 1.
Sc across.
Fasten off, leaving a long tail for sewing.
Joining the Crochet Ribcage Top
Lay the sternum and spine flat with the right sides facing upward.
Sew the first collarbone strap to one side of the upper spine.
Sew the second collarbone strap to the opposite side of the sternum.
Before securing everything permanently, try the piece on.
The sternum should sit approximately down the centre of the chest and the spine should sit down the centre of the back.
The shoulder straps should lie comfortably without pulling the front section upward.
Adjust the strap length if necessary.
Making the Crochet Ribs
This is where the pattern becomes truly made-to-measure.
There are five ribs on each side of the body, making 10 crochet ribs altogether.
The upper three ribs on each side are 3 dc wide.
The lower two ribs on each side are 2 dc wide.
The exact length depends on the person wearing the top.
Rather than relying on a fixed row count, measure each rib from its attachment point on the sternum, around the side of the body and to the corresponding point on the spine.
Positioning the Ribs
Put the sternum and spine section on the wearer or dress form.
Use stitch markers to mark five positions down each side of the sternum.
Mark matching positions down the spine.
The ribs should gently curve around the torso.
Avoid placing them perfectly horizontally. Slightly angled ribs create a much more convincing skeleton shape.
I also like leaving a little more space between the lower ribs. It makes the design easier to recognise when worn over black clothing.
Upper Three Ribs
You will need 6 ribs, three for each side.
Create a starting foundation that gives you 3 dc.
Ch 3, turn.
Dc across.
3 sts
Continue working rows of 3 dc until the rib reaches comfortably from the marked sternum position around the body to the corresponding point on the spine.
Fasten off, leaving a long sewing tail.
Repeat until you have six upper ribs.
Lower Two Ribs
You will need 4 ribs, two for each side.
Create a foundation that gives you 2 dc.
Ch 3, turn.
Dc across.
2 sts
Continue working rows of 2 dc until the rib reaches from the sternum to the spine.
Fasten off, leaving a long sewing tail.
Make four lower ribs altogether.
Attaching the Crochet Ribs
Pin all 10 ribs into position before sewing.
Start with the upper pair and work your way down.
Check the top on the wearer again.
The ribs should sit comfortably against the body without pulling the sternum or spine sideways.
Once you are happy with the placement, sew one end of each rib securely to the side of the sternum.
Wrap the rib around the body and sew the opposite end to the corresponding point on the spine.
Repeat with all five ribs on each side.
Do not worry about making both sides mathematically identical.
Human bodies are not perfectly symmetrical, and allowing a little flexibility in rib placement usually produces a much better fitting costume.
Finishing Your Crochet Skeleton Top
Weave in all remaining ends.
Try the finished top on and check that:
- The sternum sits centrally on the chest.
- The spine sits approximately centrally on the back.
- The shoulder straps are comfortable.
- The ribs gently wrap around the torso.
- Nothing pulls or digs into the body.
- The top can easily be put on and removed.
Lightly block the crochet if necessary.
Be careful when blocking cotton because it may relax and stretch slightly once wet.
How to Adjust the Crochet Ribcage Top for Different Sizes
One of the nicest things about this pattern is that you do not need to completely rewrite it for different sizes.
For a larger size, add more rows to the collarbone straps and ribs.
For a smaller size, work fewer rows.
For a longer torso, space the rib attachment points farther apart.
For a shorter torso, bring the ribs slightly closer together.
The decorative sternum and spine can generally remain the same size because most of the garment sizing comes from the straps and ribs.
How to Wear Your Crochet Ribcage Top
For the easiest Halloween costume, wear it over an all-black outfit.
A fitted black long-sleeved shirt really makes the white crochet bones stand out.
For a punk Halloween look, add black jeans, boots, layered necklaces, chains and slightly messy hair.
You could also make the ribcage in neon green, hot pink, purple or glow-inspired yarn if traditional skeleton white isn’t quite loud enough for you.
And if one crochet skeleton isn’t enough, our free crochet skeleton doll pattern makes a rather appropriate little Halloween companion.
For even more skulls and bones, have a look through our Halloween crochet skull pattern collection too.
This is one of those Halloween crochet projects that looks fantastic precisely because it doesn’t need to be perfectly polished. Slightly uneven ribs and handmade texture actually suit the skeleton design.
Make it, throw it over black, add some boots and suddenly that ball of white yarn hiding at the bottom of the stash has become your Halloween costume.