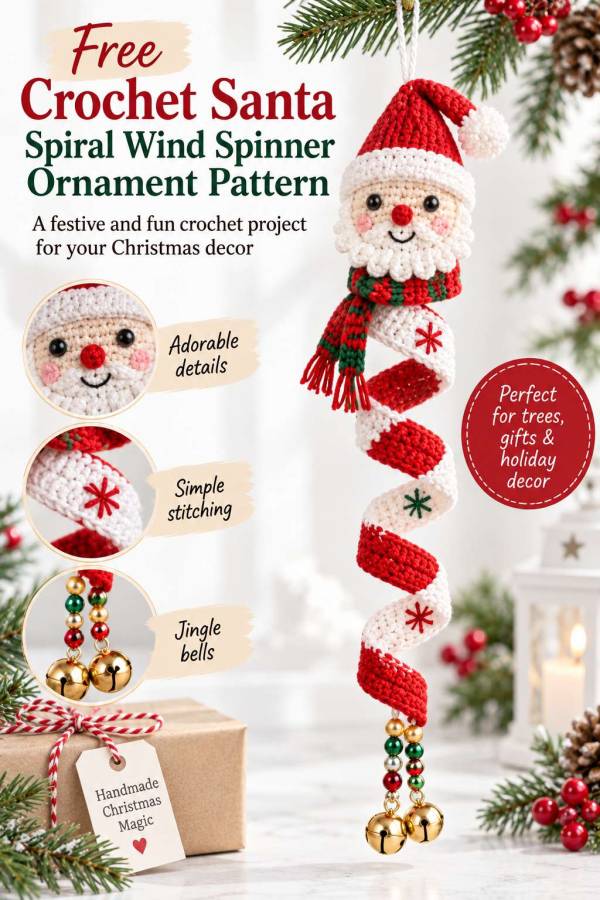
There are Christmas crochet projects that are practical, there are Christmas crochet projects that use up the yarn stash, and then there are the ones you make simply because they are ridiculously cute.
This crochet Santa spiral hanging ornament definitely falls into that last category.
At the top is a cheerful little crocheted Santa complete with a fluffy beard, red hat and striped scarf. Underneath him hangs a long red and white crochet spiral decorated with tiny embroidered snowflakes, festive beads and two jingling bells.
It looks quite elaborate when it is hanging up, but the actual crochet is surprisingly manageable.
The Santa head is worked in simple continuous rounds, the spiral begins as one long narrow strip of single crochet, and the whole thing is assembled around a strong centre cord.
This is also a lovely project if you have a drawer full of small amounts of Christmas yarn. You know the drawer. The one containing approximately seventeen different shades of red because apparently none of them were quite the right red for the last project.
If you enjoy making small festive crochet projects, you might also like these 12 free Christmas amigurumi characters to crochet. They are perfect for ornaments, gift toppers and little handmade Christmas gifts.
Crochet Santa Spiral Ornament Pattern
Skill level: Confident beginner
Crochet terminology: US terms
Finished length: Approximately 17 to 20 inches (43 to 51 cm)
Spiral strip before wrapping: Approximately 18 to 19 inches, depending on tension
The final size is not terribly critical for this project. A slightly longer or shorter spiral will simply change the number and spacing of the twists.
What You Need
Yarn
DK or light worsted weight yarn in:
- White or cream
- Red
- Green
- Black
- Pink
You will also need a small amount of polyester stuffing.
Tools and Notions
- 3 mm crochet hook
- Yarn needle
- Embroidery needle
- Scissors
- Stitch marker
- 6 to 8 mm safety eyes, or black yarn for embroidered eyes
- Approximately 24 inches (60 cm) strong white cord or nylon thread
- Red, green and gold beads
- 2 small Christmas jingle bells
Smooth cotton or cotton-blend yarn works particularly well for this project because it helps the spiral hold its shape, although acrylic DK yarn will work too.
Small bells, wooden beads and coloured craft beads are also handy supplies to keep in the Christmas craft box because once you make one of these, there is a fair chance you will want to make the snowman and Christmas tree versions as well.
Crochet Abbreviations
ch = chain
sc = single crochet
dc = double crochet
sl st = slip stitch
inc = work 2 sc in the next stitch
dec = single crochet decrease
MR = magic ring
st = stitch
sts = stitches
rnd = round
Pattern Notes
The Santa head is worked in continuous rounds. Do not join at the end of each round unless instructed.
Place a stitch marker in the first stitch of each round and move it up as you work.
The spiral ribbon is worked back and forth in rows.
The ribbon does not crochet itself into a spiral. It is made as a long flat strip and then wrapped loosely around the centre hanging cord during assembly.
This is important because there are several different types of crochet wind spinner patterns. The free crochet wind spinner pattern on CraftBits, for example, uses increases to make the crochet curl naturally. This Christmas Santa version uses an entirely different construction method, with a narrow flat strip wrapped around a central cord.
Crochet Santa Head
Use white or cream yarn.
Round 1
Make a magic ring and work 6 sc into the ring. (6 sts)
Round 2
Inc in every stitch around. (12 sts)
Round 3
Sc 1, inc.
Repeat around. (18 sts)
Round 4
Sc 2, inc.
Repeat around. (24 sts)
Round 5
Sc 3, inc.
Repeat around. (30 sts)
Round 6
Sc 4, inc.
Repeat around. (36 sts)
Rounds 7 to 10
Sc in every stitch around. (36 sts)
Now begin shaping the top of the head.
Round 11
Sc 4, dec.
Repeat around. (30 sts)
Round 12
Sc 3, dec.
Repeat around. (24 sts)
Begin stuffing the head.
Round 13
Sc 2, dec.
Repeat around. (18 sts)
Round 14
Sc 1, dec.
Repeat around. (12 sts)
Finish stuffing.
You want the head to feel firm enough to keep its round shape, but do not stuff it so enthusiastically that you can see daylight between the stitches.
Round 15
Dec around. (6 sts)
Fasten off, leaving a tail.
Thread the tail through the remaining six stitches, pull the opening closed and secure.
Add Santa’s Face
Position the safety eyes across approximately Rounds 6 to 8.
Place them around 7 to 8 stitches apart.
If the ornament may be handled by very young children, embroider the eyes instead of using safety eyes. Small beads, bells and safety eyes also mean this finished ornament should be treated as a decoration rather than a toy.
Nose
Using a small amount of red yarn, embroider or crochet a tiny round nose and sew it between the eyes.
Cheeks
Use pink yarn to add two small embroidered cheeks.
Do not make them too big. Santa needs to look as though he has been out in the cold, not as though he has discovered an entire drawer of rouge.
Smile
Using black yarn, embroider a small curved smile beneath the nose.
I like to position all the facial details with pins before securing anything permanently. Moving an eye two millimetres can be the difference between cheerful Santa and Santa who has just checked his credit card statement after Christmas.
Corrected Crochet Santa Hat
The hat has been resized so that the opening fits the crocheted head properly.
Use red yarn.
Round 1
MR, 6 sc. (6 sts)
Round 2
Sc around. (6 sts)
Round 3
Sc 1, inc.
Repeat 3 times. (9 sts)
Round 4
Sc around. (9 sts)
Round 5
Sc 2, inc.
Repeat 3 times. (12 sts)
Round 6
Sc around. (12 sts)
Round 7
Sc 3, inc.
Repeat 3 times. (15 sts)
Round 8
Sc 4, inc.
Repeat 3 times. (18 sts)
Round 9
Sc 5, inc.
Repeat 3 times. (21 sts)
Round 10
Sc 6, inc.
Repeat 3 times. (24 sts)
Round 11
Sc 7, inc.
Repeat 3 times. (27 sts)
Round 12
Sc 8, inc.
Repeat 3 times. (30 sts)
Change to white yarn.
Round 13
Sc around. (30 sts)
Fasten off, leaving a long tail for sewing.
Make the Santa Hat Pom-Pom
Make a very small white pom-pom.
You can use a miniature pom-pom maker, wrap yarn around a fork, or simply bundle several short strands together and trim them into shape.
Sew the pom-pom securely to the tip of the hat.
Place the hat over the upper section of Santa’s head.
Angle it slightly towards one side and stitch the lower edge securely to the head.
Gently bend the pointed end of the hat to one side.
Crochet Santa’s Beard
Use white yarn.
The beard is made from small crochet scallops placed across the bottom half of the face.
Join yarn near one cheek.
Beard Scallop
Ch 3.
Work 2 dc into the same attachment point.
Sl st into the next attachment point.
Repeat across the lower face to make approximately 7 scallops.
Try to centre the beard underneath the nose.
For a fuller Santa beard, add a second lower row containing approximately 5 or 6 scallops.
You do not need the two rows to line up perfectly. In fact, slightly staggered scallops make the beard look much fluffier.
Fasten off and weave in the ends.
Crochet Santa Scarf
The little striped scarf is optional, but I think it is one of the details that turns the finished ornament from cute into properly festive.
Use red yarn.
Row 1
Ch 39.
Beginning in the second chain from the hook, sc across. (38 sts)
Change to green.
Row 2
Ch 1, turn.
Sc across. (38 sts)
Fasten off.
Cut several short pieces of red and green yarn and attach them to each end for fringe.
Trim the fringe evenly.
Wrap the scarf around Santa’s neck and secure it discreetly at the back with a couple of stitches.
Do not tie it tightly around the head.
If Santa projects are already sneaking into every corner of your Christmas decorating, you might also like this free Santa Crochet Mason Jar Cozy pattern on CraftBits. It is another quick festive project that works well for handmade gifts.
Crochet the Santa Spiral Ribbon
Now we make the long ribbon section.
It looks slightly ridiculous while you are crocheting it because you are essentially making a very long, very skinny strip.
Stick with it.
Once it is wrapped around the central cord, the whole thing suddenly makes sense.
The ribbon is always 7 stitches wide.
Row 1
Using white yarn, ch 8.
Beginning in the second chain from the hook, sc across. (7 sts)
Row 2
Ch 1, turn.
Sc across. (7 sts)
Continue working in sc, keeping 7 stitches in every row.
Santa Spiral Colour Sequence
Work the rows as follows:
Rows 1 to 15: White
Rows 16 to 25: Red
Rows 26 to 45: White
Rows 46 to 55: Red
Rows 56 to 75: White
Rows 76 to 85: Red
Rows 86 to 105: White
Rows 106 to 115: Red
Rows 116 to 130: White
Fasten off.
The colour sections total exactly 130 rows.
Rather than carrying the unused yarn along the edge through the longer colour sections, I recommend fastening off and rejoining when changing colours. The edge looks much neater and you will not have long floats showing when the spiral twists.
At approximately 7 rows per inch, your finished flat strip should measure somewhere around 18 to 19 inches long.
Do not panic if yours is a little different.
The final length is adjustable during assembly.
Embroider the Christmas Snowflakes
Before attaching the spiral to the cord, add a few simple embroidered snowflakes to the white sections.
Use red or green yarn.
Bring the needle through the centre of the snowflake.
Work 5 or 6 straight stitches radiating outwards from the centre.
Add a French knot or small bead to the middle if you like.
Space the snowflakes irregularly rather than covering every section.
A few scattered motifs make the finished ornament look handmade and charming rather than overly busy.
If you enjoy tiny snowflake projects, the Crochet Snowflake Ornament pattern on CraftBits is another pretty handmade Christmas tree decoration.
Make the Centre Hanging Cord
Cut approximately 24 inches (60 cm) of strong white cord or nylon thread.
Fold the top section over and tie a secure knot to form a hanging loop.
The loop should be approximately 2½ to 3 inches long when finished.
Test the knot before assembling the ornament.
This is not the place for a decorative little knot that looks pretty but gives up on life the moment you hang Santa from the tree.
Attach Santa to the Cord
Position Santa immediately below the hanging loop.
Run the cord vertically behind the head.
Using matching yarn and a yarn needle, sew the back of Santa’s head securely around the cord.
Check from the front to make sure Santa is facing straight ahead before tightening the final stitches.
Attach the Crochet Spiral
Position the top of the crochet strip approximately 1 inch (2.5 cm) beneath Santa.
Using matching yarn, securely stitch the top of the strip to the central cord.
Begin gently wrapping the strip around the cord.
Do not pull it tight.
The spiral needs enough room to open and hang naturally.
Aim for approximately 3½ to 4½ turns from top to bottom.
Keep the spaces between the turns relatively even.
Once you are happy with the shape, add several small hidden stitches between the spiral and centre cord.
Good places to secure it are:
- Near the top
- Around the middle
- Near the bottom
The stitches should stop the spiral sliding but should not pull the ribbon tightly against the cord.
Add the Christmas Beads
Thread festive beads onto the lower section of cord.
Red, green and gold work beautifully for the traditional version.
You can use whatever you already have in the craft drawer, though. Wooden beads would give it a lovely Scandinavian Christmas look, while pearl beads would make it a little more elegant.
Keep the beads centred underneath the spiral.
Add the Jingle Bells
At the bottom of the ornament, divide the cord into two strands.
Tie one Christmas bell securely onto each strand.
Add a small bead above each bell if desired.
Knot securely.
Trim excess cord carefully.
Make sure the bells cannot simply slide off the ends.
Shape Your Crochet Santa Spiral
Hang the ornament somewhere while you make the final adjustments.
Gently turn the crochet ribbon with your fingers until the spiral spacing looks even.
If one section keeps slipping out of place, add another small hidden stitch to the centre cord.
Do not try to make every turn mathematically identical.
A little natural movement is part of what makes these hanging crochet decorations so pretty.
Christmas Colour Ideas
Traditional red, white and green is obviously perfect for Santa, but you can have quite a bit of fun with this pattern.
Vintage Christmas Santa
Use:
Cream
Deep burgundy
Forest green
Antique gold beads
Scandinavian Santa
Try:
Bright red
White
Natural wooden beads
Small brass-coloured bells
Pastel Christmas Santa
Use:
Dusty pink
Cream
Sage green
Pearl beads
Candy Cane Santa
Make the spiral using shorter alternating sections of red and white.
You could also embroider tiny green holly leaves rather than snowflakes.
Where to Hang Your Crochet Santa Spinner
These are lovely hanging from:
- Christmas trees
- Mantels
- Door handles
- Curtain rods
- Stair rails
- Covered verandas
- Kitchen windows
- Christmas market displays
- Gift baskets
Because the finished decoration is quite long, it is especially effective somewhere it has enough room to hang freely.
I also think they would be gorgeous hanging across a mantel at different heights.
For more handmade tree ideas, have a look through these 10 easy Christmas crochet baubles.
Can I Make the Crochet Spiral Longer?
Yes.
Simply add additional rows to the flat strip before fastening off.
Keep the strip 7 stitches wide.
If you want to maintain the original striped look, add extra rows in multiples of approximately 10 to 20 rows and continue alternating red and white.
You may also need a longer centre cord.
Can I Make a Shorter Christmas Ornament?
Absolutely.
Stop the spiral around Row 90 to 100.
Make your central cord correspondingly shorter and aim for approximately three spiral turns rather than four.
This is handy if you want to hang the ornament directly on a Christmas tree rather than from a doorway or window.
Can I Use Worsted Weight Yarn?
Yes, but the Santa and spiral will turn out larger.
Try a hook appropriate for your yarn and keep your tension fairly firm, particularly when making the stuffed Santa head.
For the neatest version closest to the pattern measurements, DK or light worsted yarn works best.
Can I Leave Off the Bells?
Definitely.
Replace the bells with:
- Tassels
- Pom-poms
- Wooden beads
- Crochet stars
- Small yarn balls
- Christmas charms
This is useful if you want a completely soft ornament or are making one for a household where jingling bells might drive everyone slightly mad by Boxing Day.
Make a Whole Set
Once you understand how the central cord and spiral construction works, this design is surprisingly adaptable.
Santa can be joined by a crochet snowman and Christmas tree using the same basic hanging construction, which makes the three pieces look lovely displayed together.
And if you are making a whole handmade Christmas tree this year, the CraftGossip Christmas crochet bauble collection is another useful place to raid for ideas.
There is something particularly satisfying about handmade Christmas decorations. They do not need to be perfectly matched, and they certainly do not need to look as though they came out of a department store box.
A slightly wonky Santa beard, a bead that sits a fraction to one side, or a scarf with uneven fringe usually becomes part of the charm.
And when you unpack him again next Christmas, you will remember that you actually made him.