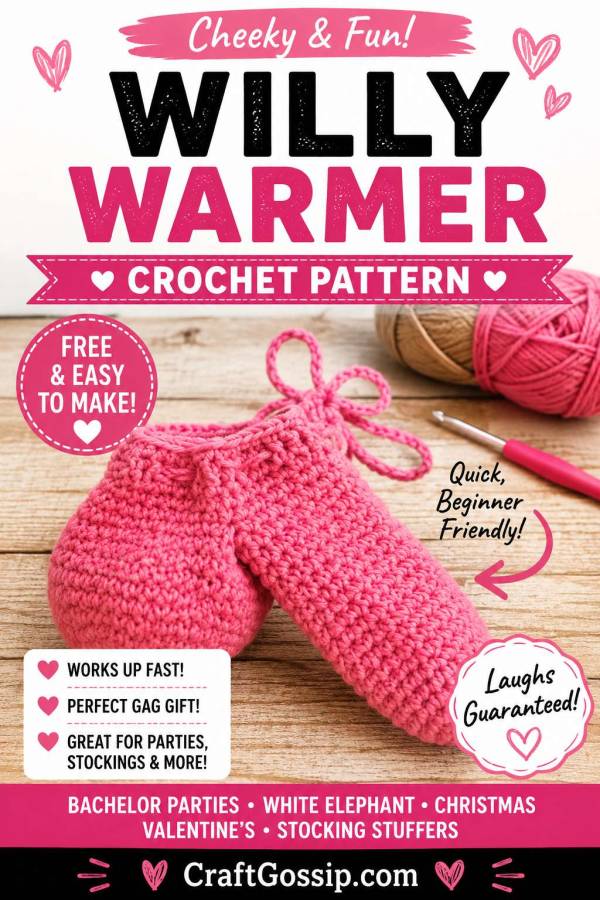
This free crochet willy warmer pattern is quick, cheeky, beginner-friendly, and perfect for gag gifts, white elephant parties, Christmas stockings, Valentine’s jokes, and novelty crochet lovers. Somehow this funny crochet pattern is trending like crazy right now, so we’re sharing it for anyone brave enough to make one.
I don’t know who had “crochet willy warmers” on their craft bingo card, but apparently here we are.
Every now and then the internet collectively decides that one very specific, very silly handmade project needs to have its moment, and right now this cheeky little crochet willy warmer seems to be doing the rounds again. Why? No idea. Is it practical? Questionable. Is it funny? Absolutely. Am I sharing it anyway? Of course I am.
This is a quick and easy novelty crochet pattern that works up with worsted weight yarn and a 5.5 mm hook. It’s a stash-busting project, a bachelor party laugh, a white elephant gift, a naughty Christmas stocking stuffer, or the sort of handmade present you make for the friend who says, “Surprise me.”
And really, if you’ve ever crocheted a small amigurumi shape, a simple tube, or anything in continuous rounds, you can make this. The stitches are basic, the construction is simple, and the finished project is ridiculous in the best possible way.
For a slightly more sensible beginner project, you might like our basic crochet flower tutorial on CraftBits, but if you are here for something cheekier, keep reading.
Free Crochet Willy Warmer Pattern
This pattern uses simple crochet stitches and is worked in separate sections before being joined together. The shaft and sack are worked in continuous rounds, then the top edging and drawstring are added at the end.
It’s designed as a novelty gag gift, not a fitted garment, so sizing is flexible. You can make the shaft longer or shorter depending on the look you want.
Skill Level
Beginner to confident beginner.
You should know how to:
Make a magic circle
Work single crochet stitches
Work increases and decreases
Crochet in continuous rounds
Join pieces together
Work a simple drawstring edging
If you are brand new to crochet, this is still achievable, but you may want to practise working in the round first.
Materials
Worsted weight yarn
5.5 mm crochet hook, also known as an I hook
Yarn needle
Scissors
Stitch marker
Acrylic yarn works perfectly well for this project, especially if you are making it as a gag gift. You don’t need anything fancy. This is a great leftover yarn project, so have a dig through the stash basket before buying more yarn. Though, let’s be honest, none of us need much encouragement to buy more yarn.
If you do need supplies, this is the sort of small beginner project where a basic crochet hook set from Amazon or a few colourful worsted yarns from Mary Maxim would be more than enough.
Abbreviations
This pattern uses US crochet terms.
MC – magic circle
ch – chain
sc – single crochet
dc – double crochet
inc – increase, work 2 single crochet stitches into the same stitch
dec – decrease, single crochet 2 stitches together
sl st – slip stitch
st/sts – stitch/stitches
rnd – round
Pattern Notes
The shaft is worked first in continuous rounds.
The sack is worked separately in continuous rounds.
Do not join rounds while making the shaft or sack.
Use a stitch marker to mark the first stitch of each round.
The top edging is worked in joined rounds after the pieces are assembled.
The chain at the beginning of the joined rounds does not count as a stitch.
The drawstring row is made using double crochet stitches so the drawstring can be threaded through the spaces.
The drawstring can be made as a simple crochet chain or by braiding several strands of yarn together.
Shaft
Do not join. Work in continuous rounds.
Make a magic circle. Ch 1. Do not count the ch 1 as a stitch.
Rnd 1: Work 5 sc into MC.
5 sts
Rnd 2: Inc in each st around.
10 sts
Rnd 3: *Sc in next st, inc in next st; repeat from * around.
15 sts
Rnd 4: *Sc in next 2 sts, inc in next st; repeat from * around.
20 sts
Rnd 5 and onward: Sc in each st around until the shaft reaches your desired length.
20 sts per round
Fasten off, leaving a long tail for sewing.
Sack
Do not join. Work in continuous rounds.
Make a magic circle. Ch 1. Do not count the ch 1 as a stitch.
Rnd 1: Work 6 sc into MC.
6 sts
Rnd 2: Inc in each st around.
12 sts
Rnd 3: *Sc in next st, inc in next st; repeat from * around.
18 sts
Rnd 4: *Sc in next 2 sts, inc in next st; repeat from * around.
24 sts
Rnd 5: *Sc in next 3 sts, inc in next st; repeat from * around.
30 sts
Rnd 6–10: Sc in each st around for 4 rounds.
30 sts
Rnd 11: Dec, sc in next 5 sts, dec, sc in next 5 sts, dec, sc in next 6 sts, dec, sc in next 6 sts.
26 sts
Fasten off and weave in the starting tail.
Assembly
Position the shaft against the sack.
Attach the shaft to the sack using approximately 6 stitches or 6 single crochet stitches.
You can sew the pieces together with a yarn needle, or you can join them with single crochet if you prefer a firmer join.
The aim is to attach the shaft securely while leaving the top opening free for the edging and drawstring.
Top Edging
Attach yarn at the middle back of the sack.
Work around the entire top opening of the piece.
Rnd 1: Ch 1, sc evenly around the entire top opening. Join with sl st to first sc.
36 sts
Rnd 2: Ch 1, sc in each st around. Join with sl st to first sc.
36 sts
Rnd 3: Ch 1, sc in each st around. Join with sl st to first sc.
36 sts
Drawstring Hole Row
This row is worked in double crochet so you can thread the drawstring through the spaces between the stitches.
Rnd 1: Ch 2, dc in each st around. Join with sl st to first dc.
36 dc
Finishing Row
Rnd 1: Ch 1, sc in each st around. Join with sl st to first sc.
36 sc
Fasten off and weave in all ends.
Drawstring
Chain your desired length for the drawstring.
Fasten off.
Thread the chain through the double crochet row and tie it in a bow.
You can also braid several strands of yarn together if you want a thicker drawstring. This looks especially cute if you use a contrasting colour.
Sizing Notes
The shaft length is completely adjustable. Just keep working 20 sc rounds until it reaches the length you want.
For a shorter gag gift version, work fewer straight rounds.
For a longer version, add more straight rounds before fastening off.
If you want a slightly firmer shape, use a smaller hook than recommended for your yarn.
If you want a softer, stretchier version, use the 5.5 mm hook as written.
Colour Ideas
This is where you can have a bit of fun.
Try bright pink for a bachelorette party gift.
Use red and white for a cheeky Christmas version.
Make it in rainbow colours for a funny Pride-themed gag gift.
Use skin-tone yarn if you’re really leaning into the joke.
Make it in team colours for a sports fan who has a good sense of humour.
Use novelty faux fur yarn around the top if you want it to look extra ridiculous.
This is also a brilliant scrap yarn project. You only need a small amount of yarn, so those random leftover balls from other crochet projects finally have a purpose. A very strange purpose, admittedly, but a purpose nonetheless.
Beginner Tips
Use a stitch marker. Continuous rounds are easy to lose track of, especially when you put the project down and come back later.
Count your stitches after each increase round. It saves a lot of frustration later.
Keep the stitches fairly firm. A tighter fabric helps the finished piece hold its shape.
Do not worry too much about tiny imperfections. This is a novelty crochet project, not a lace wedding shawl. A little wonkiness is not going to ruin the joke.
When joining the shaft to the sack, pin or hold the pieces in place first so you can check the position before sewing.
If the drawstring feels too thin, braid three strands of yarn instead of making a crochet chain.
Why This Pattern Is Suddenly Everywhere
Novelty crochet patterns have a funny way of coming back around. One minute everyone is making tiny emotional support pickles, and the next minute the internet decides it needs a crochet willy warmer. I don’t make the rules.
This pattern is probably trending because it has everything people love in a viral craft project: it is quick, slightly outrageous, beginner-friendly, easy to share, and guaranteed to get a reaction.
It is the kind of project that makes people tag their crochet friends with “you need to make this,” and before you know it, everyone is digging through their yarn basket looking for the perfect shade of pink.
Gift Ideas For This Crochet Willy Warmer
Tuck it into a Christmas stocking as a joke gift.
Wrap it for a white elephant exchange.
Make one for a bachelor or bachelorette party.
Use it as a Valentine’s Day gag gift.
Add it to a handmade novelty gift basket.
Give it to a crochet friend who appreciates ridiculous patterns.
Make one purely because the internet made you curious.
You could even pair it with a nice crochet hook set, a ball of yarn, and a printed copy of the pattern for a very cheeky “make your own” gift kit.
A Little Note Before You Share It
This is obviously a novelty adult crochet pattern, so use your judgement when sharing it. It’s funny in the right setting, but probably not the one to print out for your church craft table unless your group is much more entertaining than most.
That said, crochet is meant to be fun. Not every project needs to be serious, heirloom-worthy, or beautifully styled for a farmhouse basket. Sometimes the best handmade projects are the ones that make everyone laugh.
And for reasons I still cannot fully explain, this crochet willy warmer is having its moment. So here it is, cleaned up, easy to follow, and ready for anyone brave enough to make one.