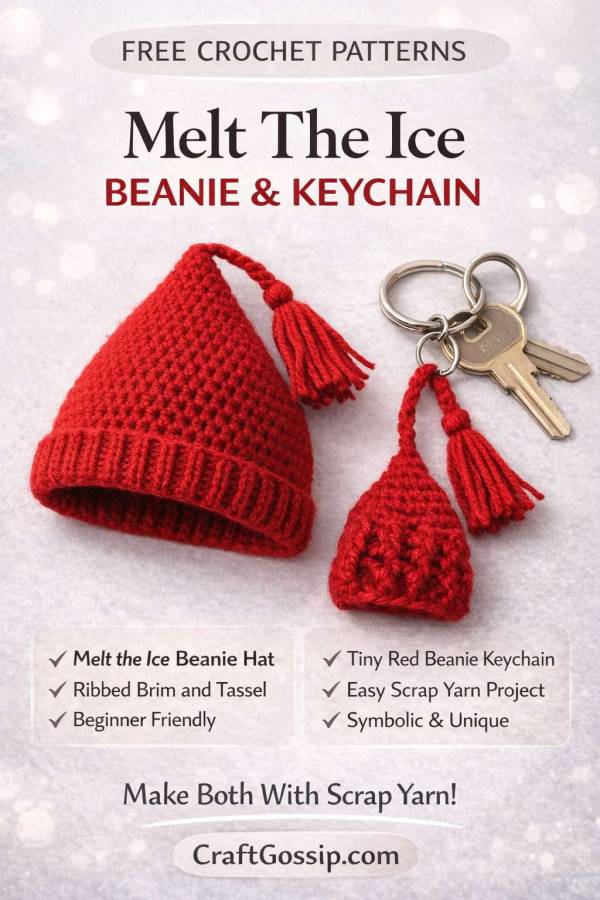
The Melt The Ice Hat has become one of those crochet and knitting projects that is about far more than simply keeping your ears warm. At first glance it is a bright red pointed beanie with a tassel, but behind the shape is a story of craftivism, visual protest, and crafters using yarn to quietly — and sometimes not so quietly — say something that matters.
This free crochet version is a beginner-friendly way to make a red tassel beanie inspired by the Melt The Ice Hat movement. It uses simple crochet stitches, a ribbed brim, a shaped pointed crown, and a tassel finish, so it is approachable without looking plain.
There is also an official paid Melt The Ice Hat knitting pattern, created through Needle & Skein, with proceeds supporting immigrant aid organizations. So if you are making this hat because the message matters to you, I do recommend supporting the official pattern when you can. If you are here because you want a free crochet red tassel hat pattern to try the style first, this crochet version is a lovely place to start.
Every now and then a crochet pattern comes along that is more than just a cute project for your hook and yarn stash. The Melt The Ice Beanie Hat is one of those patterns. Yes, it is a striking pointed red hat with a tassel, but it is also part of a wider protest movement. The hat draws on the history of the red Norwegian resistance cap, and the current “Melt the ICE” version has been used as a craftivist response to U.S. Immigration and Customs Enforcement, with the official paid pattern directing proceeds to immigrant aid groups supporting people affected by ICE actions.
That makes this one of those rare crochet projects that feels practical, symbolic, and conversation-starting all at once. If you have been wanting to make something with meaning, not just something to fill a winter accessories basket, this is a pattern worth looking at. It is very much about using craft as protest, and that gives the finished hat a whole lot more weight than your average beanie.
From a crochet point of view, the pattern itself is very approachable. The free crochet guide uses single crochet in the back loop only for the ribbed brim, then switches to half double crochet for the body of the hat. The crown is shaped with decrease rounds that create that tall pointed finish, and of course there is a tassel at the top to complete the classic look. The free tutorial includes sizing, stitch help, yarn guidance, and a full walkthrough for crocheters who want to make their own version.
The free pattern recommends worsted weight yarn for an easy, beginner-friendly version, with around 180 to 210 yards needed and hooks in the 4.5 mm to 5 mm range for the crochet version. That makes this a fairly manageable project for a weekend make, and the visual guide estimates around 4 to 6 hours to complete depending on your pace. So this is not one of those giant “I’ll finish it by next winter” projects. It is much more of a satisfying, get-it-done, wear-it-proud kind of make.
What I really like here is that the hat still works as a crochet project even if someone first notices it for the politics. The ribbed brim gives it a nice fitted look, the pointed crown makes it instantly recognizable, and the tassel adds that final old-world detail. It is bold, a little quirky, and definitely not the sort of hat that disappears into the crowd. Which, honestly, is probably the point.
The story behind this design is also part of why it has spread so quickly through the craft world. Recent coverage has described the Melt the ICE hat as part of a broader resurgence in craftivism, where knitting, crochet, quilting, and other handmade work are being used to protest immigration crackdowns and raise money for immigrant support efforts. One report noted that the movement has raised hundreds of thousands of dollars for immigrant aid through pattern sales and related campaigns.
So yes, this hat is very much about fighting ICE immigration enforcement. It is a crochet project with a clear political message, rooted in protest history and tied to modern immigrant advocacy. If that is something your readers care about, this pattern has a lot more depth than just “here’s a red hat.” There are lot’s of variations on Etsy too and here is a Knit Version for this hat too.
If you want to make one yourself, the free crochet tutorial is available online, and there is also an official paid pattern connected to fundraising for immigrant aid. That gives readers a few options depending on whether they want a free walkthrough or want to directly support the original movement through the paid version. If you are a visual learner then check out this youtube video.
Sizes & Finished Dimensions
Child (Adult Small/Medium, Adult Large)
Circumference: 17 1/4 (19, 20 1/2) in / 44 (48, 52) cm; hat fits with negative ease
Length: 9 1/2 (10 3/4, 11) in / 24 (27.5, 28) cm
Abbreviations
Links below go to right-handed tutorials for the technique. See my YouTube channel for left-handed versions of these basic stitches.
ch: chain
FPdc (front post double crochet): yarn over, insert hook from front to back to front around next st, yarn over and pull up a loop, [yarn over and pull through 2 loops] 2 times
dc: double crochet
inc (increase): place 2 dc in 1 st
sc: single crochet
rep: repeat
rnd(s): round(s)
RS: right side
st(s): stitch(es)
Materials
Worsted weight yarn: approximately 115 (150, 154) yds / 105 (137, 141) m
Size I-9 (5.5 mm) crochet hook, or size needed to obtain gauge
Gauge
14 dc and 8 1/2 rnds = 4 in / 10 cm
Instructions
Crown Shaping
Ch 4, join with slip st to form a ring.
Rnd 1: Ch 3 (counts as dc throughout), 7 dc in ring, join—8 dc.
Rnd 2: Ch 3, dc in same st, dc in next st, *inc, dc in next st; rep from * around, join—12 dc.
Rnd 3: Ch 3, dc in same st, dc in next 2 sts, *inc, dc in next 2 sts; rep from * around, join—16 dc.
Rnd 4: Ch 3, dc in next 2 sts, inc, *dc in next 3 sts, inc; rep from * around, join—20 dc.
Rnd 5: Ch 3, dc in same st, dc in next 4 sts, *inc, dc in next 4 sts; rep from * around, join—24 dc.
Rnd 6: Ch 3, dc in next 2 sts, inc, *dc in next 3 sts, inc; rep from * around, join—30 dc.
Rnd 7: Ch 3, dc in same st, dc in next 4 sts, *inc, dc in next 4 sts; rep from * around, join—36 dc.
Rnd 8: Ch 3, dc in next 4 sts, inc, *dc in next 5 sts, inc; rep from * around, join—42 dc.
Rnd 9: Ch 3, dc in same st, dc in next 6 sts, *inc, dc in next 6 sts; rep from * around, join—48 dc.
Rnd 10: Ch 3, dc in next 6 sts, inc, *dc in next 7 sts, inc; rep from * around, join—54 dc.
Rnd 11: Ch 3, dc in same st, dc in next 8 sts, *inc, dc in next 8 sts; rep from * around, join—60 dc.
Child size only: Skip to Work Even Section.
Rnd 12: Ch 3, dc in each st around, join.
Rnd 13: Ch 3, dc in next 8 sts, inc, *dc in next 9 sts, inc; rep from * around, join—66 dc.
Adult S/M size only: Skip to Work Even Section.
Rnd 14: Rep Rnd 12.
Rnd 15: Ch 3, dc in same st, dc in next 10 sts, *inc, dc in next 10 sts; rep from * around, join—72 dc.
Work Even Section
All sizes: Rep Rnd 12 on 60 (66, 72) sts until hat measures about 8 1/4 (9 1/2, 9 1/2) in / 21 (24, 24) cm from beginning, or about 1 1/4 (1 1/4, 1 1/2) in / 3 (3, 4) cm less than desired length.
Brim
Rnd 1: Ch 1 (does not count as a st), sc in first st, FPdc in next st, *sc in next st, FPdc in next st; rep from * around.
Rep Rnd 1 until hat measures about 9 1/2 (10 3/4, 11) in / 24 (27.5, 28) cm from beginning. Fasten off. Weave in ends.
Tassel
Cut 6 strands of yarn, each 22 in / 56 cm long. Holding strands together, fold them in half, insert hook through tip of hat, and pull loop of fringe through the fabric.
Pull yarn ends through the loop and pull gently to tighten the loop. You now have a fringe with 12 ends. Holding groups of 4 strands together, braid ends together for about 3–4 in / 7.5–10 cm. Secure with an overhand knot. Trim ends.

Melt The ICE Away Keychain Crochet Pattern
Materials
3 mm crochet hook
Scrap red acrylic yarn, thin enough to suit a 3 mm hook
Abbreviations
sl st – slip stitch
ch – chain
sc – single crochet
dc – double crochet
fpdc – front post double crochet
bpdc – back post double crochet
dec – single crochet decrease
Pattern
Start: Ch 20, sl st to the first ch to form a ring.
Row 1: Ch 3 (counts as a dc), 19 more dc, sl st to the top of the ch-3. (20)
Note: Chains will not count as a stitch from this point onward.
Row 2: Ch 2, (fpdc, bpdc) repeat 10 times, sl st to the first fpdc. (20)
Row 3: Ch 2, (fpdc, bpdc) repeat 10 times, sl st to the first fpdc. (20)
Row 4: (3 sc, inc) 4 times, sc 4. (24)
Row 5: (4 sc, dec) 4 times. (20)
Row 6: (3 sc, dec) 4 times. (16)
Row 7: (2 sc, dec) 4 times. (12)
Row 8: (sc, dec) 4 times. (8)
Row 9: (dec) 4 times. (4)
Fasten off, leaving a long tail to close the hole and use as part of the tassel braid.
Tassel Finishing
Cut 2 additional yarn pieces, each about twice the height of the yarn left dangling from the top.
Pull them through where the dangling yarn is coming from. Braid the strands together in groups of 2, 2, and 1 yarn strands.
When you reach your desired tassel length, cut a smaller piece of yarn and tie it tightly around the braid with a double knot.
Trim the ends neatly.
Why This Little Project Works
This is one of those fast crochet patterns that would be great for:
- protest craft projects
- meaningful handmade gifts
- zipper pulls and bag charms
- stash-busting red yarn scraps
- small market stall items with a message
It is also a nice option if you want to make something connected to the anti-ICE immigration message without committing to a full hat. The finished size is small, quick to crochet, and easy to personalize depending on how long or chunky you make the tassel.
A Few Handy Tips
If your yarn is a little thicker, your keychain will come out slightly larger and softer in shape. If you want a firmer finish, go down a hook size or crochet tightly.
You could also add a keyring, lobster clasp, or small swivel clip at the top to turn it into a proper bag charm. A bit of stuffing might help if you want it to hold its shape more firmly, though it should still sit nicely as a flat soft charm without any filling.