• Home
  • Suggest A DIY
  • DIY Newsletter

Crochet

Patterns, projects and techniques

  • About CraftGossip
  • Our Network
    • Bath & Body Crafts
    • Candle Making Ideas
    • Crochet Ideas
    • Cross Stitch
    • Edible Crafts
    • Felting Patterns
    • Glass Art
    • Home & Garden Ideas
    • Indie Crafts
    • Jewelry Making
    • Kids Crafts
    • Knitting Patterns
    • Lesson Plans
    • Needlework
    • Party Ideas
    • Polymer Clay
    • Quilting Ideas
    • Recycled Crafts
    • Scrapbooking
    • Sewing Patterns
    • Card Making
    • DIY Weddings
    • Not Craft Ideas
  • Giveaways
  • Roundups
  • Store
  • Search

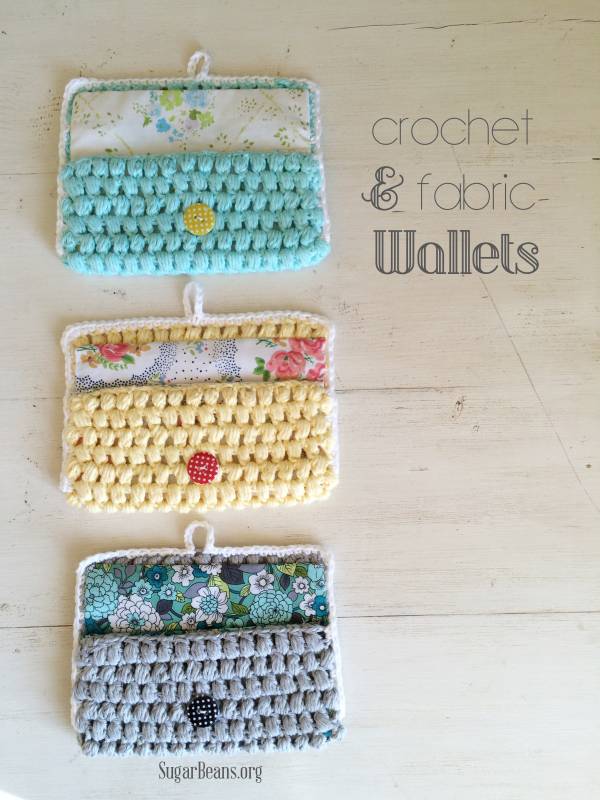
Crochet & Fabric Wallets

July 4, 2016 by Shellie Wilson

Crochet+++fabric+wallets.+SugarBeans.org

These are adorable and the perfect little purse for your handbag or date night bag. Assuming of course you are lucky enough to go out on dates. I don’t care where I go as long as it means I don’t have to cook dinner.  Fabric And Crochet Purse Pattern.
«
»

Have you read?

Free Ghost Crochet Pattern: Easy No-Sew Halloween Ghost

There is something about a little crochet ghost that makes it almost impossible to stop at one.

You begin with perfectly sensible intentions. Maybe you want a quick Halloween decoration for the mantel, something handmade to tuck beside a pumpkin, or a tiny ghost to add to a Halloween gift basket.

So you crochet one.

Then you look at it sitting there by itself and decide it needs a friend.

The second ghost obviously can’t have exactly the same face. Then one of them looks as though it would be improved enormously by a witch hat. Before long you’re choosing yarn colors for an entire ghost family and wondering whether you’ve technically started a paranormal yarn collection.

I’m quite happy to accept that risk.

This free ghost crochet pattern is designed to be one of those satisfying Halloween projects you can finish without an enormous amount of fuss. The ghost is crocheted from the top of the head downward in one continuous piece, with the little arms worked directly into the body.

That means there are no separate arms waiting to be pinned, positioned and sewn into place later.

If sewing tiny amigurumi pieces together is the part of crochet that makes you quietly put a project back into the unfinished-project basket, this one should make you very happy.

The shape itself is simple enough for a confident beginner. You’ll mainly use single crochet, increases and decreases, with a few taller stitches used for the arms and wavy bottom.

And that wavy edge really does make the whole project.

Before the ruffle is added, the ghost looks slightly like a white crochet potato.

A cute potato, certainly.

But still a potato.

Add the little waves around the bottom and suddenly it becomes unmistakably ghost-shaped.

You can make yours in classic white, but don’t feel restricted to traditional Halloween colors. Cream gives the ghost a slightly vintage look, pale lavender is wonderfully whimsical, grey feels moodier and a black ghost with contrasting facial features would look fantastic among brighter Halloween decorations.

And then there is glow-in-the-dark yarn.

If you happen to own some, I think we both know what needs to happen.

The same ghost crochet pattern can also be made in different yarn weights. Use thinner yarn for miniature ornaments and garlands or make it in chunky chenille for a larger squishy crochet ghost plushie.

I have also included a little crochet witch hat further down, because once I’d imagined a tiny ghost wearing one there was really no going back.

So if you have a partly used ball of white yarn hiding somewhere in your stash, pull it out.

It finally has a job.

Ghost Crochet Pattern at a Glance

Skill level: Easy / confident beginner

Terminology: US crochet terms

Construction: Worked from the top down in continuous rounds

Sewing: No separate body pieces need to be attached

Finished size: Approximately 4½–5 inches tall when made with worsted-weight yarn

Time: Approximately 1–2 hours

Gauge: Not critical

Uses: Halloween decorations, shelf sitters, ornaments, garlands, gift toppers and spooky handmade gifts

Finished measurements will vary depending on yarn, hook size and crochet tension.

Materials

To make one small ghost you will need:

Approximately 35–50 yards of worsted-weight / Weight 4 yarn in white or your chosen ghost color

3.5 mm crochet hook

Small amount of black yarn or embroidery floss for the face

Polyester stuffing

Stitch marker

Tapestry needle

Scissors

Optional pink yarn or embroidery floss for cheeks

Optional 8 mm safety eyes

If the finished ghost is intended for a baby or young child, embroider the eyes rather than using safety eyes.

Crochet Abbreviations

MR – magic ring

ch – chain

sc – single crochet

hdc – half double crochet

dc – double crochet

sl st – slip stitch

inc – work 2 single crochet stitches into the same stitch

dec – single crochet decrease

BLO – back loop only

FLO – front loop only

st / sts – stitch / stitches

A Note Before You Begin

The ghost body is worked in a continuous spiral.

Do not join the rounds unless specifically instructed.

Place a stitch marker into the first stitch of each round and move it upward as you work.

This is one of those little crochet habits that doesn’t seem particularly important until you put the project down, come back half an hour later and have absolutely no idea where the round began.

Use the marker.

Future you will appreciate it.

Free Ghost Crochet Pattern

Crochet the Head

Round 1: Make a MR and work 6 sc into the ring. — 6 sts

Round 2: Inc in each stitch around. — 12 sts

Round 3: Sc in next st, inc in next st. Repeat around. — 18 sts

Round 4: Sc in next 2 sts, inc in next st. Repeat around. — 24 sts

Round 5: Sc in next 3 sts, inc in next st. Repeat around. — 30 sts

Pull the centre of the magic ring firmly closed.

Shape the Upper Body

Rounds 6–9: Sc in each stitch around. — 30 sts

At this stage your crochet should resemble a smooth little dome.

Don’t stuff yet.

Crochet the Ghost Arms

The arms are made as part of Round 10.

They are not separate pieces, so there will be nothing to sew on afterwards.

Round 10: Sc in next 7 sts.

For the first arm:

Ch 5.

Beginning in the second chain from the hook:

Sl st in next ch.

Sc in next ch.

Hdc in next ch.

Dc in final ch.

You have now crocheted back down the chain toward the body.

Do not work back into the body stitch where the chain began.

Continue into the next unworked body stitch.

Sc in next 15 body sts.

Make the second arm:

Ch 5.

Beginning in the second chain from the hook, work:

Sl st in next ch.

Sc in next ch.

Hdc in next ch.

Dc in final ch.

Continue into the next unworked body stitch.

Sc in remaining 8 body sts.

— 30 body sts

The stitches used to form the arms do not count toward the 30-stitch body total.

Continue the Ghost Body

Rounds 11–15: Sc in each stitch around. — 30 sts

Your ghost should now have a rounded head, straight body and one little arm extending from each side.

Add the Face

If you are using safety eyes, this is a good point to insert them before stuffing and closing the body.

Place the eyes approximately between Rounds 7 and 8.

Try spacing them around 5 stitches apart, then adjust until you like the expression.

Don’t permanently attach the backs until you’ve checked the placement from the front.

For embroidered eyes, you can add the face now or wait until the ghost has been stuffed.

I tend to wait because it is easier to judge the final expression once the head has its proper shape.

Create the Hem Attachment Round

Round 16: Working in BLO only, sc in every stitch around. — 30 sts

This leaves the front loops from Round 16 unused.

Do not crochet into those loops yet.

They will become the attachment point for the ghost’s wavy lower edge.

Shape and Close the Bottom

Round 17: Sc in next 3 sts, dec. Repeat around. — 24 sts

Round 18: Sc in next 2 sts, dec. Repeat around. — 18 sts

Begin stuffing the ghost.

Add stuffing gradually rather than pushing one enormous handful inside.

Shape the head first, then fill the body.

The goal is softly firm rather than rock hard. Overstuffing can stretch the crochet stitches and make the filling visible.

Round 19: Sc in next st, dec. Repeat around. — 12 sts

Add the final amount of stuffing.

Check that the ghost is evenly filled.

Round 20: Dec around. — 6 sts

Fasten off, leaving a yarn tail.

Thread the tail through the front loops of the remaining stitches.

Pull gently to close.

Secure the yarn and weave the tail into the body.

The finished closure will be hidden underneath the decorative hem.

Crochet the Wavy Ghost Bottom

Turn the ghost upside down so you can clearly see the unused front loops from Round 16.

Join your ghost-colored yarn into any unused front loop.

Work the following around:

*Sl st in next front loop. Work hdc, dc, hdc into the next front loop.*

Repeat around.

Because each repeat uses two front loops, you will create 15 waves around the ghost.

Fasten off.

Weave in the yarn ends.

Turn the ghost upright and gently shape the waves with your fingers.

There.

No longer a crochet potato.

Embroider the Ghost Face

Use black yarn or embroidery floss to create the expression.

For a simple friendly face, embroider two short vertical eyes and a small curved mouth.

Or change the expression entirely.

Try:

Tiny round eyes with a smile

Long oval eyes with a surprised “O” mouth

One slightly raised eyebrow

A tiny sideways smile

Closed sleepy eyes

You can also add one or two small pink stitches beneath each eye for cheeks.

There is something about blush on a ghost that makes absolutely no logical sense and yet somehow works perfectly.

Optional Mini Crochet Witch Hat

This little hat is worked from the point downward.

Use black, charcoal, purple or your preferred witch-hat color.

Materials

Small amount of worsted-weight yarn

3.25–3.5 mm crochet hook

Stitch marker

Tapestry needle

Crochet the Hat

Round 1: Work 4 sc into a MR. — 4 sts

Round 2: Sc around. — 4 sts

Round 3: Sc in next st, inc in next st. Repeat twice. — 6 sts

Round 4: Sc around. — 6 sts

Round 5: Sc in next 2 sts, inc in next st. Repeat twice. — 8 sts

Round 6: Sc around. — 8 sts

Round 7: Sc in next 3 sts, inc in next st. Repeat twice. — 10 sts

Round 8: Sc around. — 10 sts

Round 9: Sc in next 4 sts, inc in next st. Repeat twice. — 12 sts

Round 10: Sc around. — 12 sts

Crochet the Hat Brim

The brim increases gradually so it sits flatter rather than becoming heavily ruffled.

Round 11: Working in FLO, sc in next st, inc in next st. Repeat around. — 18 sts

Round 12: Sc in next 2 sts, inc in next st. Repeat around. — 24 sts

Round 13: Sc in next 3 sts, inc in next st. Repeat around. — 30 sts

Sl st into the next stitch.

Fasten off and weave in the ends.

Do not stuff the hat.

Shape the point gently with your fingers and bend it slightly to one side if you like.

The hat can simply rest on the ghost’s head for decorating, or you can secure it with a couple of discreet stitches.

Make a Mini Crochet Ghost

You don’t need to rewrite the pattern to make a smaller ghost.

Simply change the yarn and hook.

Try sport or DK yarn with approximately a 2.75–3 mm crochet hook.

The stitch counts remain exactly the same, but the finished ghost will be noticeably smaller.

Mini crochet ghosts are perfect for:

Halloween garlands

Hanging ornaments

Bag charms

Halloween place settings

Gift toppers

Miniature decorations

If you’re making several for a garland, embroidered faces keep the ghosts light and remove the need for plastic safety-eye backs.

Make a Chunky Crochet Ghost Plushie

For a larger, squishier ghost, use super-bulky chenille yarn.

A 5–6 mm hook is a good starting point, although the exact size will depend on your yarn and tension.

Use the same stitch counts.

The resulting ghost will be considerably larger.

Chenille yarn can sometimes make magic rings difficult to tighten, so you can substitute the following beginning:

Ch 2.

Work 6 sc into the second ch from hook.

Continue with Round 2.

And keep your stitch marker close.

Chenille yarn has an extraordinary ability to make individual stitches disappear.

Don’t Like Magic Rings?

You can make the ghost without one.

Instead:

Ch 2.

Work 6 sc into the second chain from your hook.

Then begin Round 2.

The tiny opening at the top can usually be closed neatly when you weave in the starting tail.

What Yarn Works Best?

For the standard-sized ghost, worsted-weight acrylic or cotton works beautifully.

Acrylic is inexpensive and available in countless colors.

Cotton creates a slightly firmer fabric with excellent stitch definition.

Cotton blends are also a lovely choice.

The most important thing is using a hook small enough to produce a dense fabric.

You don’t want large gaps between the stitches because the stuffing may show through.

Ghost Color Ideas

White is the obvious choice.

But Halloween crochet doesn’t need to be entirely black, white and orange.

Try:

Cream for a vintage ghost

Pale grey for a softer gothic look

Lavender for a whimsical ghost

Pastel pink for cute Halloween decor

Mint green

Neon green

Black with white embroidered features

Striped scrap yarn

Glow-in-the-dark yarn

You could even make an entire rainbow ghost garland.

Nobody said ghosts had to respect a color palette.

Why Is My Crochet Ghost Leaning?

Usually this happens because the stuffing isn’t distributed evenly.

Before closing the bottom completely, gently massage the stuffing through the crochet fabric.

Move small amounts from one side to the other until the ghost sits more evenly.

Check the base too.

The decrease rounds should create a relatively flat bottom underneath the ruffle.

But don’t become obsessed with perfect symmetry.

A slight lean or oddly positioned arm can actually give each ghost more personality.

Why Can I See the Stuffing?

There are three common causes.

Your hook may be too large.

Your tension may be too loose.

Or the ghost may be overstuffed.

Try dropping down a hook size.

For worsted-weight yarn, approximately 3.5 mm is a useful starting point.

Add stuffing gradually and stop when the ghost feels softly firm.

My Ghost Arms Are Twisting

A small amount of twisting is normal because the arm is made from a short chain.

After finishing the ghost, dampen your fingers very lightly and shape the arms into position.

For natural fibres such as cotton, gentle blocking can also help.

You can angle the arms slightly upward, outward or downward.

I actually prefer when the two aren’t perfectly identical.

It makes the ghost look as though it is doing something.

What exactly?

No idea.

Ghost business, presumably.

Is This Ghost Crochet Pattern Suitable for Beginners?

If you’re comfortable with single crochet, increases and decreases, you should be able to make this pattern.

The chain arms introduce slip stitch, half double crochet and double crochet, but they’re only used for a few stitches.

The most important beginner tip is simply to count.

Use your stitch marker and check your stitch total at the end of each shaping round.

Fixing one missing stitch immediately is much easier than discovering it six rounds later.

Turn Your Ghost Into a Halloween Ornament

Before finishing, attach a yarn loop to the top of the head.

You can then hang the ghost from:

A Halloween tree

Bare decorative branches

Door handles

A mantel garland

Gift bags

Halloween wreaths

Several mini ghosts strung together would also make a very cute handmade ghost garland.

Make a Whole Ghost Family

This is where changing yarn weights becomes particularly fun.

Make one chunky chenille ghost.

Add a worsted-weight version.

Then crochet a few smaller DK ghosts.

Give each one a slightly different face.

Add the witch hat to one.

Maybe give another a tiny bow.

At this point you’ve crossed from Halloween decorating into ghost genealogy, but I’m not judging.

More Halloween Crochet Ideas

Once the Halloween yarn has come out, there’s really no reason to put it away again.

Try our Free Halloween Crochet Patterns You Can Make in a Day for more quick seasonal projects.

White yarn left over from your ghost can be used for the Free Crochet Spider Web Pattern.

For something a little more substantial, browse our Halloween Crochet Projects You Can Finish in a Weekend.

And naturally, once September arrives, there is always room for another crochet pumpkin.

Ghost Crochet Pattern FAQs

Is this ghost crochet pattern free?

Yes. The complete crochet ghost instructions and optional witch-hat pattern are included here for free.

Is this a no-sew crochet ghost pattern?

The arms are crocheted directly into the body rather than made separately, so there are no limbs to sew on.

You will still need to weave in your yarn ends and close the bottom opening.

How long does a crochet ghost take to make?

An experienced crocheter may complete one in approximately an hour.

A beginner may need closer to two hours.

What size crochet hook should I use?

For worsted-weight yarn, start with approximately a 3.5 mm hook.

If your fabric has visible gaps, try going down a hook size.

Can I use plush yarn?

Yes.

Use a larger hook appropriate for your chenille or plush yarn and follow the same stitch counts.

Can I make the ghost larger?

Yes.

The easiest method is simply to use thicker yarn and a larger hook.

This keeps the proportions of the original pattern intact.

Do I have to use safety eyes?

No.

Embroidered eyes work beautifully and are recommended when making the ghost for babies or young children.

Can I make the arms longer?

Yes.

Simply add one or two additional chains when creating each arm.

Work back down the chain using the same progression of stitches, adjusting as needed.

Why are the front loops left unused in Round 16?

Those loops are deliberately saved so you have a clean attachment point for the decorative wavy hem.

Can I sell finished ghosts?

You may sell finished handmade ghosts that you personally crochet from this pattern.

Please do not reproduce, republish or sell the written pattern itself.

One Last Warning

These little ghosts have a habit of multiplying.

Partly because they don’t use much yarn.

Partly because they’re quick.

Mostly because the moment you finish one, you immediately start thinking about what the next one could look like.

A witch ghost.

A pink ghost.

A chunky ghost.

A tiny ghost.

A glow-in-the-dark ghost.

Perhaps one wearing a ridiculously small bow.

And at that point, you may as well accept that the Halloween yarn basket is staying out for a while.

I certainly have.

More Articles

Afghans, Blankets & Throws amigurumi Baby Hat Baby Patterns Beanies Beginner Book Reviews Christmas CHRISTMAS Clothing Crochet Patterns Crochet Techniques & Ideas Easy Crochet Patterns Free Crochet Patterns Granny Squares Halloween Patterns Quick Scarfs shawls

RSS More Articles

  • 10 DIY Halloween Jewellery Ideas That Are Cute, Not Creepy
  • Ghost Craft Ideas for Kids
  • How to Add Glow-in-the-Dark Pigment to Polymer Clay (Tips, Tricks and Project Ideas)
  • Dollar Tree Halloween Tiered Stand
  • DIY Sea Glass Planter: A Coastal Terracotta Pot Makeover
  • 15 Spider Web Crochet Patterns for Halloween – Free & Paid Patterns
  • Free Crochet Pattern – Skeleton Ribcage Top
  • Michaels Skeleton Crochet Pattern + 10 Spooky Crochet Skeleton Tops and Corsets
  • Cross Stitch Forum Asks for Proof Stitches Aren’t AI
  • Embroidery Keychain Laser Cut Pattern

Pick Your Blog

  • Sewing
  • Knitting
  • Quilting
  • Crochet
  • Home & Garden
  • Recycled Crafts
  • Scrapbooking
  • Card Making
  • Polymer Clay
  • Cross-Stitch
  • Edible Crafts
  • Felting
  • Glass Art
  • Indie Crafts
  • Kids Crafts
  • Jewelry Making
  • Lesson Plans
  • Needlework
  • Bath & Body
  • Party Ideas
  • Candle Making
  • DIY Weddings
  • Not Craft
  • Free Craft Projects

Copyright © 2026 · CraftGossip | Start Here | Contact Us | Link to Us | Your Editors | Privacy and affiliate policy