• Home
  • Suggest A DIY
  • DIY Newsletter

Crochet

Patterns, projects and techniques

  • About CraftGossip
  • Our Network
    • Bath & Body Crafts
    • Candle Making Ideas
    • Crochet Ideas
    • Cross Stitch
    • Edible Crafts
    • Felting Patterns
    • Glass Art
    • Home & Garden Ideas
    • Indie Crafts
    • Jewelry Making
    • Kids Crafts
    • Knitting Patterns
    • Lesson Plans
    • Needlework
    • Party Ideas
    • Polymer Clay
    • Quilting Ideas
    • Recycled Crafts
    • Scrapbooking
    • Sewing Patterns
    • Card Making
    • DIY Weddings
    • Not Craft Ideas
  • Giveaways
  • Roundups
  • Store
  • Search

Home Wall Hanging Crochet Pattern

February 16, 2023 by Shellie Wilson

Welcome to the Boho Bobble Stitch Crochet Wall Hanging pattern! This beautiful and intricate design is sure to elevate any home with its bohemian charm and texture. The bobble stitch, also known as the “bump stitch,” is a fun and versatile crochet technique that creates raised, three-dimensional clusters of stitches. It’s a great way to add interest and depth to your projects, and it’s not as difficult as it might look at first glance.

Here are my top three tips for mastering the bobble stitch:

Practice makes perfect. As with any new crochet technique, the more you practice, the better you’ll get at it. So don’t be discouraged if your bobbles don’t come out perfectly on the first try. Keep at it, and you’ll soon be a bobble pro!

Pay attention to your tension. Maintaining consistent tension is crucial for neat and even bobbles. If your tension is too tight, your bobbles may be too small and tight, while too loose tension can result in lopsided or uneven bobbles.

Use a crochet hook one size larger than the one recommended for the yarn. This will give you some extra room to work the bobbles and will help prevent your stitches from getting too tight and difficult to work with.

Now that you’ve got the hang of bobble stitch, you’re ready to dive into this gorgeous Boho Bobble Stitch Crochet Wall Hanging pattern. This design uses worsted-weight yarn and a size H hook, and it measures 11 1/2” x 39 1/2” including tassels. Please note that chart reading is required for this pattern.

Designed by Little Light Design Co., this crochet wall hanging is sure to become a treasured addition to your home decor. Happy crocheting!

Looking for more bobble stitch patterns? Check these out

45+ Free Bobble Stitch Crochet Patterns

25+ Crochet Patterns For Amazing Bobble Blankets

12 Bobble Stitch Baby Blankets To Crochet


«
»

Have you read?

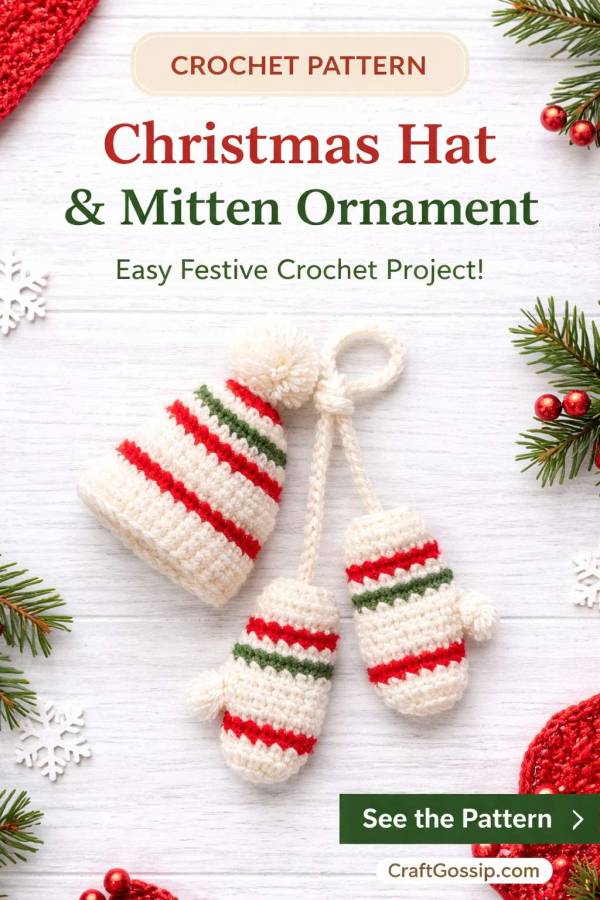
Crochet Christmas Hat and Mitten Ornament

This tiny crochet Christmas hat and mitten set is such a sweet little holiday make. It works up in festive stripes and looks lovely as a tree ornament, package topper, stocking decoration, or tucked onto a wreath. It’s also one of those fun small projects that uses up leftover yarn, which is always satisfying around Christmas.

Materials

  • Red Heart Super Sport or 3 ply sport yarn in Christmas colours such as: 
    • Blue 
    • White 
    • Green 
  • Size 1 steel crochet hook 
  • Yarn needle for finishing 

Finished Size

  • Hat: approximately 1½ inches long 
  • Mitten: approximately 2 inches long 

Abbreviations

  • ch = chain 
  • sc = single crochet 
  • sl st = slip stitch 
  • st = stitch 
  • sts = stitches 
  • tog = together 
  • rpt = repeat 
  • rnd = round 
  • lps = loops 

Pattern Notes

  • Unless otherwise stated, work in the back loops only. 
  • Join rounds with a slip stitch. 
  • The mitten is worked from the cuff upward. 
  • The hat is worked from the cuff upward. 
  • For a more traditional Christmas look, try red, white, and green. 

Christmas Mitten Ornament

Cuff

With mitten colour, ch 6.

Row 1: Sc in 2nd ch from hook and in each of the remaining 4 ch. Turn.
(5 sc)

Rows 2–12: Ch 1, sc in each st across. Turn.

Row 13: Hold the first and last rows together, matching stitches. Working through both thicknesses, ch 1, sl st in each st across to form the cuff. Do not turn.

Hand

Rnd 14: Working in the ends of the cuff rows, ch 1, (sc in next row end, 2 sc in next row end) around. Join with sl st in first sc.
(18 sts)

Rnd 15: Ch 1, sc in each st around. Join. Fasten off.

Rnd 16: Join stripe colour with sc in first st, sc in each st around. Join. Fasten off.

Rnd 17: With mitten colour, repeat Round 16.

Rnd 18: Join stripe colour with sc in first st, sc in next 10 sts, 2 sc in next st, leaving last 6 sts unworked. Join. Fasten off.
(13 sts)

Rnds 19–21: Repeat Rounds 17 and 16 alternately, ending with Round 17.

Rnd 22: Working in both loops, ch 1, sc in each st around. Join.

Rnd 23: Working in both loops, ch 1, sc in first 2 sts, sc next 2 sts tog, (sc in each of next 2 sts, sc next 2 sts tog) 2 times, sc in last st. Join.
Leave an 8 inch tail and fasten off.

Thread the yarn tail through the stitches of Round 23, pull to gather, and secure.

Thumb

Working in both loops, join mitten colour with sc in the first unworked st of Round 17.

Thumb Round 1: Sc in next 4 sts, 2 sc in last st. Join with sl st in first sc.
(7 sc)

Thumb Rounds 2–3: Ch 1, sc in each st around. Join.

At the end of the final round, leave an 8 inch tail and fasten off. Thread yarn through the stitches, pull to gather, and secure.

Christmas Hat Ornament

Cuff

With hat colour, ch 4.

Row 1: Sc in 2nd ch from hook and in each of the last 2 ch. Turn.
(3 sc)

Rows 2–32: Working in back loops only, ch 1, sc in each st across. Turn.

Row 33: Repeat Row 13 of the mitten pattern to join the cuff into a ring.

Hat Body

Rnd 34: Working in the ends of rows around the cuff, ch 1, sc in each row around. Join with sl st in first sc.
(32 sts)

Rnd 35: Working in back loops only, ch 1, sc in each st around. Join.

Rnds 36–38: Ch 1, sc in each st around. Join. Fasten off at the end of Round 38.

Rnds 39–44: Working in back loops only, repeat Rounds 16 and 17 of the mitten alternately for festive striping.

Rnd 45: Ch 1, sc in first 2 sts, sc next 2 sts tog, (sc in next 2 sts, sc next 2 sts tog) around. Join.
(18 sts)

Rnd 46: Repeat Round 45.
(12 sts)

Rnd 47: Ch 1, sc in first st, sc next 2 sts tog, (sc in next st, sc next 2 sts tog) around. Join.
Leave an 8 inch tail and fasten off.

Thread yarn through remaining stitches, pull to gather, and secure. Turn cuff up.

Tie

With mitten colour, ch 20. Fasten off.

Sew one end of the tie to the mitten cuff and the other end to the centre top of the hat on the wrong side.

Hanger

With mitten colour, ch 18. Fasten off.

Tack both ends of the hanger to the centre top of the hat on the right side.

This tiny Christmas set is adorable worked in classic holiday shades, and it would be very cute hanging on the tree beside handmade stockings and mini crochet candy canes.

More Articles

Afghans, Blankets & Throws amigurumi Baby Hat Baby Patterns Beanies Beginner Book Reviews Christmas CHRISTMAS Clothing Crochet Patterns Crochet Techniques & Ideas Easy Crochet Patterns Free Crochet Patterns Granny Squares Halloween Patterns Quick Scarfs shawls

RSS feed: More Articles More Articles

  • How To Make A Recycled Bottle Cap Tray With Resin
  • 9 Painted Mosaic Walkway DIY Ideas to Brighten a Plain Garden Path
  • DIY Beaded Towel Holder: An Easy Boho Bathroom Update
  • How to Cook Lamb Shanks: Tender Oven and Slow Cooker Methods
  • Crochet Christmas Hat and Mitten Ornament
  • Christmas Stick and Stitch Embroidery Pattern – Etsy Review
  • Quilt As You Go Tutorial (Beginner-Friendly Step-by-Step Guide)
  • Etsy Feature – Bread Pan Pottery Template
  • A Nostalgic Christmas Pudding Knitting Pattern for Your Handmade Decorations
  • 10 Bucket Hat Knitting Patterns for a Fun Handmade Wardrobe

Pick Your Blog

  • Sewing
  • Knitting
  • Quilting
  • Crochet
  • Home & Garden
  • Recycled Crafts
  • Scrapbooking
  • Card Making
  • Polymer Clay
  • Cross-Stitch
  • Edible Crafts
  • Felting
  • Glass Art
  • Indie Crafts
  • Kids Crafts
  • Jewelry Making
  • Lesson Plans
  • Needlework
  • Bath & Body
  • Party Ideas
  • Candle Making
  • DIY Weddings
  • Not Craft
  • Free Craft Projects

Copyright © 2026 · CraftGossip | Start Here | Contact Us | Link to Us | Your Editors | Privacy and affiliate policy