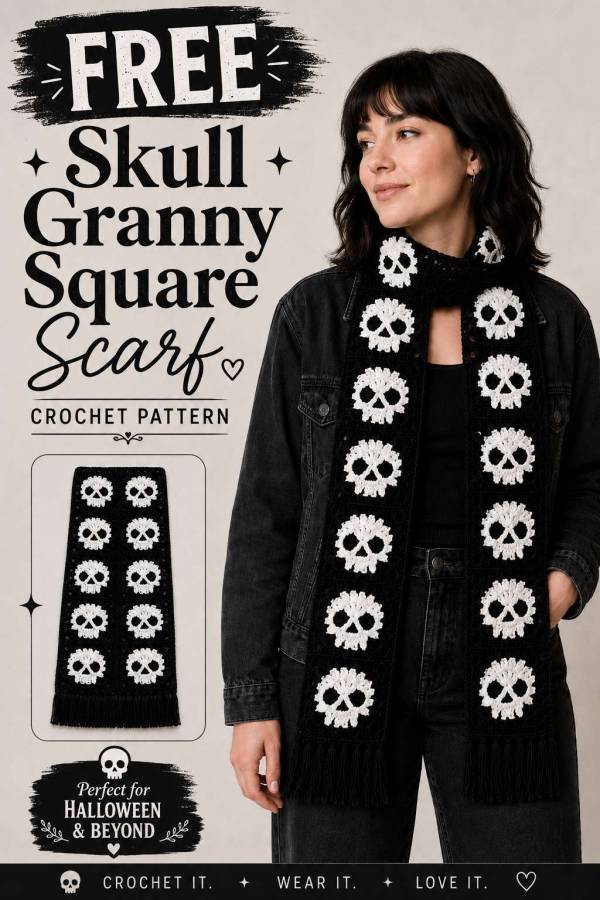
If you love a project that looks impressive but comes together one small piece at a time, this scarf is for you. It’s built from individual skull granny squares — each one about 5 inches across — that you join end to end into a long, spooky strip. The result is a scarf with serious Halloween energy that you can wear all through the cooler months.
Each square works up quickly and uses only basic stitches, so once you get the hang of the first one, the rest go fast. I made mine in white skulls on a black background, but this pattern really shines in any high-contrast color combo — orange and black, purple and green, or even a bold red and white for something a little less traditional.
Twelve squares gives you a scarf around 61 inches long, which is a great standard length. Want something longer? Just keep going. Want it wider? Work two rows of squares side by side for a chunkier, more dramatic look.
Materials
- Aran weight yarn in two colors (Color A for the skull, Color B for the border)
- 4.5mm crochet hook
- Yarn needle
- Scissors
Stitches & Abbreviations
- ch – chain
- sl st – slip stitch
- sc – single crochet
- hdc – half double crochet
- dc – double crochet
- tr – treble crochet
- sk – skip
- st(s) – stitch(es)
- ( ) – work all stitches listed into the same stitch or space
- * * – repeat section as instructed
Special Stitch: Treble Crochet (tr)
Yarn over twice, insert hook into stitch, yarn over and pull up a loop (4 loops on hook). Yarn over and pull through 2 loops (3 loops on hook). Yarn over and pull through 2 loops (2 loops on hook). Yarn over and pull through last 2 loops.
Pattern Notes
- Finished square size: approx. 13cm × 13cm (5 inches × 5 inches)
- Hook: 4.5mm
- Yarn weight: Aran
- Level: Intermediate
- The pattern is worked in rounds.
- Block each square before joining for the most even finish.
How Many Squares to Make
| Scarf Style | Squares | Finished Size |
| Narrow (1 square wide) | 12 | ~5″ × 61″ |
| Wide (2 squares wide) | 24 | ~10″ × 61″ |
Skull Granny Square Pattern
Make the required number of squares. Each square is worked in two parts: the skull (Rounds 1–4 in Color A) and the granny square border (Rounds 5–6 in Color B).
Rounds 1–4: The Skull (Color A)
Round 1: Make a magic ring. Ch 4 (counts as tr), tr in next 4 sts, ch 7, tr, ch 4, tr, ch 7, sl st to close. (7 sts)
Round 2: Ch 3 (counts as 1 dc), dc in same st where you sl st, (2 dc) in next, (3 dc) in next, (2 dc) in next, (2 dc), (hdc, sc in next 7 sts, hdc) in the ch-7 space, ch 3, tr in the tr below, (5 tr) in the ch-4 space, tr in the tr below, ch 3, (hdc, sc in next 7 sts, hdc) in the ch-7 space, sl st to close. (36 sts)
Round 3: Ch 3 (counts as 1 dc), dc in same st where you started, ch 3, (2 dc) in next, ch 2, sk 2, sc in next 3 sts, ch 2, sk 2, (2 dc) in next, ch 3, (2 dc) in next, ch 2, sk 2, sc in next 3 sts, ch 2, sk 2, (2 dc) in next, ch 3, (2 tr) in next, sc in the tr below, ch 2, sk 2, sc, ch 2, sk 2, sc, (2 tr) in next, ch 3, (2 dc) in next, ch 2, sk 2, sc in next 3 sts, ch 2, sk 2, sl st to close. (28 sts)
Round 4: Sl st in next, sl st in ch-3 space, (ch 3, 2 dc, ch 3, 3 dc) in the ch-3 space where you sl st, (3 dc) in each of the next 2 ch-2 spaces. (3 dc, ch 3, 3 dc) in next ch-3 space, (3 dc) in each of next 2 ch-2 spaces. Repeat from * 3 more times. Sl st to top of ch-3 to close. (64 sts)
Rounds 5–6: The Granny Square Border (Color B)
Join Color B in the same space where you sl st to close Round 4.
Round 5: Ch 3 (counts as 1 dc), dc in same st where you started, ch 3, (2 dc) in next, ch 2, sk 2, sc in next 3 sts, ch 2, sk 2, (2 dc) in next, ch 3, (2 dc) in next, ch 2, sk 2, sc in next 3 sts, ch 2, sk 2, (2 dc) in next, ch 3, (2 tr) in next, sc in the tr below, ch 2, sk 2, sc, ch 2, sk 2, sc, (2 tr) in next, ch 3, (2 dc) in next, ch 2, sk 2, sc in next 3 sts, ch 2, sk 2, sl st to close. (28 sts)
Round 6: Sl st in next, sl st in ch-3 space, (ch 3, 2 dc, ch 3, 3 dc) in the ch-3 space where you sl st, (3 dc) in each of the next 2 ch-2 spaces. (3 dc, ch 3, 3 dc) in next ch-3 space, (3 dc) in each of next 2 ch-2 spaces. Repeat from * 3 more times. Sl st to top of ch-3 to close. (64 sts)
Fasten off and weave in ends. Block the square. Repeat until you have made all your squares.
Joining the Squares into a Scarf
Before joining, lay all your squares out in a line (or two rows side by side for the wide version). Make sure every skull is facing the same direction — rotate each square as needed before you start joining.
Option 1: Flat Seam (invisible join)
For a seamless finish, place two squares with right sides facing each other. Using a yarn needle and matching yarn, whip stitch through the back loops only along one edge, from corner ch-3 space to corner ch-3 space. Fasten off. Continue joining squares one by one until all are connected in a strip.
Option 2: Single Crochet Join (decorative ridge)
For a bold, textured seam, hold two squares with wrong sides facing each other. Join yarn at one corner, ch 1, then single crochet through both layers across the shared edge, working into each stitch and ch space. Fasten off. Repeat for each join.
Finishing
Weave in any remaining ends.
Optional border: Work a single round of sc around the entire scarf. At each corner, work 3 sc into the corner ch-3 space to keep corners flat and neat.
Optional fringe: Cut yarn into 20cm (8 inch) lengths. Fold each piece in half, pull the folded loop through a stitch at one short end of the scarf, then draw the ends through the loop and pull tight. Repeat every 2–3 stitches along both short ends.
Cowl variation: Instead of fringe, sew the two short ends of the wide version together for a chunky loop scarf.