• Home
  • Suggest A DIY
  • DIY Newsletter

Crochet

Patterns, projects and techniques

  • About CraftGossip
  • Our Network
    • Bath & Body Crafts
    • Candle Making Ideas
    • Crochet Ideas
    • Cross Stitch
    • Edible Crafts
    • Felting Patterns
    • Glass Art
    • Home & Garden Ideas
    • Indie Crafts
    • Jewelry Making
    • Kids Crafts
    • Knitting Patterns
    • Lesson Plans
    • Needlework
    • Party Ideas
    • Polymer Clay
    • Quilting Ideas
    • Recycled Crafts
    • Scrapbooking
    • Sewing Patterns
    • Card Making
    • DIY Weddings
    • Not Craft Ideas
  • Giveaways
  • Roundups
  • Store
  • Search

Crochet Pattern – Child’s Dress

March 11, 2008 by jd wolfe

crochet-child-dress

I made several of these before I knew a pattern or instructions for doing so existed. This is the easiest toddler or little girl dress you’ll ever make. Here’s Candi Jensen’s version as shown on HGTV.

http://www.hgtv.com/handmade/how-to-crochet-a-childs-dress/index.html (current link 02/12) (Thanks, Barbara!)


You can make this dressy or not. You can easily add a sleeve or even crochet a little shrug to top it.

How about this one by Cristina?

crochet kiddie shrug free pattern cristinascrochethaven

http://www.christinascrochethaven.com/summer_bright_dress_and_shrug.htm

One really nice thing about taking the time to make a dress for this age child is the amount of wear she’ll get out of the dress. Since kiddies from age 2 to 8 or even 10 mostly grow up rather than out, if you leave a deep hem in this dress, you can let the hem out more than once, allowing the dress to be worn year after year or by several children.

Another idea is to edge the dress with a crocheted hem. Why not? There are so many pretty edgings with free patterns online, you can easily find one that will match your crochet stitches or the print on the fabric.

So, get busy! You have time to make a cute dress and shrug like this for that special little girl in your life before Easter. You can even apply a little flower to the kerchief above to create a special easter bonnet! Here’s a freebie from Adorn Magazine’s website:
crochet free pattern flower adorn magazine

http://www.adornmag.com/node/22

I HAVE TO SHARE A GREAT IDEA FOR THIS LITTLE DRESS THAT WAS EMAILED TO ME BY SHARON BOLTON.  Here’s what she wrote:

How about using a pretty pillowcase for the dress portion with the
crocheted yoke?  They often have pretty hems.

Sharon in Phoenix

That got me really thinking!  Wow!  What about one of those Crinoline Lady pillowcases?  Oh, I think I have to go find me one of those and see what I can do with it!

Thanks, Sharon!

[tags]CROCHET GIRL DRESS SHRUG FLOWER[/tags]
«
»

Comments

  1. dianne says

    March 11, 2008 at 8:40 pm

    Saw your post on CP. These are adorable! Thanks for posting.

  2. cathy says

    March 11, 2008 at 10:32 pm

    I have seen similar dresses in the Philippines for adults too. why not make one for ourselves too??

    GREAT IDEA, CATHY! jd

  3. Patti says

    January 27, 2009 at 6:45 am

    If someone has this pattern sweet and easy girls dress esemble (Candi Jensen) please foreward.

    Thanks in advance.

  4. Amber Price says

    June 9, 2009 at 1:14 am

    I am after someone in New Zealand that could Crochete 3 flower girl dresses for my December the 12th wedding in colour charcoal. Could anyone help me.
    Thanks Amber

  5. peggy says

    January 1, 2011 at 10:02 am

    am looking for pattern for Candi Jensen’s crochet dress shown at top of this site.
    when I click on website, can’t get.
    can anyone help me?

  6. jd wolfe says

    January 1, 2011 at 10:07 pm

    Peggy,
    I have made several of these with no pattern. However, if you find a free pattern for a simple tank top, you can make it easily. Crochet the tank top as the bodice. Make it as long as you’d like. The one pictured is not very long. With a piece of coordinating polycotton fabric (typically about a half yarn of 44 inch wide fabric), you prepare the skirt. Baste a deep hem into what will become the lower edge of the skirt. Sew up the side the create a cylinder. That leaves the raw top edge which can be treated several ways. You can use a basting stitch to gather the top, leaving the top edge raw. Then use a blanket stitch all around the fabric top and crochet evenly into that with a row of single crochets. Then do the math to match up the # of stitches in your bodice to the # of available stitches in the skirt and sew the bodice onto the skirt. This is my preferred way to finish it off. Others might like to crochet directly into the fabric with a steel hook, but I don’t care for that. It works for many tho’. HTH
    jd

  7. Barbara says

    February 22, 2012 at 6:05 pm

    Try this
    http://www.hgtv.com/handmade/how-to-crochet-a-childs-dress/index.html

  8. swingers says

    April 26, 2013 at 8:49 am

    My brother suggested I might like this website. He was totally
    right. This post truly made my day. You can not imagine simply how much time I had spent for this info!

    Thanks!

Have you read?

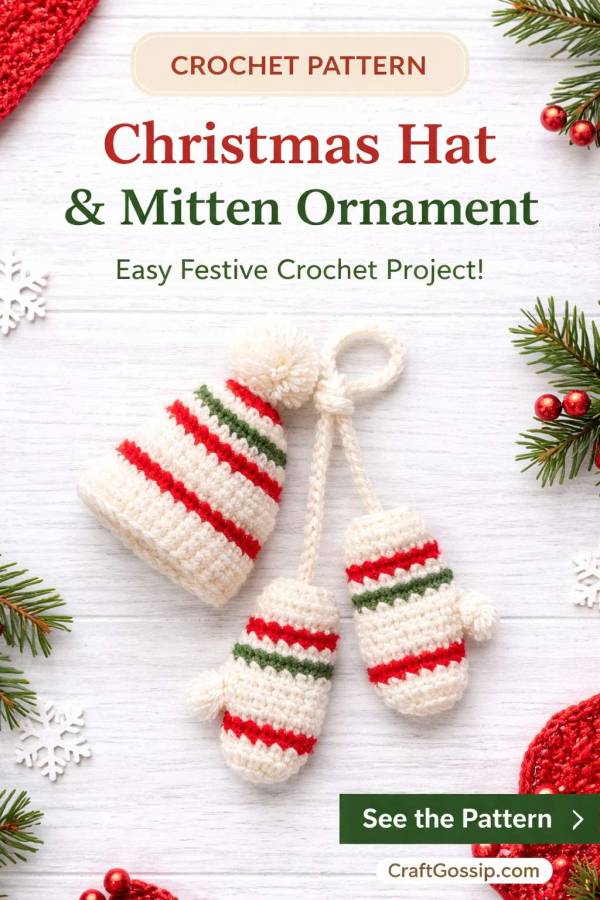
Crochet Christmas Hat and Mitten Ornament

This tiny crochet Christmas hat and mitten set is such a sweet little holiday make. It works up in festive stripes and looks lovely as a tree ornament, package topper, stocking decoration, or tucked onto a wreath. It’s also one of those fun small projects that uses up leftover yarn, which is always satisfying around Christmas.

Materials

  • Red Heart Super Sport or 3 ply sport yarn in Christmas colours such as: 
    • Blue 
    • White 
    • Green 
  • Size 1 steel crochet hook 
  • Yarn needle for finishing 

Finished Size

  • Hat: approximately 1½ inches long 
  • Mitten: approximately 2 inches long 

Abbreviations

  • ch = chain 
  • sc = single crochet 
  • sl st = slip stitch 
  • st = stitch 
  • sts = stitches 
  • tog = together 
  • rpt = repeat 
  • rnd = round 
  • lps = loops 

Pattern Notes

  • Unless otherwise stated, work in the back loops only. 
  • Join rounds with a slip stitch. 
  • The mitten is worked from the cuff upward. 
  • The hat is worked from the cuff upward. 
  • For a more traditional Christmas look, try red, white, and green. 

Christmas Mitten Ornament

Cuff

With mitten colour, ch 6.

Row 1: Sc in 2nd ch from hook and in each of the remaining 4 ch. Turn.
(5 sc)

Rows 2–12: Ch 1, sc in each st across. Turn.

Row 13: Hold the first and last rows together, matching stitches. Working through both thicknesses, ch 1, sl st in each st across to form the cuff. Do not turn.

Hand

Rnd 14: Working in the ends of the cuff rows, ch 1, (sc in next row end, 2 sc in next row end) around. Join with sl st in first sc.
(18 sts)

Rnd 15: Ch 1, sc in each st around. Join. Fasten off.

Rnd 16: Join stripe colour with sc in first st, sc in each st around. Join. Fasten off.

Rnd 17: With mitten colour, repeat Round 16.

Rnd 18: Join stripe colour with sc in first st, sc in next 10 sts, 2 sc in next st, leaving last 6 sts unworked. Join. Fasten off.
(13 sts)

Rnds 19–21: Repeat Rounds 17 and 16 alternately, ending with Round 17.

Rnd 22: Working in both loops, ch 1, sc in each st around. Join.

Rnd 23: Working in both loops, ch 1, sc in first 2 sts, sc next 2 sts tog, (sc in each of next 2 sts, sc next 2 sts tog) 2 times, sc in last st. Join.
Leave an 8 inch tail and fasten off.

Thread the yarn tail through the stitches of Round 23, pull to gather, and secure.

Thumb

Working in both loops, join mitten colour with sc in the first unworked st of Round 17.

Thumb Round 1: Sc in next 4 sts, 2 sc in last st. Join with sl st in first sc.
(7 sc)

Thumb Rounds 2–3: Ch 1, sc in each st around. Join.

At the end of the final round, leave an 8 inch tail and fasten off. Thread yarn through the stitches, pull to gather, and secure.

Christmas Hat Ornament

Cuff

With hat colour, ch 4.

Row 1: Sc in 2nd ch from hook and in each of the last 2 ch. Turn.
(3 sc)

Rows 2–32: Working in back loops only, ch 1, sc in each st across. Turn.

Row 33: Repeat Row 13 of the mitten pattern to join the cuff into a ring.

Hat Body

Rnd 34: Working in the ends of rows around the cuff, ch 1, sc in each row around. Join with sl st in first sc.
(32 sts)

Rnd 35: Working in back loops only, ch 1, sc in each st around. Join.

Rnds 36–38: Ch 1, sc in each st around. Join. Fasten off at the end of Round 38.

Rnds 39–44: Working in back loops only, repeat Rounds 16 and 17 of the mitten alternately for festive striping.

Rnd 45: Ch 1, sc in first 2 sts, sc next 2 sts tog, (sc in next 2 sts, sc next 2 sts tog) around. Join.
(18 sts)

Rnd 46: Repeat Round 45.
(12 sts)

Rnd 47: Ch 1, sc in first st, sc next 2 sts tog, (sc in next st, sc next 2 sts tog) around. Join.
Leave an 8 inch tail and fasten off.

Thread yarn through remaining stitches, pull to gather, and secure. Turn cuff up.

Tie

With mitten colour, ch 20. Fasten off.

Sew one end of the tie to the mitten cuff and the other end to the centre top of the hat on the wrong side.

Hanger

With mitten colour, ch 18. Fasten off.

Tack both ends of the hanger to the centre top of the hat on the right side.

This tiny Christmas set is adorable worked in classic holiday shades, and it would be very cute hanging on the tree beside handmade stockings and mini crochet candy canes.

More Articles

Afghans, Blankets & Throws amigurumi Baby Hat Baby Patterns Beanies Beginner Book Reviews Christmas CHRISTMAS Clothing Crochet Patterns Crochet Techniques & Ideas Easy Crochet Patterns Free Crochet Patterns Granny Squares Halloween Patterns Quick Scarfs shawls

RSS feed: More Articles More Articles

  • Christmas Stick and Stitch Embroidery Pattern – Etsy Review
  • A Nostalgic Christmas Pudding Knitting Pattern for Your Handmade Decorations
  • Quilt As You Go Tutorial (Beginner-Friendly Step-by-Step Guide)
  • Etsy Feature – Bread Pan Pottery Template
  • 10 Bucket Hat Knitting Patterns for a Fun Handmade Wardrobe
  • 10 Free Hot Water Bottle Cover Knitting Patterns for Cosy Nights
  • How to Make a Thanksgiving Family Recipe Scrapbook
  • 10 Triangle Scarf Knitting Patterns for Cosy Layers and Handmade Gifts
  • Free Christmas Pudding Cross Stitch Gift Tag Pattern With DMC Colour Key
  • 10 Thanksgiving Math Printables for Kids: Counting, Addition and Fun Number Puzzles

Pick Your Blog

  • Sewing
  • Knitting
  • Quilting
  • Crochet
  • Home & Garden
  • Recycled Crafts
  • Scrapbooking
  • Card Making
  • Polymer Clay
  • Cross-Stitch
  • Edible Crafts
  • Felting
  • Glass Art
  • Indie Crafts
  • Kids Crafts
  • Jewelry Making
  • Lesson Plans
  • Needlework
  • Bath & Body
  • Party Ideas
  • Candle Making
  • DIY Weddings
  • Not Craft
  • Free Craft Projects

Copyright © 2026 · CraftGossip | Start Here | Contact Us | Link to Us | Your Editors | Privacy and affiliate policy