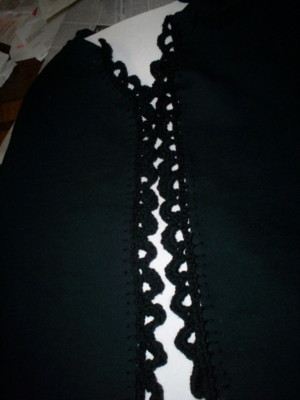
Here’s a close up of the edging I crocheted to the front of a black sweatshirt to create a cardigan for my mom. How’d I do it? Really easy!
Fleece and sweatshirt material are wonderfully forgiving and perfect for embellishing with crochet. They’re wonderful because, in addition to being warm and easy care, they don’t ravel! This is especially helpful when trying to cut and embellish with crochet or other edgings.
First, wash the cardigan to remove any sizing. I just put it through the washer and dryer to treat it the way it’s always going to be cared for. In this application, I always use acrylic yarn because it’s easy to machine wash and dry. The yarn used in this cardigan was a no-name thin worsted weight acrylic. Since it doesn’t take very much yarn, it’s an easy way to use up some of your scraps or partial leftover skeins.
Spread the sweatshirt out on a table, smoothing out all the wrinkles and fold with back of sleeve to back of sleeve. Match them up well since this will determine the center front of your cardigan. When you’ve got it laid out nicely and have determined where the center front is, make a single cut the full length of the front of the sweatshirt from bottom edge through the neck ribbing.
In this example, the sweatshirt had one of those little triangle designs sewn into the center front just below the neck ribbing, so I actually cut that out to create a larger neck opening. But, you can just go straight up if you want or make the neck opening larger still by cutting off all the neck ribbing.
Because my mom’s arms are short, I decided to leave the wrist ribbing intact. To shorten the sleeves or further embellish, you can also remove the cuff ribbing and use the same technique I’ll describe for the front.
Whatever you’ve cut off now needs to be crochet embellished. First, you need to use a sharp needle with a larger eye to sew a single row of blanket stitch around all the raw edges. This is what you’ll crochet into.
Here’s the hard part. You MUST
be sure to have the same number of stitches on matching sides – of the front, of sleeves, whatever. To do this, I just eyeball the first side of the slit front, then place the sweatshirt on a table to match up my stitches for the second side of the front.
After you’ve finished your blanket stitch, you’re ready for a row of single crochets all around. This forms the foundation for whatever edging you want to crochet. In this case, I decided to go simple. After my row of single crochets, I crocheted a row of single crochet, chain 4, sk 4 single crochets, sc into the 5th sc around.
The next row was to sc into the first ch 4 space then work 5 double crochets and a single crochet in the same ch 4 space. I repeated that sequence on both sides of the front of the sweatshirt, starting at the bottom on both sides. This created an edging that very closely matches on both sides – since the front and back of each ‘5DC motif’ look pretty much the same.
My mom really likes this new ‘cardigan’. I actually made this one from an older sweatshirt that she already owned but that she had ‘outgrown’. Since then, I’ve purchased a new sweatshirt in a very pale celadon green that i’ll embellish with Aunt Lydia’s double strand of size 10 in the colorway that contains the light green, beige, and white. That’ll be a nice transition to her Spring wardrobe.
I have in mind a simple Christmas cardigan, created with a red sweatshirt trimmed in green worsted weight acrylic and further embellished with a small crocheted Christmas tree applique.
There are so many other ways to make something special from the humble and inexpensive sweatshirt. Imagine what you’d pay for this at your local designer boutique? Well, be your own designer and make your cardigans to match your outfits yourself. This is a project that takes only a couple hours and is greatly appreciated.
I have to tell you that as far as I know, my mother ‘invented’ this technique when I was in junior high about 45 years ago. She had sewn me a kilt in lovely wool of red, gray, and white. To make it a real outfit – which was rare for me to have in those times – she took a plain gray sweatshirt, slit it down the middle, hemmed the raw edges, and sewed a brocade ribbon down the front of each side. It was my absolute favorite outfit for several years. For once, maybe the first time in my life, I was ‘in style’!! Can you tell the impression this outfit made on me? More than 45 years later, I still fondly recall that outfit so lovingly made for me by a mom who worked full time. Lucky me! She continue to sew for me for years as I had an adult body from the time I was 9 years old – and in those days kids and adults wore different clothes. Not like now when adults and kids can wear jeans and sweats just about anywhere!
So, if you’re going to wear sweats, jazz them up a bit with your own dash of crochet!
Need Crochet supplies and Yarn? We highly recommend Lionbrand for quality yarn and ongoing yarn sales and discounts. Make sure to check out their free crochet patterns too.
Check out these Cardigan Crochet Pattern Books and these Crochet cardigan patterns we found on Etsy.
Check out our NEW Facebook page for Crochet. This page is only about Crochet!! Free pattern links, tips tricks, and tutorial videos. We will be sharing it all to the ONE SPOT. Make sure you LIKE the new Crochet Facebook Page so you don’t miss out. Crochet Facebook Page. or join our Facebook group for conversations about crochet.


Thanks for this tip JD. I make it in my blouse. Maybe I must try another project.
Thanks for the great pattern ideas. I have some but your’s is new and refreshing for making a sweatshirt cardigan. Starting right now. Thanks again, H
Wow! I am back in the Dark ages again! I saw the ad for this cardigan. I have a Sweatshirt with decorative edging and made it a Duster from an Annie’s Attic pattern booklet. That is one of the projects that will be exhibited at the August 2014 Fair. Hugs
It appears the blanket stitches are about 1/4″ apart? Is this accurate! Sitting here with needle in hand. ????
I left a message before. I would like to know how far apart the blanket stitches are. Please let me know
Susan,
I am sorry for not getting back to you sooner. I can’t get in contact with the original editor who wrote this pattern.