• Home
  • Suggest A DIY
  • DIY Newsletter

Crochet

Patterns, projects and techniques

  • About CraftGossip
  • Our Network
    • Bath & Body Crafts
    • Candle Making Ideas
    • Crochet Ideas
    • Cross Stitch
    • Edible Crafts
    • Felting Patterns
    • Glass Art
    • Home & Garden Ideas
    • Indie Crafts
    • Jewelry Making
    • Kids Crafts
    • Knitting Patterns
    • Lesson Plans
    • Needlework
    • Party Ideas
    • Polymer Clay
    • Quilting Ideas
    • Recycled Crafts
    • Scrapbooking
    • Sewing Patterns
    • Card Making
    • DIY Weddings
    • Not Craft Ideas
  • Giveaways
  • Roundups
  • Store
  • Search

15 Free Crochet Patterns for Diwali – Diyas, Lanterns and Torans

October 2, 2025 by Shellie Wilson

Diwali, the festival of lights, is a time when our homes come alive with color, sparkle, and warmth. Traditionally, oil diyas and lanterns brighten the night, but what if this year you added a handmade twist? If your yarn stash is overflowing (guilty here!), these crochet patterns are the perfect way to craft your own festive glow.

The beauty of crocheting for Diwali is that it combines two of our favorite things—tradition and creativity. You can whip up tealight holders that make your dinner table shimmer, garlands that bring joy to your doorway, or even lanterns that become heirloom pieces you’ll pull out year after year. Many of these projects are quick enough for a weekend, and they’re a wonderful way to involve kids or friends in the celebrations.

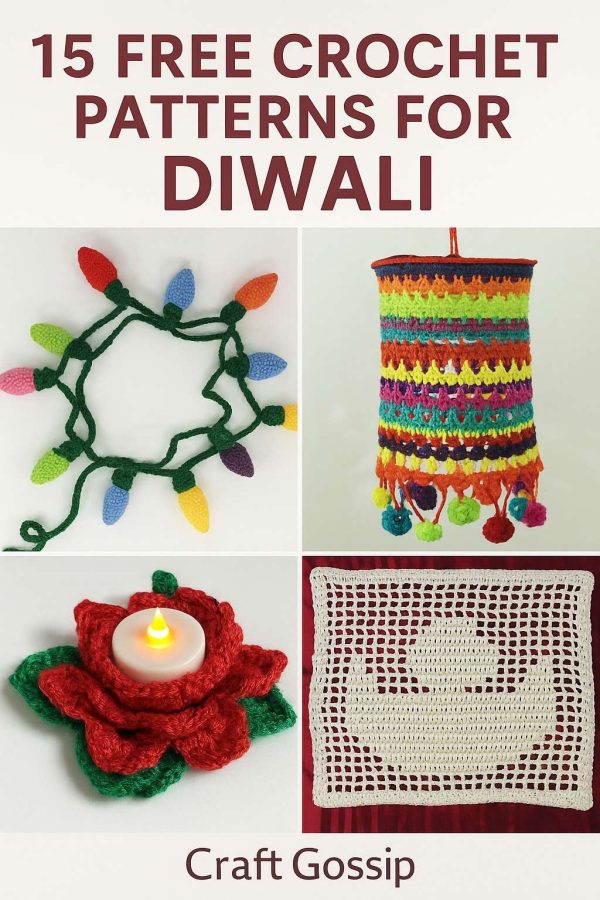
I’ve gathered together 15 free crochet patterns for Diwali—everything from sparkling diyas to colorful torans. Each one is beginner-friendly, stash-busting, and guaranteed to bring a handmade glow to your festival décor.

Crochet Diyas & Tealight Holders

Nothing says Diwali quite like the warm glow of diyas. These crochet patterns let you keep the tradition alive while adding a creative twist.


Festival Starburst Crochet Ornament – Free Diwali Crochet Pattern

I Heart Diwali Garland

Amma’s Door Toran 

Ravelry: Tealight Lotus pattern by Daniela Herbertz

Ravelry: Autumn Glow Tealight jar cosy pattern by Lucy Duffy

Ravelry: Tealight Rose pattern by Daniela Herbertz 

 Ravelry: Rainbow tealight holders pattern by Crazyfox Design 

My Blooming Lantern – Crochet Pattern – Clover Needlecraft

Crochet pattern Lantern 

Crochet Toran Pattern #58#bhandhanvar#newtorandesign#simpletorandesign 

Happy Days Mandala Crochet pattern by Knothing Usual | LoveCrafts

Brighter Daze Mandala Crochet pattern by Alexandra Lund | LoveCrafts 

Ravelry: Diwali Lamp Filet pattern by Swaroopa 

Ravelry: Diwali Diya pattern by Preeti Palorkar

A Handmade Glow for Diwali

There’s something so magical about lighting a handmade diya or hanging a crochet toran you stitched yourself. These patterns not only add charm to your festival décor but also connect us to the tradition of slowing down, making things with our hands, and sharing them with loved ones.

Whether you’re working up a quick tealight holder for the dining table, a lantern to hang on your balcony, or a garland for your front door, these patterns let you celebrate the festival of lights in a way that’s truly personal.

So gather your yarn, pick a pattern (or three!), and let your hooks bring the glow this Diwali. Handmade, heartfelt, and filled with joy—that’s the real light of the season.

Festive Diwali Diya: Free Crochet Pattern 

Happy Diwali Diya light Pattern

Christmas flower tealight holder 

Ravelry: A Burst Of Light Tealight Cosy pattern by Eminent Knits 

Poinsettia Tealight holder

Clematis tealight Holder 

Ravelry: Scrap-Buster Holiday Light Garland pattern by Carla D. T. Fisher

Ravelry: Diwali Tea Light Diya pattern by Pan Perkins  


More Crochet?

  • Festival Starburst Crochet Ornament – Free Diwali…
  • Free Crochet Pattern - Amma's Diwali Toron Door Garland
  • Free Crochet Pattern - Diwali Heart Door Garland
«
»

Have you read?

Free Giant Squishy Octopus Crochet Pattern

There is just something ridiculously charming about a giant crochet octopus, isn’t there? Maybe it is the soft round head, maybe it is the eight chunky little legs, or maybe it is the fact that once you make one, you suddenly start wondering whether every couch, bed, nursery corner, and reading nook needs its own oversized sea creature.

This free giant squishy octopus crochet pattern is one of those projects that feels wonderfully playful but still practical enough to make as a handmade gift. It is worked with soft blanket yarn, which means it grows quickly, feels lovely to cuddle, and has that big plush-toy finish without needing lots of tiny fiddly stitches. If you enjoy amigurumi but sometimes look at those miniature details and think, “Not today, thank you very much,” this larger version is a much friendlier kind of crochet project.

Unlike a tiny amigurumi octopus, this one has real presence. It is big, soft, and properly huggable. The finished octopus has a rounded stuffed body, eight separate crocheted legs, contrast-coloured tips, black safety eyes, and a simple stitched smile. It is cute without being too fussy, which is exactly the sort of handmade toy I love.

We have shared plenty of ocean-themed crochet inspiration over the years, including this roundup of octopus and kraken crochet patterns, but this one is for anyone who wants something larger, softer, and just a little bit more dramatic. Because honestly, if you are going to crochet an octopus, why not make it squishy enough to take over the sofa?

About This Giant Crochet Octopus Pattern

This giant octopus is made using blanket yarn and a large crochet hook, which gives it that lovely soft plush finish. The body is worked in the round and shaped with steady increases and decreases. Once stuffed firmly, it becomes beautifully round and cuddly.

The legs are made separately and then joined into a ring before being sewn onto the base of the body. That means the finished octopus has proper chunky legs rather than little floppy afterthoughts. The updated leg-joining method makes the assembly much clearer too, especially if you have ever made an amigurumi project and stared at the pieces wondering how on earth they are all meant to sit neatly together.

If you like smaller octopus projects too, you might also enjoy the Emotional Support Ollivander Octopus crochet pattern on CraftBits. That one is a sweet little amigurumi-style project, while this one is more of a giant cuddle buddy.

What You’ll Need

  • Blanket yarn in your main octopus colour
  • Blanket yarn or soft chunky yarn in a contrast colour for the leg tips
  • 8mm crochet hook
  • 30mm safety eyes
  • Black worsted weight yarn for the mouth
  • Yarn needle
  • Stitch marker
  • Toy stuffing or Poly-fil
  • Scissors
  • Free PDF Pattern – Giant_Squishy_Octopus_Crochet_Pattern

If you are buying supplies especially for this project, look for soft blanket yarns or chenille-style yarns from places like Mary Maxim or Amazon. A good large-eye yarn needle is also worth having for sewing the legs securely to the body, because trying to wrestle blanket yarn through a tiny needle is one of those little crafting frustrations we do not need in our lives.

Skill Level

I would call this an advanced beginner to intermediate crochet pattern.

You should already be comfortable with chain stitch, single crochet, slip stitch, increasing, decreasing, crocheting in the round, basic amigurumi assembly, and sewing crochet pieces together.

The stitches themselves are simple, but the size of the project makes it a little more involved than a tiny beginner amigurumi. Blanket yarn is wonderfully forgiving, but it can be tricky to see your stitches if you are working in poor light. A stitch marker will be your best friend here. Possibly your only friend by the time you are deep into the decreases, but still a good one.

Tips Before You Start

Blanket yarn makes this octopus beautifully soft, but it also behaves differently from standard worsted yarn. It can stretch, shed a little, and hide stitches if you are not paying attention. Keep your tension firm but not stiff, especially if you want the stuffing to stay hidden.

Stuff the body generously. The pattern depends on firm stuffing to create that rounded, squishy shape. If you under-stuff it, the head can collapse slightly or look a little flat on top. Add stuffing gradually and shape the body as you go, pushing the filling evenly into the sides.

For the legs, stuff each one a little more than halfway, keeping the top section flatter so it is easier to join. This helps the legs spread nicely around the body instead of creating a bulky lump underneath.

When attaching the safety eyes, check the placement before locking the backs in place. Once safety eyes are snapped together, they are not designed to come apart. I always like to set the eyes in place, step back, squint at it like I am judging a craft fair entry, and then commit.

Getting the Legs Right

The biggest visual difference between a cute giant octopus and a slightly confusing blob with feet is the leg placement. You want eight legs in total, with four sitting toward the front and four sitting toward the back. Some of the back legs should be partly hidden by the body so the octopus looks natural rather than like all the legs have been lined up for a class photo.

When you join the legs, flatten the top of each one and single crochet through both layers across the opening. This gives the legs a cleaner, flatter join and makes it much easier to attach them evenly to the bottom of the body.

Before sewing the leg ring on permanently, pin or clip the legs into position. Place four legs toward the front, then arrange the remaining four around the back and sides. This is one of those moments where a few minutes of fiddling saves you from having to unpick blanket yarn later, and nobody wants that. Blanket yarn does not forgive unpicking as politely as cotton does.

Make It Your Own

This giant crochet octopus is easy to customise with colour. A sage green and cream combination gives it a soft coastal look, but you could make it in bright rainbow colours, classic ocean blue, soft baby pastels, or even a scrap-yarn style version if you have chunky yarn leftovers waiting for their moment.

For a nursery gift, try coral pink with white tips, soft lavender with cream tips, or pale blue with oatmeal-coloured feet. For a modern coastal room, sage, sand, navy, grey, and cream would all look lovely. For a cheerful kid’s bedroom, go bold with rainbow legs or mix-and-match colours.

If you love stash-busting projects, the Scrap Yarn Octopus on CraftBits is a fun no-crochet alternative, and it is a lovely reminder that octopus crafts have been charming children for years.

A Note About Toy Safety

If this octopus is intended for display, older children, teens, or adults, safety eyes give it that classic cute amigurumi look. If you are making it for a baby, toddler, or heavy-duty toy use, embroider the eyes and mouth instead.

Also make sure all legs are sewn on securely. Giant plush toys get dragged around, hugged, sat on, used as pillows, and occasionally claimed by the family dog if your house is anything like mine. Strong assembly matters.

If you are making soft toys for children, always check your yarn, stuffing, and embellishments are suitable for the age of the child. Buttons, beads, plastic eyes, and loose decorations can be choking hazards, so when in doubt, stitch the details instead.

Why This Pattern Works So Well

The best thing about this pattern is the shape. The body is built with steady increases, a straight middle section, and gradual decreases, which creates a nice rounded octopus head once it is stuffed. The legs are worked separately, which gives them more definition than trying to crochet everything in one piece.

The contrast leg tips are a sweet detail too. They add just enough visual interest without making the project complicated. It is the kind of crochet plush toy that looks impressive when finished but is still made from very familiar stitches.

If you are newer to amigurumi and want to build confidence before tackling a giant version, you may want to browse our amigurumi pattern helpers for tips and techniques. A little bit of amigurumi know-how makes the stuffing, shaping, and joining process much less mysterious.

Ideas for Using Your Giant Crochet Octopus

This giant squishy octopus would make a gorgeous handmade gift for an ocean-loving child, a fun statement piece for a nursery, or a soft reading pillow for a cosy corner. It would also be adorable in a beach house, nautical-themed bedroom, classroom reading nook, or handmade market stall display.

You could make a whole ocean family by pairing it with smaller sea-creature crochet projects, or use it as the hero piece in an under-the-sea nursery. I can also imagine this made in school colours or favourite team colours for a very quirky teenager’s room.

And yes, it is absolutely the sort of crochet project that people will pick up and squish the moment they see it. Consider yourself warned.

Pattern Notes

  • This pattern is worked mainly in single crochet.
  • The body is worked in the round.
  • The legs are made separately and joined before being sewn to the body.
  • Stuff the body firmly to help it hold its rounded shape.
  • Stuff the legs only partly so they remain soft and flexible.
  • Use a stitch marker to keep track of rounds.
  • For a child-safe version, embroider the eyes instead of using safety eyes.

Updated Leg Joining Instructions

For the first seven legs, fasten off and leave a short tail. Stuff each leg a little more than halfway, pushing the stuffing toward the foot so the top remains easier to flatten.

For the eighth leg, do not fasten off. Flatten the top opening of the leg so the stitches line up across the top. Single crochet through both layers to close the top edge. Continue by single crocheting across the flattened top of each of the remaining seven legs, joining all eight legs into one connected ring.

Slip stitch to the first stitch to form a circle. Fasten off, leaving a long tail for sewing.

Assembly Tips

Turn the octopus body upside down and centre the joined leg ring over the base of the body. Arrange the legs so four sit toward the front and four sit toward the back. Some of the back legs should sit partly behind the body so the finished octopus has a more natural shape.

Using a yarn needle and the long yarn tail, sew the leg ring securely to the body all the way around. Check that each leg is firmly attached, then weave in any loose ends.

Turn the octopus right-side up and gently shape the legs with your hands. You can pull some forward slightly, tuck some behind the body, and adjust the stuffing so the octopus sits nicely.

More Octopus and Ocean Crochet Ideas

If this giant octopus has started a whole ocean-themed crochet mood, you are not alone. There are plenty of smaller sea creature projects to try once this big fellow is finished. You might like this amigurumi octopus crochet pattern for a smaller version, or this preemie octopus crochet pattern if you are interested in tiny charity-style makes.

There is also something lovely about making ocean animals in soft yarns because they work so well for nurseries, playrooms, and handmade gifts. Sea creatures give you permission to use cheerful colours, soft textures, and slightly whimsical details without overthinking it. And really, any crochet project that makes people smile before it is even finished is already a winner in my book.

This giant squishy octopus is a wonderfully satisfying make if you love blanket yarn crochet, oversized amigurumi, or handmade gifts with a bit of personality. It is soft, cuddly, slightly ridiculous in the best possible way, and absolutely worth the stuffing explosion that will probably happen somewhere along the way.

Pop the kettle on, grab your biggest hook, and prepare to make an octopus that may very well need its own chair.

Free Giant Octopus Pattern

Giant, Squishy Octopus — Crochet Pattern
Abbreviations
• ch — chain
• sc — single crochet
• sl st — slip stitch
• inc — increase (2 single crochets in one loop)
• dec — decrease (pull yarn through loop, pull yarn through second loop, yarn over and
pull through all loops)
Materials Needed
• L (8mm) crochet hook
• Bernat Blanket yarn — 10.5 oz size (2 balls of main color, 1 ball of vintage white). You
may be able to use a smaller ball of the vintage white.
• 30mm safety eyes
• Black worsted weight yarn (for the mouth)
• Yarn needle
• Poly-fil (a full 50 oz bag was used per octopus)
Notes Before You Begin
1. If you tend to crochet with loose stitches, use a smaller crochet hook to reduce yarn
used and tighten your stitches.
2. The octopus head won’t look very round while you’re working it — stuffing it fully with
poly-fil rounds it out. Stuff extra full and push filling into shape; this also helps it keep its
shape through hugging and squishing.
3. This pattern is worked in the round, through both loops unless noted otherwise. At the
end of each row: sl st, ch 1, turn, working the next row in the opposite direction. You may
skip turning and crochet continuously in the same direction throughout if preferred.
Body
Ch 3. Sl st to first ch to create a circle. (You can use a magic circle instead, if preferred.)
Row 1: Ch 1, 10 sc inside circle. Sl st to first sc, ch 1, turn.
Row 2: *Inc in first stitch, sc in next stitch, repeat from * around. Sl st to first sc, ch 1, turn.
Row 3: *Inc in first stitch, sc in next 2 stitches, repeat from * around. Sl st to first sc, ch 1, turn.
Row 4: *Inc in first stitch, sc in next 3 stitches, repeat from * around. Sl st to first sc, ch 1, turn.
Row 5: *Inc in first stitch, sc in next 4 stitches, repeat from * around. Sl st to first sc, ch 1, turn.
Row 6: *Inc in first stitch, sc in next 5 stitches, repeat from * around. Sl st to first sc, ch 1, turn.
Row 7: *Inc in first stitch, sc in next 6 stitches, repeat from * around. Sl st to first sc, ch 1, turn.
Row 8: *Inc in first stitch, sc in next 7 stitches, repeat from * around. Sl st to first sc, ch 1, turn.
Row 9: *Inc in first stitch, sc in next 8 stitches, repeat from * around. Sl st to first sc, ch 1, turn.
Row 10: *Inc in first stitch, sc in next 9 stitches, repeat from * around. Sl st to first sc, ch 1, turn.
Row 11: *Inc in first stitch, sc in next 10 stitches, repeat from * around. Sl st to first sc, ch 1,
turn.
Row 12: *Inc in first stitch, sc in next 11 stitches, repeat from * around. Sl st to first sc, ch 1,
turn.
Row 13: *Inc in first stitch, sc in next 12 stitches, repeat from * around. Sl st to first sc, ch 1,
turn.
Row 14: *Inc in first stitch, sc in next 13 stitches, repeat from * around. Sl st to first sc, ch 1,
turn.
Row 15: *Inc in first stitch, sc in next 14 stitches, repeat from * around. Sl st to first sc, ch 1,
turn.
Row 16: *Inc in first stitch, sc in next 15 stitches, repeat from * around. Sl st to first sc, ch 1,
turn.
Row 17: *Inc in first stitch, sc in next 16 stitches, repeat from * around. Sl st to first sc, ch 1,
turn.
Row 18: *Inc in first stitch, sc in next 17 stitches, repeat from * around. Sl st to first sc, ch 1,
turn.
Row 19: *Inc in first stitch, sc in next 18 stitches, repeat from * around. Sl st to first sc, ch 1,
turn.
Rows 20–26: Sc in each stitch around. Sl st to first sc, ch 1, turn.
Row 27: *Dec in first 2 stitches, sc in next 18 stitches, repeat from * around. Sl st to first sc, ch
1, turn.
Row 28: *Dec in first 2 stitches, sc in next 17 stitches, repeat from * around. Sl st to first sc, ch
1, turn.
Row 29: *Dec in first 2 stitches, sc in next 16 stitches, repeat from * around. Sl st to first sc, ch
1, turn.
Row 30: *Dec in first 2 stitches, sc in next 15 stitches, repeat from * around. Sl st to first sc, ch
1, turn.
Row 31: *Dec in first 2 stitches, sc in next 14 stitches, repeat from * around. Sl st to first sc, ch
1, turn.
Row 32: *Dec in first 2 stitches, sc in next 13 stitches, repeat from * around. Sl st to first sc, ch
1, turn.
Row 33: *Dec in first 2 stitches, sc in next 12 stitches, repeat from * around. Sl st to first sc, ch
1, turn.
Row 34: *Dec in first 2 stitches, sc in next 11 stitches, repeat from * around. Sl st to first sc, ch
1, turn.
Row 35: *Dec in first 2 stitches, sc in next 10 stitches, repeat from * around. Sl st to first sc, ch
1, turn.
Row 36: *Dec in first 2 stitches, sc in next 9 stitches, repeat from * around. Sl st to first sc, ch 1,
turn.
Row 37: *Dec in first 2 stitches, sc in next 8 stitches, repeat from * around. Sl st to first sc, ch 1,
turn.
Row 38: *Dec in first 2 stitches, sc in next 7 stitches, repeat from * around. Sl st to first sc, ch 1,
turn.
Row 39: *Dec in first 2 stitches, sc in next 6 stitches, repeat from * around. Sl st to first sc, ch 1,
turn.
Stuff the body as full as you can, shaping it as you stuff. Position the eyes between rows 21 and
22 with 13 sc’s of space between them. Center the mouth between the eyes, sewing it on 2
rows down. Continue stuffing the body as you go.
Row 40: *Dec in first 2 stitches, sc in next 5 stitches, repeat from * around. Sl st to first sc, ch 1,
turn.
Row 41: *Dec in first 2 stitches, sc in next 4 stitches, repeat from * around. Sl st to first sc, ch 1,
turn.
Row 42: *Dec in first 2 stitches, sc in next 3 stitches, repeat from * around. Sl st to first sc, ch 1,
turn.
Row 43: *Dec in first 2 stitches, sc in next 2 stitches, repeat from * around. Sl st to first sc, ch 1,
turn.
Row 44: *Dec in first 2 stitches, sc in next stitch, repeat from * around. Sl st to first sc, ch 1, turn.
Row 45: *Dec in first 2 stitches, repeat from * around. Sl st to first sc, ch 1, turn.
If there’s still an opening at the bottom, slip stitch closed. Tie off.
Legs (make 8)
Starting with white, ch 3. Sl st to first ch to create a circle. (You can use a magic circle instead, if
preferred.)
Row 1: Ch 1, 10 sc inside circle. Sl st to first sc, ch 1, turn.
Row 2: *Inc in first stitch, sc in next stitch, repeat from * around. Sl st to first sc, ch 1, turn.
Row 3: *Inc in first stitch, sc in next 2 stitches, repeat from * around. Sl st to first sc, ch 1, turn.
Row 4: *Inc in first stitch, sc in next 3 stitches, repeat from * around. Sl st to first sc, ch 1, turn.
Row 5: *Inc in first stitch, sc in next 4 stitches, repeat from * around. Sl st to first sc, ch 1, turn.
Row 6: *Inc in first stitch, sc in next 5 stitches, repeat from * around. Sl st to first sc, ch 1, turn.
Row 7: *Dec in first 2 stitches, sc in next 5 stitches, repeat from * around. Sl st to first sc, ch 1,
turn.
Change to main color.
Rows 8–9: Sc around. Sl st to first sc, ch 1, turn.
Row 10: *Dec in first 2 stitches, sc in next 4 stitches, repeat from * around. Sl st to first sc, ch 1,
turn.
Rows 11–12: Sc around. Sl st to first sc, ch 1, turn.
Row 13: *Dec in first 2 stitches, sc in next 3 stitches, repeat from * around. Sl st to first sc, ch 1,
turn.
Rows 14–15: Sc around. Sl st to first sc, ch 1, turn.
Row 16: *Dec in first 2 stitches, sc in next 2 stitches, repeat from * around. Sl st to first sc, ch 1,
turn.
Rows 17–18: Sc around. Sl st to first sc, ch 1, turn.
For the first 7 legs, tie off. Stuff each leg a little more than halfway, pushing the stuffing toward
the foot.
With the 8th leg, instead of tying off: ch 1 and sc across the top of each leg, connecting all 8
legs together and closing the opening. Once connected, slip stitch to the first sc across the top
to form a ring. Tie off, leaving a long tail for sewing.
Assembly
4. Flip the octopus body upside down and center the leg ring on it.
5. Using a yarn needle, sew the legs to the body all the way around.
6. Flip the octopus right-side up — finished!

More Articles

Afghans, Blankets & Throws amigurumi Baby Hat Baby Patterns bags Beanies Beginner Book Reviews Christmas CHRISTMAS Clothing Crochet Patterns Crochet Techniques & Ideas Free Crochet Patterns Granny Squares Halloween Patterns Quick Scarfs shawls

Featured Posts

Hearts All Around Throw Crochet Pattern

Crocheting In Plain English

Christmas Dinner Won’t be Complete Without This

Crochet Pattern – Rainbow Flower Appliques

AMBASSADORS TO THE U.S. DEPARTMENT OF CROCHET

RSS More Articles

  • Cross Stitch Ice Cream and Frozen Treats
  • 15 Charity Sewing Projects That Let You Sew Something Useful For A Good Cause
  • Sunflower Ribbon Embroidery Tutorials and Kits to Brighten Your Hoop
  • Decorating Mistakes That Make Your Living Room Feel Cluttered
  • Remembering Jill Smokler, Founder Of Scary Mommy
  • In the Garden Layer Cake – A Bloom-Filled Fabric Collection for Spring Sewing
  • How To Do Kitchener Stitch: A Beginner-Friendly Guide To Grafting Knitting Seamlessly
  • Pattern Review: Georgie Granny Square Bucket Hat Crochet Pattern
  • 12 Handmade Patriotic 4th of July Card Ideas
  • Shark Week Learning for Kids

Pick Your Blog

  • Sewing
  • Knitting
  • Quilting
  • Crochet
  • Home & Garden
  • Recycled Crafts
  • Scrapbooking
  • Card Making
  • Polymer Clay
  • Cross-Stitch
  • Edible Crafts
  • Felting
  • Glass Art
  • Indie Crafts
  • Kids Crafts
  • Jewelry Making
  • Lesson Plans
  • Needlework
  • Bath & Body
  • Party Ideas
  • Candle Making
  • DIY Weddings
  • Not Craft
  • Free Craft Projects

Copyright © 2026 · CraftGossip | Start Here | Contact Us | Link to Us | Your Editors | Privacy and affiliate policy