If you’ve ever looked at a hexagon cardigan and thought, “That can’t possibly turn into a sweater,” you’re definitely not alone. It looks a little odd while you’re making it, it can go a bit wavy, and then somehow, like crochet magic, it folds into a cardigan shape. That part is actually normal in hexi-cardigan construction.
Editor’s Note
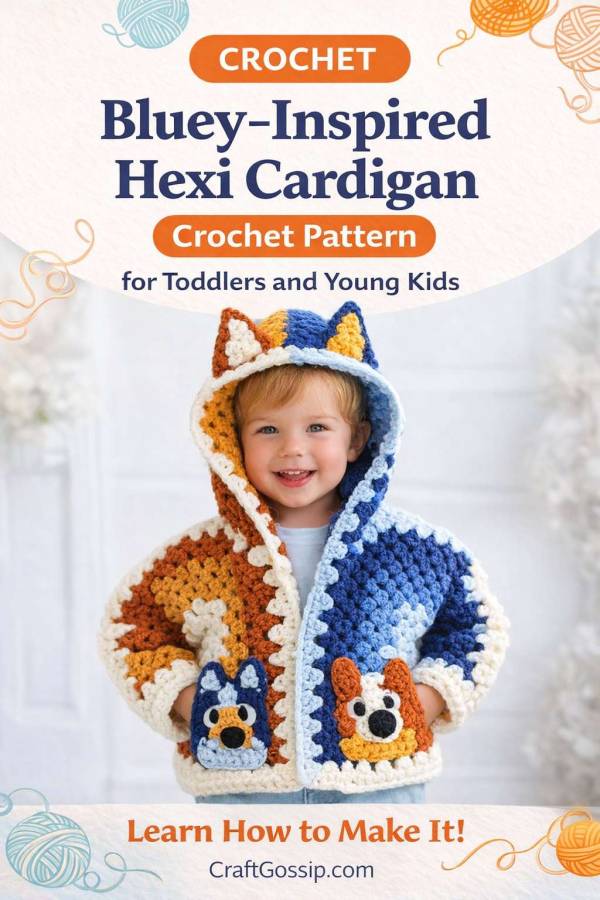
Editor’s Note: This is an adjustable hexagon cardigan recipe rather than a fully graded size-by-size garment pattern. For best results, check the fit as you go by folding each hexagon into shape and comparing it to a cardigan that already fits the child.You can find the pattern for the Bluey Granny Square pockets here.
What Size Is This Cardigan?
This is best treated as an adjustable toddler-to-young-kids cardigan rather than a tightly graded commercial pattern.
For the sample shown, think roughly toddler/preschool size, with the fit adjusted by making the hexagons larger or smaller before seaming.
The Bluey and Rusty square pockets for this pattern can be found here.
Materials
- DK or light aran yarn in Bluey-inspired shades:
- cream
- tan
- mustard
- rust
- light blue
- medium blue
- navy
- Small amounts of black and white for facial details
- 4.5 mm crochet hook for the main cardigan
- 3.5 mm crochet hook for cuffs and edging
- Tapestry needle
- Stitch markers
- Scissors
- Optional buttons if you want a front closure
A good stitch marker habit will save you a lot of muttering here, especially when you’re tracking the corners and remembering which panel is the Bluey side and which one is the Bingo side.
Crochet Terms
US terms
Abbreviations
- ch = chain
- sl st = slip stitch
- sc = single crochet
- dc = double crochet
- sdc = spike double crochet
- blo = back loop only
- sp = space
Pattern Notes
- Ch 3 counts as a dc unless stated otherwise.
- Each hexagon has 6 corners.
- The center stitch of each side group is worked as a spike dc into the corresponding stitch two rounds below.
- The hexagons may look slightly ruffled or wavy as they grow. That is normal for this construction style.
- Always check sizing after the hexagon is folded into an L-shape, not just while it is lying flat.
Construction Overview
You will:
- Crochet 2 hexagons
- Fold each hexagon into an L-shape
- Seam the shoulder/sleeve edge on each one
- Join the two halves at center back
- Add body length
- Add sleeves
- Add cuffs
- Work the hood from the finished neckline
- Seam the hood
- Add ears, patches, and border
Hexagon Panels
Make 2
Round 1
Make a magic ring.
Ch 3, 2 dc, ch 1, 3 dc, ch 1 five more times.
Join with a sl st to the top of the beginning ch 3.
Round 2
Sl st into the first corner space.
In that corner work:
3 dc, ch 1, 3 dc
Repeat 3 dc, ch 1, 3 dc in each corner around.
Join with sl st and move into the next corner.
Round 3
In the first corner work:
3 dc, ch 1, 3 dc
In the side gap between corners work:
dc, sdc, dc
Repeat around, placing:
- 3 dc, ch 1, 3 dc in each corner
- dc, sdc, dc in each side gap
Join with sl st.
Round 4 and Beyond
Repeat Round 3.
Each new round adds another side group between the corners.
Continue until the folded hexagon is the right size for the child.
Sizing the Hexagons Properly
This is where a lot of people come unstuck. The better approach is to fold the hexagon into shape and check the fit that way.
To size your hexagon:
- fold the panel into an L-shape
- check the body width across the folded section
- check the sleeve opening
- hold it against the child or compare it to a cardigan that already fits well
Bigger hexagons also create larger armholes, so sometimes the smarter move is to stop when the shoulder and underarm feel right, then add body length later rather than making the hexagon endlessly larger.
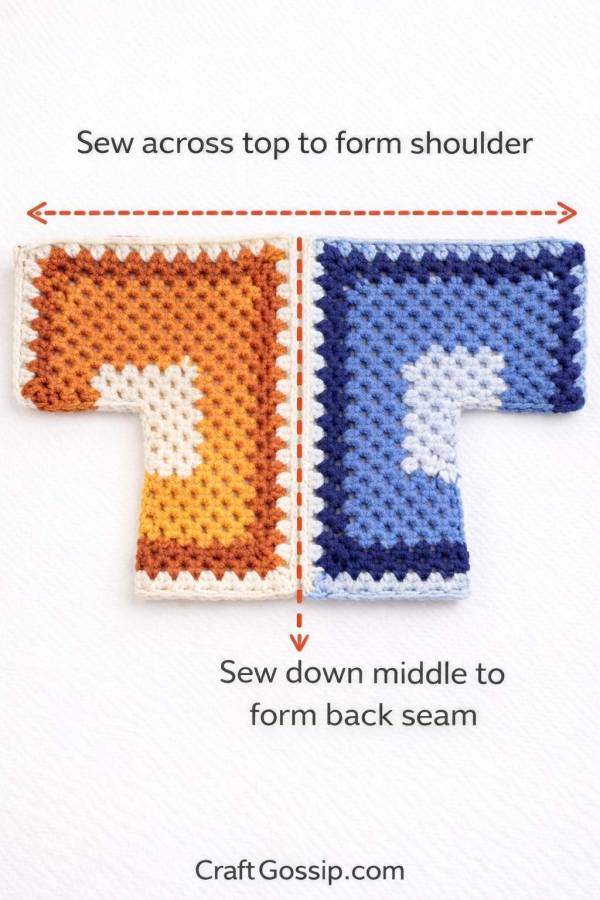
How to Fold the Hexagons
Lay one hexagon flat.
Fold it so two sides meet and the shape becomes an L. This folded shape creates the sleeve, shoulder, and body sections.
Repeat with the second hexagon.
This is the step that absolutely needs to be clear before you start seaming anything.
Which Hexagon Goes Where?
To make the cardigan read properly as Bluey and Bingo:
- Left front / wearer’s left side: Bluey hexagon
- Right front / wearer’s right side: Bingo hexagon
When the cardigan is laid flat facing you, Bluey should sit on the left half and Bingo on the right half so the two colors meet in the middle.
Before seaming, place both folded hexagons beside each other and check that:
- the cool blue shades face outward on the Bluey side
- the warm orange/tan shades face outward on the Bingo side
- the cream border will visually frame both sides once joined
This part is important, because if the colors are added in the wrong positions, the cardigan can still work structurally but won’t read as the dogs once folded and seamed.
Shoulder / Sleeve Seam
With each hexagon folded into an L-shape, seam the upper sleeve/shoulder edge on each piece.
Use slip stitch, whip stitch, or mattress stitch.
Only seam the edge that forms the upper sleeve and shoulder. Leave the front opening and lower body edges unjoined.
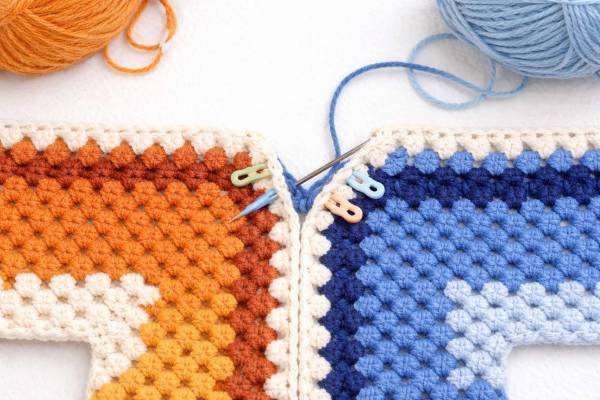
Join the Cardigan Halves
Place the two folded pieces side by side with the fronts facing outward.
Line up the back edges and seam them together to form the center back.
Leave enough opening at the neckline for a comfortable fit.
When you later work body extension rows along the bottom edge, the joined center back becomes part of the stitch path.
Add Body Length
Attach yarn at one lower front edge.
Work back and forth in rows across the lower body edge using the same side pattern:
dc, sdc, dc in each side gap across
Continue until the cardigan reaches the desired body length.
This is a much better way to lengthen the cardigan than trying to keep making the hexagons larger and larger. It preserves the shoulder and sleeve proportions more cleanly.
Add Sleeves
Join yarn at the sleeve opening.
Work in rounds using:
dc, sdc, dc in each gap around
If the underarm area needs smoothing, add one extra group there.
Continue until the sleeve is the desired length.
Ribbed Cuffs
Switch to the smaller hook.
Ch 7.
Row 1
Sc in 2nd ch from hook and across.
Sl st into the next 2 sts on the sleeve edge.
Row 2
Ch 1, turn, sc in blo across.
Row 3
Ch 1, turn, sc in blo across, sl st into next 2 sleeve-edge sts.
Repeat Rows 2 and 3 until the cuff fits around the wrist, then seam the cuff closed.
Hood
The hood is worked directly from the finished neckline opening rather than from a guessed starting chain. This gives a much better fit and makes it easier to adjust for different toddler and young child sizes.
Once the cardigan body has been assembled and the sleeves and cuffs are complete, lay the cardigan flat with the right side facing up. The hood will be worked back and forth across the neckline opening.
Step 1: Mark the Hood Starting Points
Place a stitch marker at each front neckline edge where you want the hood to begin.
For most toddler and preschool sizes, the hood should run from one front neckline edge, around the back neck, to the opposite front neckline edge. If you want a slightly deeper hood that sits further forward, begin a little lower on each front edge.
Step 2: Join Yarn and Work Across the Neckline
With the right side facing, join yarn at one neckline edge.
Work evenly across the neckline opening in dc.
Try to keep the stitches evenly spaced so the hood sits nicely against the neck. In larger spaces, you may need to place 2 dc. In tighter sections, 1 dc may be enough. The goal is a smooth neckline edge without pulling or flaring.
At the end of the row, count your stitches and make a note of the total so the following rows stay consistent.
Step 3: Build the Hood Rectangle
Turn.
Ch 3, then work 1 dc in each stitch across.
Turn and repeat this row until the hood reaches the desired height.
For a toddler or preschool size, this will usually take around 8 to 12 rows, depending on yarn, hook size, and how roomy you want the hood to be.
A simple way to check:
- fold the hood section upward
- see whether it comfortably reaches over the top of the child’s head
- add more rows if you want a deeper hood
If you prefer a slightly more fitted hood, stop once it just reaches the crown. If you want a roomier hood, continue for another row or two.
Step 4: Check the Shape Before Seaming
Before sewing the hood closed, fold it in half so the top edges meet.
Check that:
- the depth looks balanced
- the front edges sit evenly
- the hood does not feel too shallow
If it seems too short, add another row or two.
If it feels too deep and floppy, remove a row before seaming.
This step is worth doing before you grab the needle, because it is much easier to tweak now than after everything is stitched together.
Step 5: Seam the Top of the Hood
Fold the hood with right sides together.
Use whip stitch, slip stitch, or mattress stitch to seam across the top edge from front to back.
Fasten off and weave in the ends neatly.
Once turned right side out, the seamed top creates the finished hood shape.
Step 6: Add Hood Edging
To tidy the opening, join yarn at one front edge of the hood opening and work an even round of sc around the hood opening and down both front bands of the cardigan.
This helps smooth the edges and gives the cardigan a cleaner, more finished look.
If you are adding buttons, this is a good stage to decide whether you want a plain front edge or a slightly wider band.
Hood Variation: No Hood Option
If you want to make this cardigan without a hood, simply skip the hood steps and work an even edging around the full neckline instead.
You can use:
- 1 round of sc for a simple finish, or
- 2 to 3 rows of sc or hdc for a slightly more polished band
That gives you an easy no-hood variation while keeping the cardigan shape exactly the same.
Round-by-Round Color Layout
This is the part that makes the cardigan read as Bluey and Bingo rather than just “two colorful hexagons.”
You can keep the shaping the same on both panels and change only the color placement.
Bluey Hexagon
Wearer’s left side
Suggested round layout:
- Round 1: medium blue
- Round 2: medium blue
- Round 3: light blue on upper sections, medium blue on lower sections
- Round 4: navy added toward the outer edge on one side
- Round 5: light blue and medium blue split sections
- Round 6+: continue placing navy on the ear/upper outer zone, medium blue through the main body area, and lighter blue where you want the face/chest contrast
Bingo Hexagon
Wearer’s right side
Suggested round layout:
- Round 1: mustard
- Round 2: mustard
- Round 3: tan and mustard split sections
- Round 4: rust added toward the upper outer area
- Round 5: cream or pale tan introduced in the tummy/chest zone
- Round 6+: continue placing rust in the ear/outer upper area, tan through the main body area, and cream in the face/chest contrast sections
Because these are character-inspired panels rather than plain striped hexagons, you do not need every round to be one single solid color. You can change yarn within a round to create the placement zones. Use stitch markers to keep track of where the face side, tummy side, and ear side are supposed to land once folded.
Where to Place the Face Patches and Tummy Patches
This is where the visual planning really matters.
Face Patches
Place the lighter face patch area on the front-facing section of each folded hexagon, close to where the cardigan fronts meet. That way, when both halves are laid flat, the lighter face areas sit near the center opening and read more like the dogs’ faces.
For Bluey:
- use a light blue or cream-blue mix near the center front upper area
For Bingo:
- use cream or pale tan near the center front upper area
Tummy Patches
Place the lighter tummy or chest patches lower down on the front body section, again closer to the inner front edge than the outer sleeve edge.
That gives you:
- darker outer zones toward the sleeves and shoulders
- lighter face and tummy zones toward the center front
That placement matches the visual logic in the sample images much better than scattering the color changes randomly.
How to Keep the Character Layout Looking Right After Folding
This is the bit that often trips people up.
Before seaming:
- lay each hexagon flat
- mark the top outer edge, center front edge, and lower front/body section with stitch markers
- decide where the ear, face, and tummy colors belong after folding
- only then start assigning color blocks
A good rule of thumb:
- outer upper area = darker ear/head color
- inner upper area = lighter face patch
- inner lower area = tummy/chest patch
- outer lower area = body color
Once you fold the hexagon into its L-shape, check that:
- the ear color lands toward the hood/shoulder area
- the lighter face patch lands toward the center front
- the tummy patch sits on the lower front body section
That part is important, because if the colors go in the wrong spots, the cardigan may still fit, but it won’t actually read as Bluey and Bingo.
Optional Bluey-Style Ears
Make 4 pieces total: 2 outer ears and 2 inner ears
Outer Ear
Ch 2.
Row 1: 2 sc in 2nd ch from hook
Row 2: Ch 1, turn, 2 sc in first st, sc in last st
Row 3: Ch 1, turn, sc across
Row 4: Ch 1, turn, 2 sc in first st, sc across to last st, 2 sc in last st
Row 5: Ch 1, turn, sc across
Row 6: Ch 1, turn, 2 sc in first st, sc across to last st, 2 sc in last st
Fasten off.
Inner Ear
Work the same shape, but make it 1–2 rows smaller.
Sew the inner ear onto the outer ear, pinch the base slightly, and sew to the hood.
Make one blue-toned pair and one orange-toned pair to match the two cardigan sides.
Eyes and Nose
If you want to lean into the character look, sew on small safety-style crochet details using yarn:
- white and black circles for eyes
- a small oval or rounded patch for the nose
Keep these quite small and place them only after the cardigan is fully assembled, laid flat, and checked for symmetry.
Final Edging
Work an even round of sc or a simple granny-style edge around the fronts, hem, and hood opening.
A cream border works especially well because it frames both the Bluey and Bingo halves and ties the cardigan together visually.
A Few Helpful Notes Before You Start
This is one of those projects where a little planning saves a lot of frogging.
Take the time to:
- fold the hexagon before deciding color placement
- mark the face, tummy, and ear zones
- double-check left and right panel placement before seaming
- work the hood from the actual neckline, not from a guess
Every crocheter I know has had at least one moment where a “quick little color change” turned into an hour of pulling stitches back while side-eyeing the yarn pile. No judgment here. If you want this to feel less frustrating and more fun, the trick is to slow down during the planning stage. Once the panels are folded and the placement makes sense, the rest comes together much more smoothly.