If you’ve ever looked at a crochet hexagon cardigan and wondered how on earth a slightly wobbly granny-style hexagon is supposed to turn into something wearable, you’re in good company.
This is one of those crochet projects that looks rather suspicious halfway through. Your hexagon won’t lie flat, the corners seem to be going in six different directions and you may have a brief moment where you wonder whether you’re making a cardigan or some sort of colourful yarn satellite dish.
Keep going.
The magic happens when you fold it.
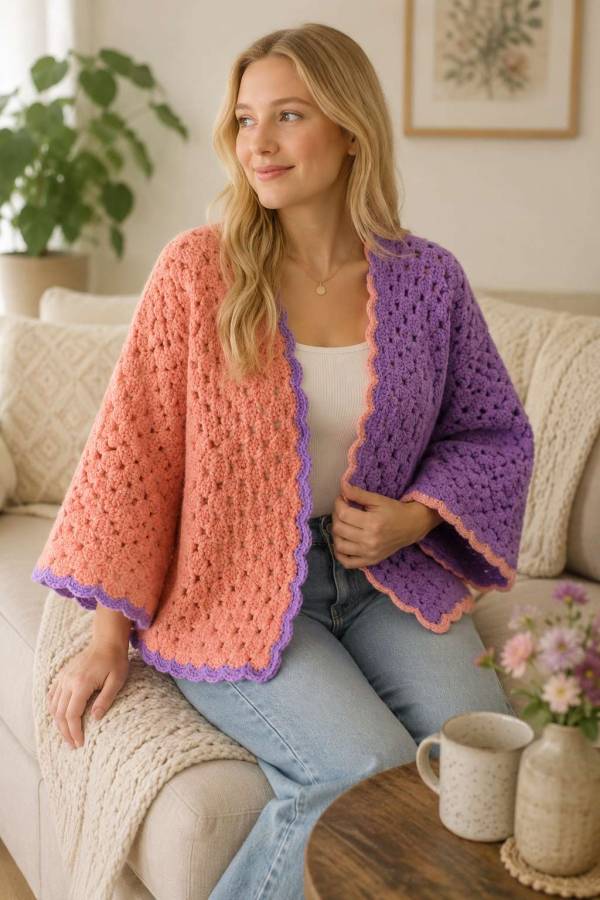
Two granny hexagons are folded into mirrored L-shapes, seamed across the sleeves and joined at the centre back to create a wonderfully relaxed crochet cardigan. It’s surprisingly simple once you understand the construction, which makes this a lovely first crochet garment for anyone who already knows basic double crochet.
I’ve written the instructions below with extra attention to the round starts, corner placement, stitch counts and fitting, because these are the places where hexagon cardigan patterns can become confusing very quickly.
Important sizing note: This is an adjustable crochet cardigan recipe rather than a fully graded size-by-size garment pattern. Your yarn, hook, tension and preferred fit will all affect the finished size, so fold and check your hexagons regularly rather than relying entirely on a particular number of rounds.
The granny hexagon cardigan construction has been around for years and there are many versions of it. This tutorial was inspired in part by HayHay Crochet’s popular Easy Crochet Granny Hexagon Cardigan tutorial, with the instructions here clarified to make the construction and fitting process easier to follow. See the original HayHay Crochet tutorial here
Skill Level
Easy / confident beginner
You should be comfortable with:
- Chain stitches
- Slip stitches
- Double crochet
- Working into chain spaces
- Joining rounds
- Basic sewing or crochet seaming
If you can make a traditional granny square, you can absolutely tackle this.
Materials
- Worsted / Medium 4 weight yarn
- 5 mm crochet hook
- Scissors
- Yarn or darning needle
- Stitch markers
For a roomy adult cardigan, you may need around six standard skeins, depending on the yardage of the yarn, your size and how oversized you want the finished cardigan.
This is one of those projects where checking yardage rather than simply counting skeins will save you grief. One brand’s skein can be very different from another.
Choose a reasonably soft worsted-weight yarn with some drape. A very stiff yarn can make the finished cardigan feel bulky rather than relaxed.
And yes, this is absolutely the sort of project where buying one extra ball “just in case” is preferable to discovering you are twelve inches from finishing the second sleeve and the colour has disappeared from every shop within driving distance.
Gauge
Approximately:
4 inches = 4 double crochet clusters wide x 4 cluster rows tall
Gauge isn’t as rigid here as it would be for a fitted sweater, but it still matters.
If your clusters are much larger or smaller than this, don’t expect a particular round count to produce the same finished measurements.
Crochet Abbreviations – US Terms
MR – magic ring
st/sts – stitch/stitches
ch – chain
sc – single crochet
sl st – slip stitch
dc – double crochet
sp – space
rep – repeat
Cluster
For this pattern, a cluster means:
3 dc worked into the same chain space
Scallop Stitch
Skip 1 st, 5 dc in next st, skip 1 st, sl st in next st.
The scallop repeat uses 4 stitches.
Pattern Notes
- Make 2 granny hexagons.
- The beginning ch 3 counts as the first dc.
- Turn your work after completing each round.
- From Round 2 onward, the granny clusters are worked into chain spaces rather than individual dc stitches.
- Every hexagon must have 6 corners.
- Each corner is worked as 3 dc, ch 3, 3 dc into the same corner space.
- Work ch 1 between granny clusters along the sides.
- The hexagon will become increasingly wavy or ruffled as it grows. This is normal.
- Do not judge the size while the hexagon is lying flat. Fold it into its cardigan shape before checking the fit.
How the Granny Hexagon Grows
Here’s a handy little stitch-count check.
Round 1: 6 clusters
Round 2: 12 clusters
Round 3: 18 clusters
Round 4: 24 clusters
Every new round adds another 6 clusters.
If your count doesn’t follow that pattern, stop and check your corners before continuing. Finding an accidental seventh corner at Round 4 is annoying. Finding it at Round 18 involves significantly more muttering.
Granny Hexagon Cardigan Pattern
Make 2 Hexagons
Round 1
Make a magic ring.
Ch 3. The ch 3 counts as your first dc.
Work 2 dc into the magic ring, ch 3.
[Work 3 dc into the ring, ch 3] 5 times.
Join with a sl st to the top of the beginning ch 3.
You should now have:
6 clusters and 6 ch-3 corner spaces.
Pull the magic ring closed.
Round 2
Turn your work.
Sl st across the next 2 dc and into the next ch-3 corner space.
Ch 3, 2 dc into the same corner space, ch 3, 3 dc into the same corner space.
This creates your first corner.
*Ch 1. Work (3 dc, ch 3, 3 dc) into the next ch-3 corner space.*
Repeat from * to * around until all 6 corners have been worked.
Ch 1 and join with a sl st to the top of the beginning ch 3.
Count: 12 clusters.
You will also have 6 ch-1 side spaces between the corners.
Round 3
Turn your work.
Sl st across the next 2 dc and into the next ch-3 corner space.
Ch 3, 2 dc, ch 3, 3 dc into the same corner space.
*Ch 1, work 3 dc into the next ch-1 side space, ch 1, then work (3 dc, ch 3, 3 dc) into the next ch-3 corner space.*
Repeat from * to * until you have worked the next 5 corners.
Ch 1, work 3 dc into the final ch-1 side space, ch 1.
Join with a sl st to the top of the beginning ch 3.
Count: 18 clusters.
Round 4 and Beyond
Continue in the established granny hexagon pattern.
At every ch-3 corner space, work:
3 dc, ch 3, 3 dc
At every ch-1 side space, work:
3 dc
Work ch 1 between every cluster or corner group.
Turn after every round.
As the hexagon grows, you will have more side spaces between each of the six corners.
Continue until the folded hexagon reaches the size you need.
How Many Rounds Should I Crochet?
This is probably the question everyone wants answered, and unfortunately it is also the one where a simple “20 rounds equals size large” can get you into trouble.
Different yarns and different crocheters produce very different-sized hexagons.
Instead, after every few rounds:
- Lay your hexagon down.
- Fold it into an L-shape.
- Compare it against the wearer or against a cardigan that already fits.
- Check the sleeve length.
- Check the armhole depth.
- Check the body width.
The adult cardigans in the version that inspired this tutorial were worked to around 20–21 rounds, but treat that only as a rough reference—not a size chart.
Adding another complete round doesn’t just make the body wider.
It also makes the:
- Sleeves longer
- Sleeves wider
- Armholes deeper
- Body longer
- Body wider
That’s why I strongly recommend trying the folded shape as you go.
If your sleeves are already long enough but you need extra body length, stop increasing the entire hexagon. Additional granny-stitch rows can be added to the body later without continuing to enlarge the sleeves.
How to Fold a Crochet Hexagon Cardigan
This is the wonderfully satisfying part.
Place one completed hexagon in front of you.
Bring two adjacent sides together and fold the hexagon so that it forms an L-shape.
Suddenly you’ll be able to see:
- Half of the cardigan body
- One sleeve
- The shoulder
- The front opening
- Half of the back
Repeat with the second hexagon, making sure it forms a mirror image of the first.
Before sewing anything, place both folded pieces next to each other.
If they don’t look like two halves of a cardigan at this stage, don’t seam them yet.
Refold them.
This sounds obvious, but crochet confidence has convinced plenty of us to sew two things together first and ask questions later.
Seam the Sleeves and Shoulders
Work on each folded hexagon separately.
Line up the two upper edges that form the top of the sleeve and shoulder.
Using your yarn needle and a mattress stitch or whip stitch, seam from the cuff edge towards the body.
Repeat on the second hexagon.
Only seam the upper sleeve/shoulder edge.
Leave the front opening and lower body edges open.
Join the Centre Back
Place your two completed L-shaped halves beside one another with the fronts facing the same direction.
Line up the two centre-back edges.
Using your preferred seaming method, join the centre-back edges together from the lower back hem up towards the neckline.
The centre-back seam should be joined securely.
The cardigan’s neckline and front opening are created by the edges that remain open at the front—not by leaving a large gap in the centre-back seam.
Give the cardigan a gentle shake and try it on.
At this point it should finally look like a cardigan rather than two confused granny hexagons.
Adjusting the Length
If the overall fit is good but you’d like a longer cardigan, you don’t necessarily need to add more full hexagon rounds.
Attach your yarn along the lower body edge and work additional granny-stitch rows back and forth.
This lets you create:
- A cropped cardigan
- Hip-length cardigan
- Longer oversized cardigan
- Coat-style hexi cardigan
without making the sleeves increasingly enormous.
It’s one of the easiest ways to customise a granny hexagon cardigan once you’ve understood the basic construction.
Optional Scallop Border
You can leave your cardigan with its simple granny edge, add ribbing or finish it with this pretty scalloped border.
I particularly like the scallops on an oversized cardigan because they soften all those straight granny-stitch edges.
Scallop Border – Round 1
Attach yarn anywhere around the outer cardigan opening.
Ch 1.
Work an even round of sc around the neckline, front edges and lower edge.
As a starting point, work:
- Approximately 3 sc across each 3-dc cluster
- 1 sc in each ch-1 space
- 4 sc into prominent outer corner spaces where you need the edging to turn neatly
The important thing here is that your sc edging sits flat.
If it starts ruffling, you have too many stitches.
If it starts pulling the cardigan inward, you need a few more.
Join with a sl st to the first sc.
Because the scallop pattern uses a 4-stitch repeat, check your stitch count before beginning Round 2. If necessary, discreetly add or remove a stitch or two near the back neckline to make the repeat fit.
Scallop Border – Round 2
Ch 1.
Sl st into the same stitch.
*Skip 1 st, work 5 dc into the next st, skip 1 st, sl st into the next st.*
Repeat from * to * around.
Join and fasten off.
Optional Scalloped Sleeves
You can use exactly the same border around each sleeve opening.
First work an even round of sc.
Then work:
*Skip 1 st, 5 dc in next st, skip 1 st, sl st in next st.*
Repeat around.
Alternatively, add a simple single crochet border or crocheted ribbing if scallops aren’t your thing.
Finishing Your Hexagon Cardigan
Weave in all your yarn ends securely.
Check the seams and reinforce any areas that will take extra strain, particularly underneath the arms.
A gentle block can help relax the granny stitches and improve the drape.
Don’t try to aggressively block the original hexagons completely flat before assembly. The waviness is part of the construction.
Once the cardigan is assembled, blocking the finished garment is much more useful.
Want to Make Another Hexi Cardigan?
Once you understand the basic granny hexagon cardigan construction, it becomes dangerously tempting to start playing with colours.
And by “dangerously tempting”, I mean you may suddenly discover that the six random balls of yarn you’ve been keeping for absolutely no reason actually have a reason.
For a playful character version, have a look at our Bluey-inspired Blue Heeler Hexi Cardigan crochet pattern. It uses the same clever folded-hexagon idea but turns it into a colourful children’s cardigan.
If you’d prefer a pattern with a much broader graded size range, the Hexi Honey Bunny Solid Cardigan pattern is another option to explore, with sizing from XS through 5XL.
And if you’ve decided you’ve had quite enough hexagons for one day but still fancy a cosy granny-style wearable, this easy granny stitch cardigan crochet pattern is another lovely option.
A Few Tips Before You Start
My biggest advice with any crochet hexagon cardigan is fold early and fold often.
Don’t crochet twenty rounds, fasten off, weave in every end and only then discover that your sleeve opening could comfortably accommodate a small Labrador.
Fold the hexagon after several rounds.
Fold it again later.
Hold it against yourself.
Compare it with a favourite cardigan.
Use stitch markers to identify the sleeve, front, back and hem edges if you’re still getting your head around the construction.
Once the folding trick clicks, the entire project suddenly makes sense.
And that’s really why granny hexagon cardigans have remained so popular. They’re repetitive enough for an evening on the couch, forgiving enough for adventurous beginners and wonderfully easy to personalise with stripes, stash yarn, scallops, cuffs and extra length.
Two slightly unruly crochet hexagons really can turn into a cardigan.
Crochet is clever like that.