There are crochet blankets, and then there are crochet blankets that make everyone stop scrolling and ask, “Wait…how does that work?”
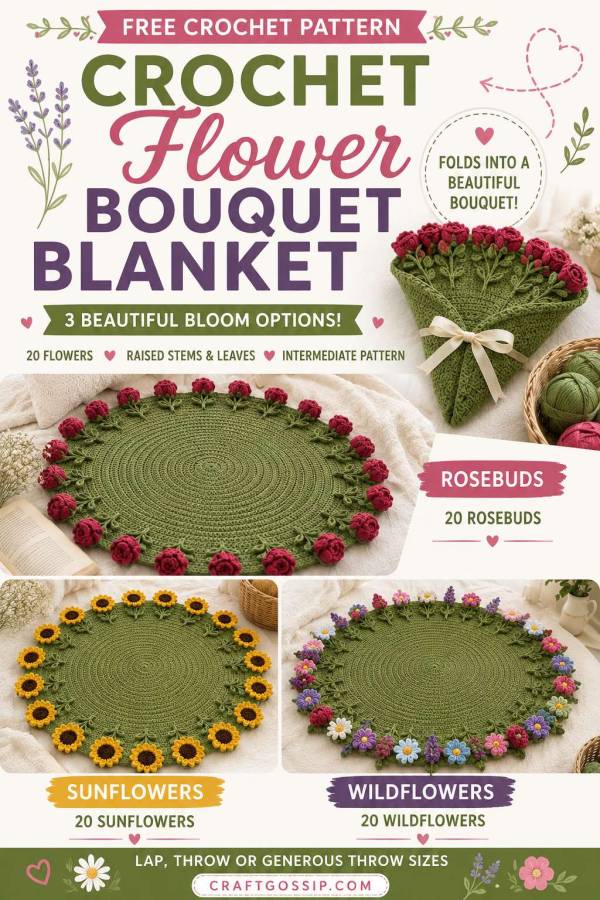
This crochet flower bouquet blanket begins as a generous circular blanket edged with raised crochet flowers. Fold the circle in half, gather the flowered edge and tie it with a ribbon, and the blanket transforms into a handmade bouquet.
It is wonderfully clever without requiring any complicated construction or sewing dozens of separate stems onto the finished blanket. The flowers are worked directly into anchor loops around the border, which means they stay attached when the blanket is opened, folded, carried or displayed.
I have included three flower-border options:
- A romantic red rosebud bouquet
- A cheerful sunflower bouquet
- A cottage-garden wildflower bouquet with rosebuds, daisies, puff flowers and lavender sprigs
You can crochet the entire border in one flower style or mix the modules together. I rather like the wildflower version because it gives you permission to rummage through the yarn leftovers and call the resulting colour chaos “botanical styling.” We crafters have been doing that with our stashes for years.
This project uses a circular half-double-crochet base, raised leaf and stem details, and dimensional flower motifs. It is best suited to a confident crocheter who is comfortable counting rounds and working simple post stitches.
Those still finding their feet with written abbreviations may find our guide to reading crochet patterns helpful before starting.
What Makes This Crochet Bouquet Blanket Different?
The blanket is worked as a flat circle from the centre outward. Along the final edge, evenly spaced anchor loops hold the flower motifs.
When the blanket is folded in half, the curved flowered border is gathered upward. This brings the flowers together into a bouquet while the folded green blanket forms the pointed wrapping underneath.
Unlike mockups that show enormous bunches containing fifty or sixty flowers, the pattern uses a controlled number of flower positions:
- Lap blanket: 16 flower motifs
- Throw blanket: 20 flower motifs
- Generous throw: 24 flower motifs
The flowers look fuller when gathered because the entire border is brought together at the top.
The throw-size version shown in our pattern-accurate mockups uses 20 flower positions.
Finished Sizes
Measurements are taken across the circular base before the flower border is added.
| Size | Base diameter | Final base round | Flower positions |
| Lap blanket | 32 inches | Round 32 | 16 |
| Throw blanket | 40 inches | Round 40 | 20 |
| Generous throw | 48 inches | Round 48 | 24 |
The flower border adds approximately 4–6 inches to the finished diameter, depending on the flower module and your tension.
Materials
Yarn
Use worsted-weight yarn, also known as weight 4 or 10-ply yarn.
Main colour for the blanket, stems and leaves:
- Lap blanket: approximately 900 yards
- Throw blanket: approximately 1,150 yards
- Generous throw: approximately 1,400 yards
A medium sage, olive or leafy green works particularly well because the folded blanket looks like the wrapping and foliage of a bouquet.
Flower colours:
Allow approximately 300–500 yards in total, depending on the blanket size and flower style.
For the individual versions, you will need:
Rosebud border
- Deep red, berry, dusty rose or pink yarn
- Optional second shade for fuller outer petals
Sunflower border
- Golden yellow yarn
- Dark brown yarn for centres
Wildflower border
Choose three to six coordinating shades, such as:
- Blush pink
- Peach
- Cream
- Butter yellow
- Lavender
- Soft purple
- Pale blue
This is a lovely project for using coordinated yarn remnants, provided they are all a similar weight and fibre. For a large blanket, however, I would still buy the green yarn in one dye lot. Nothing tests a crocheter’s emotional stability quite like discovering that “sage green” has quietly become “slightly annoyed avocado” halfway around the blanket.
A smooth worsted-weight yarn will show the flowers and raised leaves clearly. Mary Maxim, Amazon and specialist yarn shops usually have useful multipacks when you need several floral shades without buying full-size balls of every colour.
Tools
- 5.5 mm crochet hook, or size needed to obtain gauge
- Stitch markers
- Tapestry needle
- Scissors
- Blocking mats and rustproof pins
- Ribbon, cotton tape or soft twine for tying the bouquet
Gauge
Approximately:
12 half double crochet stitches and 8 rounds = 4 inches
Gauge is not critical in the way it would be for a fitted garment, but it will affect the final size and the amount of yarn required.
A relaxed, even tension is more important than hitting the measurement perfectly.
Abbreviations
- ch: chain
- sc: single crochet
- hdc: half double crochet
- dc: double crochet
- tr: treble crochet
- sl st: slip stitch
- sp: space
- st/sts: stitch/stitches
- rnd/rnds: round/rounds
- rep: repeat
- MR: magic ring
- PM: place marker
- hdc-inc: work 2 hdc in the same stitch
- FPtr: front post treble crochet
Special Stitches
Four-Double-Crochet Popcorn
Work 4 dc in the indicated stitch or space.
Remove the hook from the working loop. Insert the hook from front to back through the top of the first dc, catch the dropped loop and pull it through.
Ch 1 to close the popcorn.
Three-Double-Crochet Popcorn
Work 3 dc in the indicated stitch or space.
Remove the hook from the working loop. Insert the hook through the first dc, catch the dropped loop and pull it through.
Ch 1 to close.
Puff Stitch
Yarn over and insert the hook into the indicated space. Pull up a loop.
Repeat this action four more times in the same space. Yarn over and draw through all loops on the hook.
Ch 1 to close.
Picot
Ch 3, then sl st into the first of those 3 chains.
Crochet Flower Bouquet Blanket Pattern
Circular Blanket Base
The base is worked in continuous spiral rounds.
Do not join or turn unless instructed. Place a marker in the first stitch of each round and move it upward as you work.
With the main green yarn, make a magic ring.
Round 1: Ch 2; the turning chain does not count as a stitch. Work 10 hdc into the ring. Place a marker in the first hdc. (10 hdc)
Round 2: Work 2 hdc in every stitch around. (20 hdc)
Round 3: *Hdc-inc in the next stitch, hdc in the next stitch; repeat from * around. (30 hdc)
Round 4: *Hdc-inc in the next stitch, hdc in each of the next 2 stitches; repeat from * around. (40 hdc)
Round 5: *Hdc-inc in the next stitch, hdc in each of the next 3 stitches; repeat from * around. (50 hdc)
Continue in the same manner, adding one additional plain hdc between increases on every round.
Each completed round adds 10 stitches.
Continue until the blanket reaches the chosen size:
- Lap blanket: Finish after Round 32. (320 hdc)
- Throw blanket: Finish after Round 40. (400 hdc)
- Generous throw: Finish after Round 48. (480 hdc)
At the end of the final round, sl st into the first stitch of the round.
Do not fasten off.
Keeping the Circle Flat
Lay the blanket down every five or six rounds and check its shape.
If the edge begins to ruffle, your tension may be loose. Try a smaller hook or work one round without increases before continuing.
If the circle begins to cup, your tension may be tight. Move up a hook size or add an evenly spaced increase round.
Natural fibres and different yarn brands behave differently, so trust the fabric in front of you rather than blindly battling onward. Crochet is meant to be relaxing, not a forty-round argument with a green dinner plate.
Edge Setup Round
Ch 1.
Work 1 sc in every stitch around.
Join with a sl st to the first sc.
The stitch count remains:
- Lap: 320 sc
- Throw: 400 sc
- Generous throw: 480 sc
Stem, Leaf and Flower-Anchor Round
This round creates one anchor position for every 20 stitches.
At each anchor position, you will make:
- One ch-5 loop for the flower
- Two small leaf picots
- One raised central stem
Work as follows:
* Sc in the next stitch.
Ch 5 and sl st into the same stitch to form the flower anchor loop.
Ch 3 and sl st into the same stitch to form the first leaf picot.
Ch 3 and sl st into the same stitch to form the second leaf picot.
Work 1 FPtr around the post of the stitch located two rounds directly below.
Ch 2 and sl st into the top of the FPtr to finish the raised stem.
Sc in each of the next 19 stitches.
Repeat from * around.
Join with a sl st if necessary. Fasten off the green yarn and weave in the end.
You should now have:
- 16 anchor loops for the lap size
- 20 anchor loops for the throw size
- 24 anchor loops for the generous throw
Pattern check: The repeat uses one decorated anchor stitch plus 19 plain stitches, making a complete 20-stitch repeat.
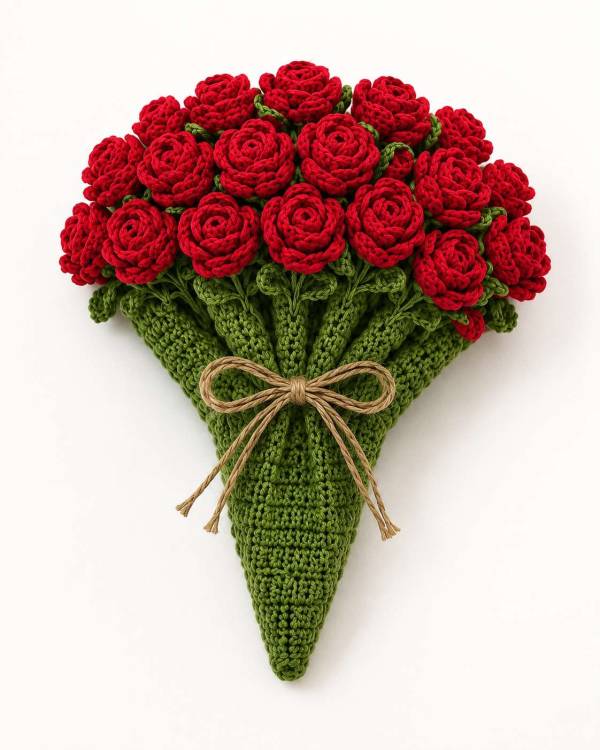
Flower Border Option 1: Rosebud Bouquet
These are compact dimensional buds rather than large, separately constructed roses.
Rosebud Round
Join the rose-coloured yarn with a sl st in one ch-5 anchor loop.
Work the following four times into the same loop:
Four-dc popcorn, ch 1
You should have four popcorns sharing the same anchor loop.
Sl st into the closing chain of the first popcorn. Gently push the popcorns together to form a rounded bud.
Fasten off and weave in the ends.
Repeat in every flower anchor loop.
Optional Outer Petals
For a slightly fuller rosebud, join a second shade in the gap between two popcorns.
* Ch 2, work 2 dc in the same gap, ch 2, sl st in the next gap between popcorns.
Repeat from * around the bud.
Fasten off.
Do not make the outer petals too large or the flowers may overwhelm one another when the blanket is gathered.
Rosebud Counts
- Lap blanket: 16 rosebuds
- Throw blanket: 20 rosebuds
- Generous throw: 24 rosebuds
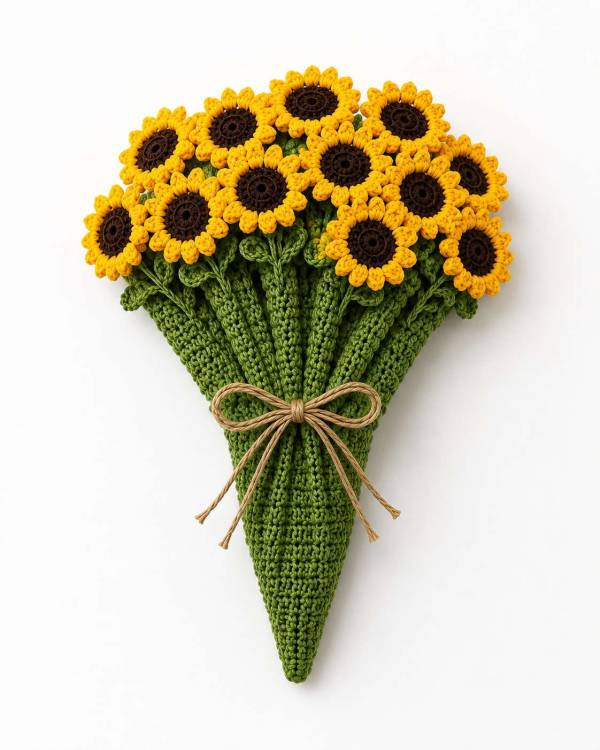
Flower Border Option 2: Sunflower Bouquet
The sunflower version is bright, cheerful and particularly good for an autumn crochet blanket or a handmade housewarming gift.
Sunflower Centre
Join brown yarn with a sl st in one ch-5 anchor loop.
Ch 1.
Work 8 sc into the loop.
Join with a sl st to the first sc.
Fasten off the brown yarn.
Sunflower Petals
Join golden yellow yarn with a sl st in the first sc.
Ch 1.
Work the following into each of the 8 centre stitches:
(Sc, hdc, dc, hdc, sc) in the same stitch
This creates 8 petals.
Join with a sl st to the first sc.
Fasten off and weave in the ends.
Repeat in every anchor loop.
Sunflower Counts
- Lap blanket: 16 sunflowers
- Throw blanket: 20 sunflowers
- Generous throw: 24 sunflowers
Anyone who has fallen down the flower-pattern rabbit hole may also enjoy our collection of easy crochet flower patterns for beginners. It includes smaller motifs that can be used for embellishments, garlands and scrap-yarn projects.
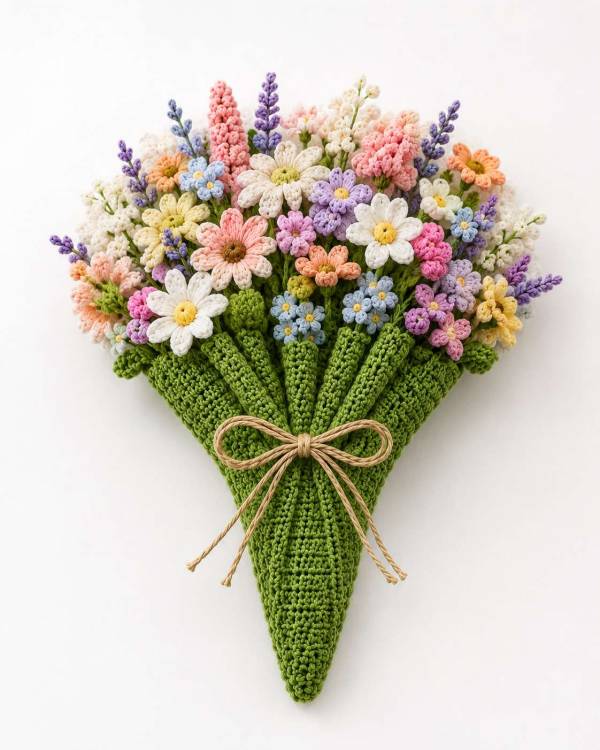
Flower Border Option 3: Mixed Wildflower Garden
This is the flower border shown in our latest wildflower mockup.
Instead of repeating one identical bloom, the border rotates through four different motifs:
- Mini rosebud
- Picot daisy
- Puff flower
- Lavender sprig
Because every blanket size has a flower-position count divisible by four, the motifs divide evenly:
| Size | Each wildflower motif | Total motifs |
| Lap | 4 of each | 16 |
| Throw | 5 of each | 20 |
| Generous throw | 6 of each | 24 |
Rotate the motifs in that order as you move around the blanket.
Changing colours freely will produce the hand-picked cottage-garden look shown in the mockup.
Wildflower Motif 1: Mini Rosebud
Join the chosen flower colour with a sl st in the ch-5 loop.
Work a four-dc popcorn in the loop.
Ch 1.
Work a second four-dc popcorn in the same loop.
Sl st into the loop beside the popcorns.
Fasten off.
Gently press the two popcorns together to create a compact rounded bud.
Use pink, peach, cream or dusty rose.
Wildflower Motif 2: Picot Daisy
Join the petal colour with a sl st in the ch-5 loop.
Ch 1 and work 5 sc into the loop.
Join with a sl st to the first sc.
For each of the 5 petals:
Ch 3, sl st into the second chain from the hook, sl st into the same sc.
Repeat once in each sc around.
Fasten off.
For a contrasting centre, thread a short length of yellow yarn through the middle and make a small French knot, or embroider two compact stitches across the centre.
Wildflower Motif 3: Puff Flower
Join the flower colour with a sl st in the ch-5 loop.
Ch 1.
Work one puff stitch into the loop.
Ch 1.
Work a second puff stitch into the loop.
Sl st into the anchor loop.
Fasten off.
The two puffs sit together like a small unopened flower head.
Lavender, pale blue and soft pink work beautifully for these little buds.
Wildflower Motif 4: Lavender Sprig
The lavender motif is slightly taller than the other flowers, giving the border the varied height that makes the gathered bouquet look much more natural.
Green Stem
Join green yarn with a sl st in the ch-5 anchor loop.
Ch 10.
Starting in the second chain from the hook, sl st in each chain back toward the anchor loop.
Sl st into the anchor loop.
Fasten off.
This creates a narrow upright stem.
Lavender Buds
Join lavender or purple yarn around the stem approximately two chain segments below the tip.
Work a three-dc popcorn around the stem.
Ch 1.
Sl st around the next chain segment below.
Repeat this sequence three more times, spacing the popcorns down the upper half of the stem.
You will have four small raised buds along the sprig.
Fasten off.
Gently stagger the buds from side to side with your fingers rather than leaving them in one straight row.
Optional Small Leaves
Using green yarn and a tapestry needle, make one short looped stitch on each side of the lower stem.
Secure the yarn at the back.
Suggested Wildflower Colour Sequence
For a 20-flower throw blanket, try this sequence:
- Blush mini rosebud
- Cream picot daisy
- Pale blue puff flower
- Lavender sprig
- Peach mini rosebud
- Butter-yellow picot daisy
- Soft pink puff flower
- Lavender sprig
- Cream mini rosebud
- Pale pink picot daisy
- Lilac puff flower
- Lavender sprig
- Rose-pink mini rosebud
- Cream picot daisy
- Pale blue puff flower
- Lavender sprig
- Peach mini rosebud
- Butter-yellow picot daisy
- Pink puff flower
- Lavender sprig
You do not have to follow the colours rigidly. In fact, the wildflower border generally looks better when it is slightly irregular.
For even more floral inspiration, browse these 25 crochet flower patterns for spring.
Mixing the Flower Modules
You can also combine the main flower styles.
For a 20-position throw blanket, consider:
- 10 rosebuds and 10 sunflowers
- 12 rosebuds and 8 wildflower motifs
- 8 sunflowers, 4 daisies, 4 buds and 4 lavender sprigs
- 5 rosebuds, 5 sunflowers, 5 daisies and 5 lavender sprigs
Keep the total number of completed motifs equal to the number of anchor loops.
This is important. Adding extra flowers may make the bouquet look fuller in a photograph, but it also adds weight and can cause the circular blanket edge to ruffle or pull unevenly.
Finishing the Blanket
Weave in every yarn end securely.
Because the blanket will be repeatedly folded and unfolded, do not simply trim the ends close to the fabric. Weave each end back and forth through several stitches.
Blocking
Lay the blanket flat with the flower side facing upward.
Dampen it lightly or wet-block it according to the yarn label.
Smooth the circle to the finished measurement and pin around the edge.
Arrange the stems, leaves and flowers so they sit neatly.
Allow the blanket to dry completely before folding it into the bouquet.
Blocking makes a noticeable difference here. It helps the circular base lie flat while allowing the dimensional flowers to stand proud from the edge.
Those who love flower-filled blankets may also enjoy this free crochet flower square blanket pattern, which uses floral squares rather than a circular bouquet construction.
How to Fold the Crochet Blanket Into a Bouquet
The blanket should not be pulled upward from its centre. For the neat pointed bouquet shape shown in the corrected mockups, fold it as follows:
- Lay the circular blanket flat with the flowers facing upward.
- Fold the circle exactly in half to create a semicircle.
- Position the straight folded edge toward you and the curved flowered edge away from you.
- Beginning at one end of the straight edge, gently concertina or fan-fold the blanket toward the centre.
- Repeat from the opposite side so the two folded sections meet.
- Bring the flowered curved edge upward. The flowers will gather together across the top.
- Wrap ribbon, cotton tape or soft twine around the blanket just below the flowers.
- Tie securely in a bow.
- Smooth the lower folded blanket into a tapered point so it resembles a bouquet wrapping.
Do not tie the ribbon tightly enough to stretch or crush the stitches.
To turn the bouquet back into a blanket, simply untie it, release the folds and smooth the circle flat.
Practical Tips Before You Begin
Mark Every Increase Section
Even experienced crocheters lose count on a large spiral. Use more stitch markers than you think you need.
Count the Final Round Carefully
The anchor repeat depends on an exact multiple of 20. Count the final base round before starting the flower setup.
Test One Flower First
Make one complete flower and fold a small section of the blanket edge inward. This lets you check whether the flower is the right size before making another nineteen of them.
Avoid Overstuffing the Border
These flowers are dimensional because of their stitches. They do not need filling.
Choose Washable Yarn
This is still a blanket, even though it spends part of its life pretending to be a bouquet. Select yarn that suits the way the finished piece will be used.
Watch the Weight
Cotton gives beautiful stitch definition but can become heavy in the generous throw size. Acrylic or an acrylic-wool blend will usually produce a lighter finished bouquet.
Is This Crochet Bouquet Blanket Beginner Friendly?
I would rate it intermediate.
The stitches themselves are not especially difficult, but the project requires:
- Accurate round counting
- Consistent circular increases
- Working front post stitches
- Managing multiple yarn ends
- Making dimensional flower motifs
- Blocking a large circular piece
A confident beginner could make it with patience, particularly in the lap size. The sunflower border is probably the easiest module to count, while the wildflower version involves more frequent colour and motif changes.
Gift Ideas for a Crochet Flower Bouquet Blanket
This would make a memorable handmade gift for:
- Mother’s Day
- A milestone birthday
- A wedding or anniversary
- A housewarming
- A new grandmother
- Someone recovering from illness
- A keen gardener
- A friend who cannot keep real flowers alive
Unlike a real bouquet, this one will not wilt, drop pollen on the table or require anyone to locate a clean vase at the last minute.
Place the taller motifs evenly around the blanket rather than grouping them together. When the blanket folds, those positions will gather and naturally create height across the bouquet.
A good repeat would be:
Tall sprig – round flower – small bud – round flower – filler flower
Repeat around the border.
The safest way to test the design is to make five or six motifs, temporarily pin them around one section of the blanket and fold that section inward. You will quickly see whether the flowers need more height, more foliage or simply more small fillers.