
Can you tell I’m not a photographer? I’ve had numerous requests for this pattern, so I will try to comply. This is a cap custom made for my husband’s smallish and very bald head. I’ve crocheted him several caps before and he likes them all – but…They all had holes. You know the kind that come between stitches? You know how much it seems men want no holes in their crochet? This may be the answer!
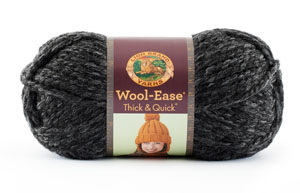
I used a size M hook with Lion Brand Wool-Ese Thick and Quick. The label calls for an N hook, but since I crochet loosely, and we want no holes, I decided to go down one size. The color is Grey Marble and I used exact.l.y ONE skein of 106 yards. Since actual yardage on these skeins may vary, please buy two skeins to be sure you have enough yarn. I now own an extra skein, thinking a cap made with post stitches would surely require more than 106 yards. Nope. Exact.l.y one skein with only an 8 inch starting tail and an 8 inch tail at the end. I like Wool-ese because it holds up nicely in the washer and dryer and is quite cost effective. I think any bulky yarn of your preference will work with this pattern.
So, while I do not have an exact pattern for you, I can give you a pretty good idea how I constructed this cap. First, chain 4, join to form a circle, chain 1, 5 sc into the circle.
Row 2 chain 1, 1 sc into same stitch, 2 sc into each stitch around (this is a spiral formation so mark your chain)
Row 3 chain 1, 1 sc into same stitch, *2 sc in each of next 2 stitches, 1 sc in next stitch*, repeat ** to end of row
Row 4 til whatever row it takes you to make a crown of 5 to 5.5 inches
Row next – chain 3, hdc in same stitch, hdc in each stitch around (now you are working in rows, not a spiral)
^Row next – chain 3, FPHDC in same stitch,* BPHDC in next stitch, FPHDC in next stitch*, repeat ** around
=Row next – ‘regular’ HDC in each stitch around (this makes all your post stitch rows look the same from the outside (and inside) which I preferred
Row next – repeat the previous TWO (indicated by ^ and =) rows for a total of 10 rows. Use a stitch marker to hold your last stitch in place while you measure your cap to determine how wide you want the brow opening to be. Typically, for a cap of this shape, the brow opening will be 1/4 to 1/3 of your total number of stitches. Determine how many stitches will be used for your brow opening, ch 1 and sc across that number of stitches.
My cap had 49 stitches around and I used 12 stitches for the brow opening. So I chained 1 and sc across 12 stitches. Then
Row next (to create ear and neck flap) chain 3, and repeat Row ^ and = until the ear and neck flap is the length you want it. For this cap, I added one row of post stitches, one row of regular and a final row of post stitches then worked a row of sc around the entire edge. Voila! My husband’s Man Cap.
Note: This pattern has not been tested. If you find errors or have questions, please email me. I’ll try to help. If you have any crochet experience at all, you should be able to forge ahead and create a reasonable facsimile of this cap. Fingers crossed…

Great job JD!!! Glad you shared!
Happy hubby, happy wifey!
Very cool.
Any way that you can remove the Pop-Ups? Much appreciated! Hat looks Great! Fun yarn to use!