• Home
  • Suggest A DIY
  • DIY Newsletter

Crochet

Patterns, projects and techniques

  • About CraftGossip
  • Our Network
    • Bath & Body Crafts
    • Candle Making Ideas
    • Crochet Ideas
    • Cross Stitch
    • Edible Crafts
    • Felting Patterns
    • Glass Art
    • Home & Garden Ideas
    • Indie Crafts
    • Jewelry Making
    • Kids Crafts
    • Knitting Patterns
    • Lesson Plans
    • Needlework
    • Party Ideas
    • Polymer Clay
    • Quilting Ideas
    • Recycled Crafts
    • Scrapbooking
    • Sewing Patterns
    • Card Making
    • DIY Weddings
    • Not Craft Ideas
  • Giveaways
  • Roundups
  • Store
  • Search

Easter Wreath Pattern – Too Old Fashioned?

March 15, 2015 by Shellie Wilson

3884_1

I am torn by this free pattern, I think it’s a little too reminiscent of something Grandma would have made and whilst I love Grandma I think that these type of projects set Crochet back by many years when it comes to outsiders looking in (non crocheters). What do you think? Should we care ? Should we be trying to make Crochet hip and cool or just get on with our WIP’s and forget about all the haters?

Easter Egg Wreath Pattern

Check out our NEW Facebook page for Crochet. This page is only about Crochet!! Free pattern links, tips tricks and tutorial videos. We will be sharing it all to the ONE SPOT.

Make sure you LIKE the new Crochet Facebook Page so you don’t miss out.

Crochet Facebook Page.

Looking for more Easter themed Crochet patterns? Check out some of our favorite places for Crochet patterns. Etsy. has lots of new patterns and the perfect place to find Crochet patterns that are trending or seasonal. We also love  Anniescatalog   for buying individual patterns and a great place to source vintage styled designs and last but not least,  Leisure Arts for more traditional styled patterns and books.
 

«
»

Comments

  1. Cindy G. says

    March 15, 2015 at 10:29 am

    I think it’s kind of sweet! But, maybe I’d use a little less white, and not have as many eggs on it. I might make the outside wreath, and then hang a few eggs from the center, and then have eggs only along the bottom portion. Also, it could be popped up with some brighter colors. It could look really cute if the wreath was in a grass green!

  2. Gramma Sue says

    March 15, 2015 at 12:03 pm

    Thanks for sharing the pattern, would have liked it better without the dialogue about whether or not it’s too Grandma-like. It makes me feel like u don’t want us Grandmas reading your “hip” site, and that’s not cool.

  3. Linda G says

    March 15, 2015 at 1:14 pm

    You know, of all the “revived” crafts, the one I really can’t get into is crochet. This is a perfect example of why.

  4. dani says

    March 15, 2015 at 7:20 pm

    I think some bold stripes and bright colors would help modernize that pattern. Show those haters where it’s at!

  5. Shellie Wilson says

    March 15, 2015 at 7:49 pm

    Granmma Sue, There is no way you’re too old for out site but tell us, Would you prefer it in brighter colors too?

  6. Heather says

    March 15, 2015 at 8:40 pm

    Just a thought, it does not take much to customize the pattern the way we want it, so colors are completely up to the crafter! 🙂 What this reminds me of is some of the projects my mother made to give as gifts to all the “elders” in our family. She has done angle tree toppers, Christmas wreathes, Pringles covers that looks like candles, christening dresses (still used today by the younger generations) as well as teddy bears that were made for myself and my siblings and cousins. I say more power to the grandmas out there as their influence is what got me to pick up crocheting as an adult some 18 years ago! <3

  7. Chyna says

    March 16, 2015 at 12:20 am

    Wow. Those snarky comments about being too ‘Grandma-like’ really cut to the quick. It was my precious Grandmother and my beloved Great Aunt who taught me to knit and crochet, and so many of their patterns adorn my home today. Set crochet BACK? Double-WOW. You’re entitled to your opinion, but I think you’re not only dead wrong about that, I think it’s patterns like Grandma’s that showcase the charm of yarncraft. There’s plenty of room for Nostalgia, Hipster and Retro styles (and any others I’ve failed to mention.

  8. Evelyn Mayfield says

    March 16, 2015 at 12:52 am

    This makes me not want to follow any more – it’s awfully narrow-minded. Beauty should be in the eye of the beholder, young or old, new or retro, whatever. We each have our own taste and should not be guided by the thoughts of others…too many lemmings out there…(sigh)

  9. Barbara Duncan says

    March 16, 2015 at 10:29 am

    The question should be “Do I like it?” I thought the comment was pretty condescending. What’s your definition of Grandma? Perhaps you will be one someday and you will wonder why anyone “labels” you.Last time for your site!

  10. Judy P says

    March 16, 2015 at 11:38 am

    I sure don’t want to get embroiled in an age related feud. I do think young people sometimes turn up their noses at older crafts but I don’t see how making something and having fun doing it can be a bad thing…no matter what a person’s age. As with many crafts, each person could alter it in their own fashion. “Beauty is in the eyes of the beholder”. Sad that talented people and “ancient” crafts have to be “:put down” because someone thinks it isn’t cool. To add further, I have noticed that many “so-called patterns” and “so-called recipes” are not really a pattern or recipe. They are ready made parts that people put together and call it a pattern or recipe. For instance, how can a box of brownie mix, a jar of caramel sauce and a jar of marshmallow creme really be called a recipe?

  11. GrammaSue says

    March 18, 2015 at 11:59 am

    Shellie, I see you caught the attention of a few other grandmas with the way you phrased your invitation for dialogue. I can’t say this pattern suits my taste, exactly–but perhaps it wouldn’t have rubbed people the wrong way if posed as a challenge instead of a criticism of grandmas, from whom many of us first learned to crochet. I may not crochet the same way she did but I surely try to respect what she did in her time. The eggs are cute, and would be fun in any color, including the pastels so traditional to Easter crafts to this day. I would probably do the wreath in a bright spring green though, with a few bright eggs to usher in springtime. Thanks to the aptly named Yarnspiration site for giving us inspiration for a springtime wreath. Time to get into my yarn stash & see how I do with this challenge.

  12. Shellie Wilson says

    March 19, 2015 at 9:33 pm

    GrammaSue, I would LOVE! to see your version of the wreath. Please come back and share it with us.

  13. GrammaSue says

    March 20, 2015 at 12:28 am

    I’m surely grateful for all the yarn choices I have that my grandma didn’t have! I will send a pic when I make my wreath.

  14. Sherry Ordoyne says

    March 30, 2015 at 12:01 pm

    i have been crocheting since i was a little kid. my grandma taught me years ago. young people like to craft too. you don’t have to be a grandma to find a hobby

Have you read?

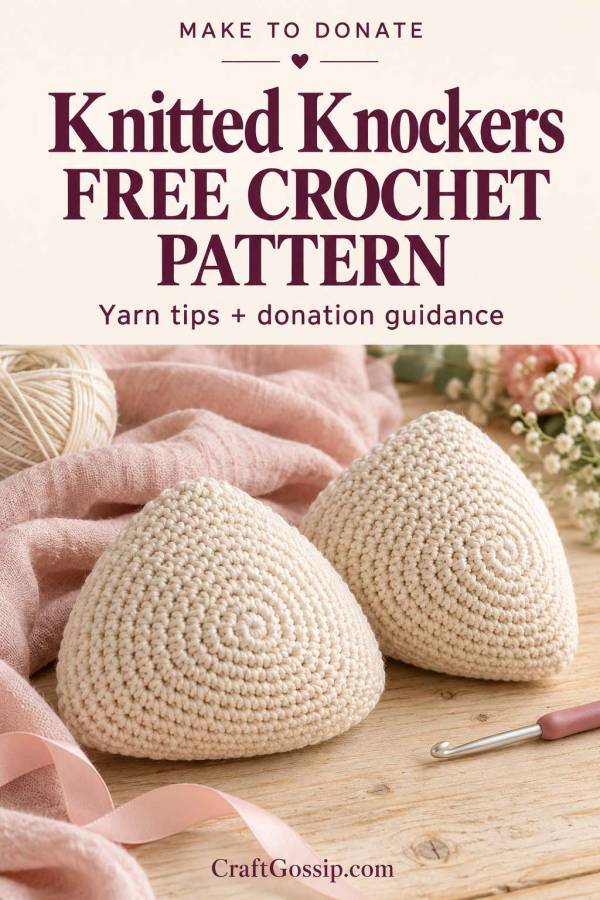
Free Knitted Knockers Crochet Pattern: Make Soft Breast Forms to Donate

If you have been searching for a Knitted Knockers crochet pattern, you might be wondering whether you have landed in the wrong craft category. Despite the name, there is an official crochet version, so you can put your hooks to good use without picking up knitting needles.

I love sharing projects that give our crafting a practical purpose. Sometimes a few carefully chosen supplies and an evening of stitching can become something very personal for someone else. This is one of those projects where following the organisation’s instructions matters far more than adding our own creative flourishes.

What Are Knitted Knockers?

Knitted Knockers are soft, lightweight breast forms made by volunteers for people who have undergone breast surgery. The organisation connects makers with recipients and provides its breast forms free of charge.

Both knitted and crocheted versions are available. For makers, the important starting point is choosing the correct pattern and materials for the organisation receiving your donation.

Where to Find the Free Knitted Knockers Crochet Pattern

Visit the official Knitted Knockers pattern and tutorial page and look for “Knitted Knockers Crochet Pattern,” revised June 10, 2023, version 8.

The pattern is credited to Claudia Barbo, with that revision by Michelle Peruskie. It includes sizes A, B, C, D and DD.

Download the written instructions before starting and use the accompanying crochet video for extra help. The organisation advises following the written pattern if the video differs, because instructions are updated periodically.

What Crochet Skills Do You Need?

This project uses a magic ring, single crochet, increases, invisible decreases and working in a continuous spiral.

I would suggest being comfortable counting stitches and following shaping instructions before making your first donation pair. Stitch markers are particularly useful here. “I’ll remember where that round started” has led plenty of us into unnecessary unravelling.

The pattern uses US crochet terminology. Its single crochet stitch is called double crochet in UK terminology, which is worth noting for Australian and British readers.

Follow the pattern’s gauge, shaping and sizing directions rather than substituting instructions from a generic crochet bra cup.

Choosing Yarn for Crocheted Knockers

This is a project where I would check the yarn requirements before opening the stash cupboard.

KnittedKnockers.org maintains a tested, approved yarn list and identifies options suitable for crochet. Crochet can produce a firmer fabric than knitting, so a yarn approved for a knitted version is not automatically the right choice for the crocheted one.

Check the current list through the official pattern page before buying supplies. Donations distributed through KnittedKnockers.org must use its approved yarns and patterns.

A soft-looking ball band or a “baby yarn” label is not enough on its own. Choose the exact yarn and weight specified by your receiving organisation.

Tips Before You Make a Donation Pair

Ask your chosen organisation what sizes and colours it currently needs, whether it accepts crocheted breast forms, and how it wants them finished and delivered.

For the official crochet pattern:

  • Keep pairs consistent in size.
  • Check the finished measurements using the pattern’s sizing guidance.
  • Follow the instructions for the adjustable opening at the back.
  • Confirm whether your receiving group wants stuffed or unstuffed donations.

That adjustable opening is intentional, so resist the temptation to sew everything neatly shut. Follow the finishing directions carefully.

An Australian Crochet Pattern Resource

Australian readers can also explore the free crocheted knockers pattern offered by Be Uplifted in Brisbane.

Its page includes a pattern-request option for making crocheted temporary breast prostheses. Contact the charity directly about its current materials and donation requirements before starting.

Keep each organisation’s instructions together. Mixing one group’s pattern with another group’s materials list can create avoidable confusion.

More Ways to Crochet Something Useful

If your craft group would like several projects to choose from, our crochet chemo cap patterns offer another way to make thoughtful donations. For a wider selection, browse our crochet patterns to make and donate to charity.

Choose a project the receiving group actually needs, check its requirements, and make one carefully before planning a whole basketful.

There is something lovely about using a familiar skill to offer a little practical kindness. Start with the official crochet pattern, take your time with that first pair, and let usefulness guide the stitches.

Original Crochet Breast Form Pattern: A Rounded Personal-Use Design

This simple crochet breast form uses a gently rounded front and a flat back, joined with an opening so the filling can be adjusted.

Unlike the triangular official Knitted Knockers design, this version has a circular outline. It is a starting point for experimenting with shape and fit, rather than a standardised cup-size pattern.

Important: This original pattern has not been physically tested or approved by Knitted Knockers. Do not use it for donations requiring an approved pattern. Anyone considering wearing it following breast surgery should first ask their breast-care nurse or treating team whether the materials, seams and design are suitable.

Materials

  • Approximately 100 g of smooth, soft sport-weight cotton yarn, allowing extra for a tension sample
  • 3.5 mm crochet hook, or size needed for the suggested tension
  • Soft, washable polyester fibre filling
  • Locking stitch marker
  • Blunt yarn needle
  • Scissors
  • Measuring tape

These materials are suggestions for this original design. They are not a substitute for a charity’s approved materials list.

Suggested Tension and Finished Size

Aim for approximately 24 single crochet stitches and 26 rows per 10 cm, measured on a flat single crochet sample.

Your stitches should form a flexible fabric without large gaps. If the fabric feels stiff, reconsider the yarn and hook combination before making the full piece.

At this tension, the finished form is expected to measure approximately 10–12 cm across, depending on filling and individual tension. This is an estimate, not a tested measurement or a bra cup-size designation.

Abbreviations

This pattern uses US crochet terminology.

  • ch: chain
  • sc: single crochet
  • inc: work 2 single crochet stitches into the same stitch
  • sl st: slip stitch
  • st/sts: stitch/stitches

In UK terminology, the US single crochet stitch is called double crochet.

Pattern Notes

  • Make one front and one back.
  • Work in continuous rounds without joining unless instructed.
  • Mark the first stitch of each round and move the marker as you work.
  • Instructions inside brackets are repeated the stated number of times.
  • The front and back both finish with 84 stitches.
  • A small opening is left along the joining edge for adjusting the filling.

Make the Rounded Front

Round 1: Work 6 sc into a magic ring. Pull the ring closed. 6 sts

Round 2: Inc in every stitch around. 12 sts

Round 3: [Sc in next st, inc in next st] 6 times. 18 sts

Round 4: [Sc in next 2 sts, inc in next st] 6 times. 24 sts

Round 5: [Sc in next 3 sts, inc in next st] 6 times. 30 sts

Round 6: [Sc in next 4 sts, inc in next st] 6 times. 36 sts

Round 7: [Sc in next 5 sts, inc in next st] 6 times. 42 sts

Round 8: [Sc in next 6 sts, inc in next st] 6 times. 48 sts

Round 9: [Sc in next 7 sts, inc in next st] 6 times. 54 sts

Round 10: [Sc in next 8 sts, inc in next st] 6 times. 60 sts

Round 11: [Sc in next 9 sts, inc in next st] 6 times. 66 sts

Round 12: [Sc in next 10 sts, inc in next st] 6 times. 72 sts

Round 13: [Sc in next 11 sts, inc in next st] 6 times. 78 sts

Round 14: [Sc in next 12 sts, inc in next st] 6 times. 84 sts

Before continuing, check the fabric. It should be broadly flat, although the repeated increase positions may give it a slightly hexagonal outline. Pronounced ruffling or cupping at this stage suggests that your tension needs adjusting.

Rounds 15–17: Sc in every stitch around. 84 sts in each round

These three rounds add depth to the front.

Sl st into the next stitch to soften the finishing step. Fasten off and weave in the end. The slip stitch does not count as an additional stitch.

Secure the starting tail carefully on the wrong side.

Make the Flat Back

Work Rounds 1–14 of the front instructions.

You will finish with 84 stitches.

Do not work the three additional rounds used for the front.

Sl st into the next stitch. Fasten off, leaving approximately 100 cm of yarn for joining. Secure the starting tail.

Join the Front and Back

Place the pieces together with their wrong sides facing inward. The extra rounds on the front should create space for the filling.

Align the edges so that each front stitch matches one back stitch. Locking markers placed at intervals can help prevent the pieces from shifting.

Using the long tail and a blunt yarn needle, whipstitch through the outermost loop of each corresponding stitch pair.

Join 72 stitch pairs, leaving 12 stitch pairs unjoined for the filling opening.

Keep the seam relaxed. Pulling it tight will gather the edge and distort the shape.

Secure the joining yarn firmly at the end of the seam and weave it into the inside of the work. Leave the opening accessible.

Add the Filling

Add small amounts of fibre filling through the opening.

Spread it evenly beneath the front panel, gently shaping the piece with your hands. Aim for a softly rounded front and a comparatively flat back.

Avoid packing it into a firm ball. More filling is not automatically a better fit.

The front should remain compressible, and the filling should stay inside without pushing through gaps in the crochet fabric.

Make an Adjustable Closure

Cut a separate length of yarn approximately 40 cm long.

Starting at one end of the opening, lace the yarn loosely between the corresponding front and back stitches across all 12 unjoined stitch pairs, as though lacing a shoe.

Leave a tail at each end.

Gently draw the edges together without gathering them tightly. Tie a loose bow and tuck the bow and tails inside the opening.

This allows the lacing to be loosened when filling needs to be added or removed. Check that the opening stays closed during handling and that the fastening does not create an uncomfortable lump.

Check Your Sample

Before considering this prototype for personal wear, check:

  • The fabric feels soft and flexible.
  • The starting ring and all woven ends are secure.
  • The seam is smooth and does not form a hard ridge.
  • No filling escapes through the stitches or opening.
  • The closure can be reopened without damaging the crochet.
  • The shape and size suit the intended purpose.

For use following surgery, have the design and fit checked by the wearer’s breast-care professional. Do not place this untested design against an incision or healing skin.

Making Breast Forms for Charity?

Please use the receiving organisation’s approved pattern and materials instead of this experimental design.

The official Knitted Knockers crochet pattern and tutorials are the appropriate starting point for donations to KnittedKnockers.org. Following the organisation’s requirements helps volunteers sort and distribute donations that meet recipients’ needs.

More Articles

Afghans, Blankets & Throws amigurumi Baby Hat Baby Patterns Beanies Beginner Book Reviews Christmas CHRISTMAS Clothing Crochet Patterns Crochet Techniques & Ideas Easy Crochet Patterns Free Crochet Patterns Granny Squares Halloween Patterns Quick Scarfs shawls

RSS feed: More Articles More Articles

  • Free Knitted Crown Pattern for Kids and Adults: A Sweet Handmade Dress-Up Idea
  • Free Knitted Knockers Crochet Pattern: Make Soft Breast Forms to Donate
  • Hedgehog Crochet Patterns for Adorable Woodland Makes
  • DIY Thrifted Glass Christmas Platter With Vintage Santa Fabric
  • Celebrate Inventor’s Day by Learning about Inventors
  • How to Make a Stamped Fall Scarecrow Card
  • Tiny Knits in Team Colors
  • Book Review: The Ultimate Cross Stitch Christmas Collection
  • FREE Cute Ghost and Pumpkin Background
  • Sandok Cable Sweater Review: Sizing, Yarn and What to Know Before Knitting

Pick Your Blog

  • Sewing
  • Knitting
  • Quilting
  • Crochet
  • Home & Garden
  • Recycled Crafts
  • Scrapbooking
  • Card Making
  • Polymer Clay
  • Cross-Stitch
  • Edible Crafts
  • Felting
  • Glass Art
  • Indie Crafts
  • Kids Crafts
  • Jewelry Making
  • Lesson Plans
  • Needlework
  • Bath & Body
  • Party Ideas
  • Candle Making
  • DIY Weddings
  • Not Craft
  • Free Craft Projects

Copyright © 2026 · CraftGossip | Start Here | Contact Us | Link to Us | Your Editors | Privacy and affiliate policy