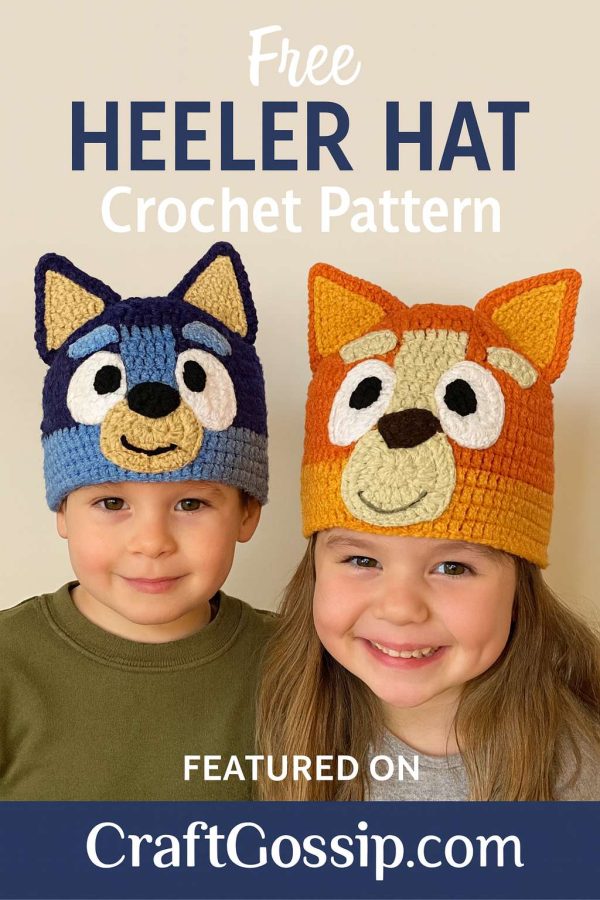
If your household is full of giggles, dance mode moments, and catchphrases like “For real life!”, then this Heeler Hat is bound to be a hit. Whether you’re stitching it up for a little Bluey fan, a playful Bingo, or even a grown-up who loves the show as much as the kids do (no judgment here!), this cozy crochet hat is pure joy from start to finish.
This project is worked in parts — the base beanie, eyes and snout, and finally, those iconic ears. Below you’ll find the full pattern for the base hat and the ear construction so you can bring your Heeler buddy to life from start to finish.
Bluey Activities and Crafts [Lesson Plans]
Bluey Costume for Kids – DIY Sewing Tutorial [Sewing]
Materials You’ll Need
- Yarn (Worsted/Medium 4 weight)
- Blue Heeler (Big Sister): Red Heart Super Saver Soft Navy for the main color, and Buff or Cornmeal for the accents.
- Orange Heeler (Little Sister): Red Heart Super Saver Carrot for the main color, and With Love Tangerine for the accents.
Feel free to substitute with any soft worsted-weight yarn that gives you similar shades.
- Hook: 5.0 mm (H-8). A Tulip Etimo is my go-to for comfort and even tension.
- Other Tools: Yarn needle, scissors or snips, and a stitch marker (especially handy if you tend to lose count during those long, relaxing rounds).
Stitches & Skills (US Terms)
- Magic Ring
- Chain (ch)
- Slip Stitch (sl st)
- Single Crochet (sc)
- Half Double Crochet (hdc)
- Double Crochet (dc)
- Increase (two stitches in one stitch)
The Base Beanie
Let’s start with the beanie base that forms the “head” of your Heeler. This simple double crochet hat is worked in joined rounds from the top down.
Round 1
Make a magic ring, ch 2 (counts as first dc), and work 11 more dc into the ring. Pull the tail tight to close and join to the top of the ch-2. (12 sts)
Round 2
Ch 2, work 2 dc in each stitch around. Join with a sl st. (24 sts)
Round 3
Ch 2, dc in next st, 2 dc in next; repeat from * to * around. Join. (36 sts)
Round 4
Ch 2, dc in next 2 sts, 2 dc in next; repeat around. Join. (48 sts)
Round 5
Ch 2, dc in next 3 sts, 2 dc in next; repeat around. Join. (60 sts)
Round 6
Ch 2, dc in next 4 sts, 2 dc in next; repeat around. Join. (72 sts)
At this point, your beanie crown should be nicely rounded and roughly child-sized.
Rounds 7–14 (or until desired depth)
Ch 2, dc in each stitch around, joining with a sl st at the end of each round. Continue until your hat reaches the desired length.
Optional Stripe (for the classic Heeler look)
To give your hat that distinct Bluey or Bingo stripe, switch to your accent color and work two rounds in that shade. Then return to your main color for two or three more rounds, depending on how long you want the hat to be.
Fasten off and weave in your ends neatly — or, if you’re like me, tie them off inside and call it good enough.
And that’s it — your base beanie is done!
The Ears
Now let’s add those signature pointy ears that make this hat unmistakably “Heeler.” You can make each ear as a cone shape — either working in a continuous spiral (no joins or chains between rounds) or by joining and chaining 1 at the end of each round. Both ways work fine, just make sure to increase by 2 stitches in each round.
Tip: The ears look best when sewn closed at the base to form a flat, double-thickness triangle. Before doing that, make the inner ear triangles and attach them to the front layer of the cone — this way your stitches stay hidden and neat.
Ear Cone Pattern
Round 1: Start with a magic ring, ch 1, and sc 6 into the ring. Pull tight to close. (6 sts)
Round 2: (Sc, sc, inc) × 2 ? 8 sts
Round 3: (Sc, sc, sc, inc) × 2 ? 10 sts
Round 4: (Sc, sc, sc, sc, inc) × 2 ? 12 sts
Round 5: (Sc, sc, sc, sc, sc, inc) × 2 ? 14 sts
Round 6: (Sc, sc, sc, sc, sc, sc, inc) × 2 ? 16 sts
Round 7: (Sc, sc, sc, sc, sc, sc, sc, inc) × 2 ? 18 sts
Round 8: (Sc × 8, inc) × 2 ? 20 sts
Round 9: (Sc × 9, inc) × 2 ? 22 sts
Round 10: (Sc × 10, inc) × 2 ? 24 sts
Round 11: (Sc × 11, inc) × 2 ? 26 sts
Round 12: (Sc × 12, inc) × 2 ? 28 sts
Round 13: (Sc × 13, inc) × 2 ? 30 sts
Round 14: (Sc × 14, inc) × 2 ? 32 sts
Check the size — if your tension runs tight, you can add another round or two. Loose crocheters might want to stop earlier. Adjust to what looks right to your eye.
Fasten off, leaving a long tail for sewing later. Don’t close the cone yet — you’ll need to attach the inner ear triangle first.
Inner Ear Pattern
Row 1: Ch 2, sc in 1st ch. Ch 1, turn. (1 st)
Row 2: Inc. Ch 1, turn. (2 sts)
Row 3: Inc in each st. Ch 1, turn. (4 sts)
Row 4: Sc across. Ch 1, turn. (4 sts)
Row 5: Inc, sc, sc, inc. Ch 1, turn. (6 sts)
Row 6: Sc across. Ch 1, turn. (6 sts)
Row 7: Inc, sc × 4, inc. Ch 1, turn. (8 sts)
Row 8: Sc across. (8 sts)
Row 9: Inc, sc × 6, inc. Ch 1, turn. (10 sts)
Row 10: Sc across. Fasten off, leaving a tail for sewing.
Sew the inner ear piece to the front of the cone before you fold and sew the cone base closed.
Face Details
Outer Eyes (Make 2)
Using white yarn and a 5 mm (H hook):
Round 1: Create a magic circle (MC), ch 1, and work 6 sc into the ring. (6)
Round 2: Work 2 sc in each stitch around. (12)
Round 3: (2 sc, 1 sc) repeat around. (18)
Round 4: (2 sc, sc in next 2) repeat around. (24)
Round 5: sc in next 8 sts, (2 sc) in next 4 sts, sc in next 8 sts, (2 sc) in next 4 sts. Sl st to join. (32)
Fasten off and weave in your end, leaving a tail for sewing.
Stitch both eyes onto the light blue face section of the hat, spacing them evenly apart.
Pupils (Make 2)
Using black yarn and your H hook:
Round 1: In a magic circle, ch 1 and work (2 hdc, 3 sc) twice into the ring. (10)
Fasten off and sew each pupil to the center of a white eye.
Eyebrows (Make 2)
Using light blue yarn and your H hook:
Row 1: Ch 7, turn, and sc across. (6)
Rows 2–4: Ch 1, turn, sc across. (6)
Fasten off and sew the bottom closed to form a soft tube shape.
Gently curve the eyebrow into position above the eyes and stitch it down so it arches slightly, giving your Heeler that expressive look.
Snout
Using yellow or buff yarn and your H hook:
Round 1: In a magic circle, ch 1 and make 8 sc. (8)
Round 2: 2 sc in each st around. (16)
Round 3: (2 sc, 1 sc) repeat around. (24)
Round 4: (2 sc, sc in next 2) repeat around. (32)
Round 5: (2 sc, sc in next 3) repeat around. (40)
Fasten off, leaving a long tail for sewing.
Attach the snout to the middle section of the face, centered beneath the eyes.
Nose
Using black yarn and your H hook:
Row 1: Ch 7, turn, sc in each st. (6)
Row 2: Ch 1, turn, sc dec, sc 2, sc dec. (4)
Row 3: Ch 1, turn, sc dec twice. (2)
Row 4: Ch 1, turn, sc dec. (1)
Continue working sc evenly around the outer edge of the nose, placing 2 sc in each corner to round it off.
Fasten off, leaving a tail for sewing.
Stitch the nose securely to the top of the snout, then with a short length of black yarn, embroider a small smile below it for that classic Bluey grin.
Final Construction & Assembly
Once you’ve finished all your pieces, it’s time to put everything together!
Use a clear photo of your favorite Heeler (Bluey or Bingo) as a placement guide, and then pin everything in place before you sew.
Here’s the layout that works best for me:
- Eyes: Start with the eyes. They should sit just overlapping the color stripe slightly. Make sure the pupils are facing the right direction before stitching them down!
- Eyebrows: Place them just above the eyes, roughly level with the top of the stripe, leaving a small gap between the two.
- Snout & Nose: Center this piece at the lower front of the hat. It may overlap the inside corners of the eyes a bit — that’s okay and looks natural.
- Ears: Attach them right near the top, one on each side of the magic ring at the crown.
Once all your pieces are sewn on securely, your Heeler Hat is finished!
Ta-Da! Your Heeler Hat is Complete
Pop it on, cue the “Wackadoo!” and enjoy the smiles from your little Bluey or Bingo. This pattern is simple enough for confident beginners but detailed enough to look amazing when finished.
Quick Tip: Don’t stress over weaving in every last end perfectly — most of them will hide neatly inside the hat. A few quick knots inside will do the trick if you’re gifting it or just making it for playtime.
Now that your Heeler is ready for action, you can move on to matching accessories — maybe a Heeler-themed scarf or even a mini amigurumi to go with it!