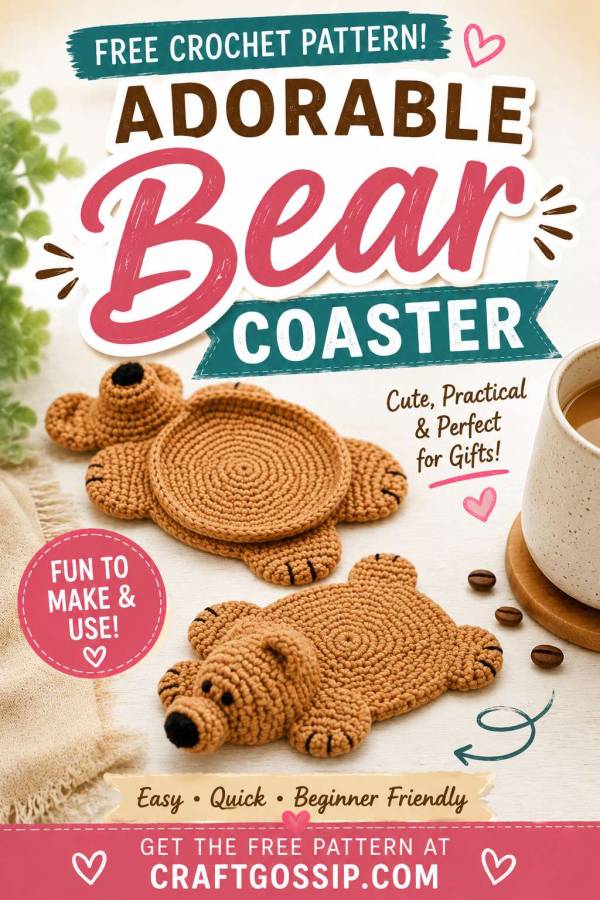
There is something so charming about animal crochet coasters, especially when they look like a tiny teddy bear has flopped down underneath your coffee cup. This free crochet bear coaster pattern is a lovely little project for using up brown cotton yarn, and it makes a sweet handmade gift for bear lovers, nursery decor, woodland-themed kitchens, or market stall stock.
This bear coaster is made in separate crochet pieces, then sewn together so the body stays nice and flat for a mug while the head, ears, paws, and little tail give it that soft handmade character. The original archived pattern used simple single crochet rounds with a lightly stuffed head and paws, embroidered eyes, nose, and claws. This version has been rewritten into a clearer CraftGossip-style pattern with fuller instructions, cleaner formatting, and extra maker notes for beginners.
You can make your bear in classic brown, honey beige, cream, grey, or even pink if you want a cute teddy bear party coaster set.
Crochet Bear Coaster Pattern
Skill Level
Easy / confident beginner
You will need to know how to work in the round, increase, decrease, sew pieces together, and embroider simple details.
Materials
- Brown cotton or cotton-blend yarn
- Small amount of black yarn or embroidery thread
- Crochet hook suitable for your yarn
- Yarn needle
- Scissors
- Small amount of toy stuffing
- Stitch marker
The original maker mentioned using YarnArt Baby yarn in the comments, but no hook size was listed on the archived page. Choose a hook that gives you firm stitches so the coaster holds its shape.
Abbreviations
- ch – chain
- sc – single crochet
- inc – increase, work 2 sc into the same stitch
- dec – single crochet decrease over the next 2 stitches
- st/sts – stitch/stitches
- MR – magic ring, optional substitute for ch 2 start
- FO – fasten off
This pattern is written in US crochet terms.
Maker Notes Before You Start
The bear body is made from two matching flat circles. The head, paws, tail, and ears are attached to one body circle first, then the second body circle is sewn to the back to hide the joins and give the coaster a neat finish.
Do not overstuff the head or paws. You want a soft 3D look without making the coaster too bulky.
Head
Use brown yarn.
Round 1: Ch 2, work 6 sc into the 2nd ch from hook.
Round 2: Inc in each st around. (12 sts)
Round 3: Sc in next st, inc in next st, repeat around. (18 sts)
Round 4: Sc in each st around. (18 sts)
Round 5: Sc in next st, dec, repeat around. (12 sts)
Round 6: Sc in each st around. (12 sts)
Round 7: Inc in each st around. (24 sts)
Round 8: Sc in each st around. (24 sts)
Round 9: Sc in next st, inc in next st, repeat around. (36 sts)
Rounds 10–11: Sc in each st around. (36 sts)
Round 12: Sc in next st, dec, repeat around. (24 sts)
Round 13: Sc in each st around. (24 sts)
Pause here to embroider the face before closing the head.
Using black yarn or embroidery thread, stitch a small nose onto the front of the muzzle area. Add two eyes using French knots or tiny straight stitches.
Lightly stuff the head. Keep the muzzle area fairly flat so the bear face sits nicely.
Final Round: Dec around until the opening closes.
FO and leave a long tail for sewing.
Ears
Make 2.
Use brown yarn.
Round 1: Ch 2, work 6 sc into the 2nd ch from hook.
Round 2: Inc in each st around. (12 sts)
Round 3: Sc in next st, inc in next st, repeat around. (18 sts)
Round 4: Sc in each st around. (18 sts)
FO, leaving a tail for sewing.
Flatten the ears slightly and sew them to the top sides of the bear’s head.
Body Circles
Make 2.
Use brown yarn.
Round 1: Ch 2, work 6 sc into the 2nd ch from hook.
Round 2: Inc in each st around. (12 sts)
Round 3: Sc in next st, inc in next st, repeat around. (18 sts)
Round 4: Sc in next 2 sts, inc in next st, repeat around. (24 sts)
Round 5: Sc in next 3 sts, inc in next st, repeat around. (30 sts)
Round 6: Sc in next 4 sts, inc in next st, repeat around. (36 sts)
Round 7: Sc in next 5 sts, inc in next st, repeat around. (42 sts)
Round 8: Sc in next 6 sts, inc in next st, repeat around. (48 sts)
Round 9: Sc in next 7 sts, inc in next st, repeat around. (54 sts)
Round 10: Sc in next 8 sts, inc in next st, repeat around. (60 sts)
Round 11: Sc in next 4 sts, inc in next st, repeat around 12 times. (72 sts)
Round 12: Sc in each st around. (72 sts)
FO on the first body circle and weave in the end.
For the second body circle, leave a long yarn tail for sewing the two body pieces together later.
Tail
Use brown yarn.
Round 1: Ch 2, work 6 sc into the 2nd ch from hook.
Round 2: Inc in each st around. (12 sts)
FO, leaving a tail for sewing.
Sew the tail to the back end of one body circle. This will be the front/top body piece before the second circle is attached behind it.
Paws
Make 4.
Use brown yarn.
Round 1: Ch 2, work 6 sc into the 2nd ch from hook.
Round 2: Inc in each st around. (12 sts)
Round 3: Sc in next st, inc in next st, repeat around. (18 sts)
Round 4: Sc in next 2 sts, inc in next st, repeat around. (24 sts)
Rounds 5–7: Sc in each st around. (24 sts)
Lightly stuff each paw.
FO, leaving a long tail for sewing.
Using black yarn or embroidery thread, stitch small claw marks onto the end of each paw.
Assembly
Lay one body circle flat. This will be the front/top of the coaster.
Sew the head to one edge of the body circle. Make sure the face is facing upward.
Position the paws around the body. You can place the legs stretched out for a relaxed bear look, or tuck them closer to the body for a rounder teddy bear style. Sew each paw securely in place.
Sew the tail to the opposite end of the body if you have not already attached it.
Once all pieces are attached to the first body circle, place the second body circle behind it. Wrong sides should be facing together, with all loose joins tucked neatly between the two layers.
Sew the two body circles together around the edge. Keep your stitches neat and even so the coaster sits flat.
Weave in all remaining ends.
Finishing Tips
Steam-block or gently press the body section with your hands to help the coaster sit flat. Avoid pressing the stuffed head or paws too firmly.
For a more practical coaster, cotton yarn is best because it handles moisture better than acrylic. If you are making these for a market stall, try a set of four bears in different shades of brown, cream, and grey.
Looking for more coaster patterns to crochet? Check out these Crochet designs on Etsy.
Looking for a dog or puppy coaster? Check out this online video
For something a little cheekier than the usual flower or granny square coaster, this Crochet Lizard Coaster Pattern PDF is such a fun one to add to your list. It’s a beginner-friendly reptile mug rug with plenty of personality, and it’s a great stash-busting project if you’ve got green cotton yarn sitting in the basket waiting for its moment.