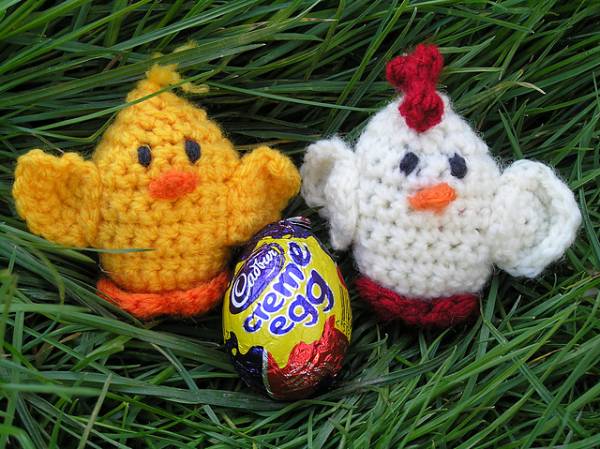
If receiving a Creme egg isn’t enough for your kidlets then how about wrapping it up or hiding it in these cute little Creme egg covers. These also make great little sellers on stalls. A basket of these little chicks will surely excite kids of all ages. Including those chocolate lovers that need to hide their chocolate. (This is me) The free Easter pattern is available here creme egg creatures spinstar creations.
Check out our NEW Facebook page for Crochet. This page is only about Crochet!! Free pattern links, tips tricks and tutorial videos. We will be sharing it all to the ONE SPOT.
Make sure you LIKE the new Crochet Facebook Page so you don’t miss out.
Looking for more Easter themed Crochet patterns? Check out some of our favorite places for Crochet patterns. Etsy. has lots of new patterns and the perfect place to find Crochet patterns that are trending or seasonal. We also love Anniescatalog for buying individual patterns and a great place to source vintage styled designs and last but not least, Leisure Arts for more traditional styled patterns and books.
Creme Egg Crochet Critters
A playful amigurumi pattern to cradle your chocolate eggs (American terms)
Materials & Notes
- Yarn: DK weight scraps (shown in 3.5mm hook)
- Hook: 3.5mm (or size to match your yarn)
- Key Supplies:
- Creme eggs (buy extra – they’re irresistible!)
- Yarn needle, scissors
- Pro Tip: Wash sticky fingers before handling yarn!
Stitch Guide
| Term | Meaning |
| MR | Magic Ring |
| sl st | Slip Stitch |
| ch | Chain |
| sc | Single Crochet |
| hdc | Half Double Crochet |
| dc | Double Crochet |
| tc | Treble Crochet |
| sc2tog | Decrease (2 sc together) |
Pattern Instructions
Body (Egg Pocket)
Base:
- MR: 6 sc, tighten.
- Rnd 2: Ch 1, 2sc in each st (12 sc). Join with sl st.
- Rnd 3: Ch 1, [1sc, 2sc] around (18 sc). Join.
- Rnd 4: Ch 1, [1sc, 1sc, 2sc] around (24 sc). Do not join – continue spiraling.
Back Slot (for egg insertion):
5. Work back-and-forth rows (not rounds):
- Sc in each st, ch 1, turn. Repeat for 6 rows.
- Final row: Sc across, do not turn; join gap with 2 sc.
Shaping the Top:
7. Decrease with sc2tog:
- Rnd 1: [sc2tog, 1sc] around.
- *Rnd 2+:* Continue decreasing until opening fits egg snugly.
- Fasten off, weave tail through remaining sts, pull tight.
Accessories
Base Options
Nest:
- Follow body base instructions (Rnds 1-4), using a larger hook.
- Work 2-3 extra even rounds.
Feet (Make 2):
- MR: 6 sc.
- Rnd 2: 2sc in each st (12 sc). Join.
- Toes: Ch 3, tc in next 2 sts, ch 3, sl st in same st. Sl st to next st. Fasten off.
Wings (Make 2):
- MR: 6 sc.
- Rnd 2: 2sc in each st (12 sc). Join.
- Shape: Sc, [2hdc], [2dc], [2tc], [2dc], [2hdc], sc. Fasten off.
Beak (Use thinner yarn if possible):
- Ch 4.
- Pull loop through 2nd ch, then through last ch (3 loops on hook).
- Yarn over, pull through all loops. Fasten off.
Comb (Optional – omit for ducklings):
- Make 3 strips:
- Each strip: Ch 4, sc in 2nd ch and next 2 ch (3 sc). Fasten off.
Assembly
- Pin First: Arrange wings, beak, and comb before sewing.
- Eyes: Embroider with black yarn (don’t pull too tight!).
- Insert Egg: Gently push creme egg through back slot.
Final Notes
- Duckling Variation: Replace comb with tufted yarn hair.
- Stability Tip: Weight the nest with dried beans or stuffing.
Enjoy your sweet, snuggly critter!