• Home
  • Suggest A DIY
  • DIY Newsletter

Crochet

Patterns, projects and techniques

  • About CraftGossip
  • Our Network
    • Bath & Body Crafts
    • Candle Making Ideas
    • Crochet Ideas
    • Cross Stitch
    • Edible Crafts
    • Felting Patterns
    • Glass Art
    • Home & Garden Ideas
    • Indie Crafts
    • Jewelry Making
    • Kids Crafts
    • Knitting Patterns
    • Lesson Plans
    • Needlework
    • Party Ideas
    • Polymer Clay
    • Quilting Ideas
    • Recycled Crafts
    • Scrapbooking
    • Sewing Patterns
    • Card Making
    • DIY Weddings
    • Not Craft Ideas
  • Giveaways
  • Roundups
  • Store
  • Search

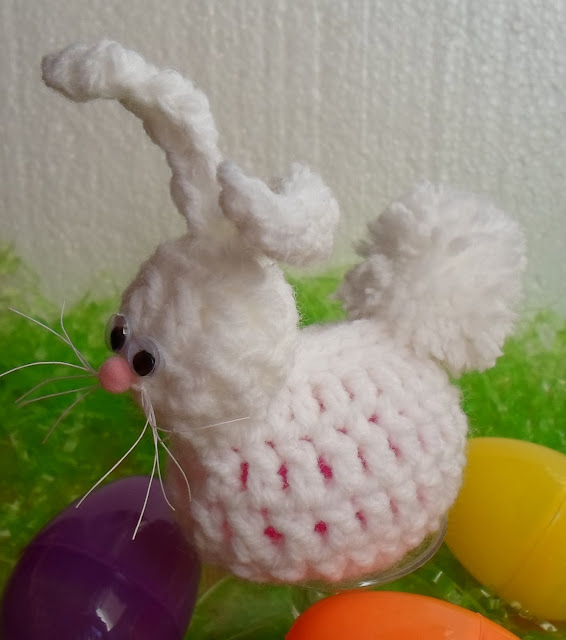
How to Crochet an Easter Bunny Egg Holder

March 24, 2020 by Sarah White

This picture tutorial shows how to crochet an Easter Bunny plastic egg holder. It’s a cute project that comes together pretty quickly. You can see the full Crochet pattern here.

Looking for more Easter themed Crochet patterns? Check out some of our favorite places for Crochet patterns. Etsy. has lots of new patterns and the perfect place to find Crochet patterns that are trending or seasonal. We also love  Anniescatalog   for buying individual patterns and a great place to source vintage styled designs and last but not least,  Leisure Arts for more traditional styled patterns and books.
«
»

Have you read?

Mattress Stitch Crochet: How To Join Crochet Pieces With A Nearly Invisible Seam

There comes a point in nearly every crochet project where you have to face the seam.

You have made the squares. You have crocheted the panels. You have carefully followed the pattern, possibly had a little argument with your stitch count, and now the whole thing needs to become one finished piece rather than a hopeful pile of yarn rectangles sitting on the sofa.

This is where mattress stitch crochet comes in.

Mattress stitch is one of those finishing techniques that sounds much fancier than it actually is. It is a hand-sewing method used to join crochet pieces together so the seam sits flat and, when worked neatly, almost disappears into the fabric. It is especially useful for joining crochet panels, granny squares, cardigan seams, shoulder seams, cushions, hats, bags and blanket blocks.

It is also a lovely technique to learn if you are tired of seams that look bulky, lumpy or a bit “homemade in the wrong way.” And yes, I say that with love, because we have all made a seam that looked like it had been dragged through the yarn basket backwards.

If you are still building your crochet confidence, you might also like our beginner guide on how to read crochet patterns before tackling more finishing techniques.

What Is Mattress Stitch In Crochet?

Mattress stitch crochet is a sewing technique used to join two pieces of crochet fabric together edge-to-edge. Instead of creating a visible raised join like a slip stitch seam or single crochet join, mattress stitch pulls the two edges together so the seam is hidden between the pieces.

The result is:

  • flat
  • neat
  • flexible
  • almost invisible from the right side
  • less bulky than many crochet joins

It is commonly used for crochet garments, crochet blankets made from squares, cushion covers, bags, hats and any project where you want the seam to look polished rather than decorative.

You may also see people search for this as “matress stitch crochet” with one “t,” but the correct spelling is mattress stitch.

Why Use Mattress Stitch For Crochet Seams?

Mattress stitch is especially helpful when you want the join to quietly do its job without becoming the star of the project.

Use mattress stitch when:

  • joining crochet garment panels
  • sewing shoulder seams
  • closing side seams on crochet tops or cardigans
  • joining granny squares without a raised ridge
  • sewing cushion panels together
  • closing the back seam of a crochet hat
  • joining crochet pieces made in different colours
  • finishing projects where a clean, professional look matters

For example, if you are making a wearable granny square project like one of the ideas in our post on ways to wear crochet granny squares, mattress stitch is a great joining option because it keeps the seams from becoming too chunky.

It is also a useful technique for simple garment shapes, including rectangle-style makes like this simple crochet cardigan. A good seam can make even a very basic construction look much more finished.

What You Need

You only need a few simple supplies:

  • Two crochet pieces to join
  • Matching yarn or a smooth yarn in a similar weight
  • Tapestry needle or yarn needle
  • Scissors
  • Stitch markers or locking markers
  • A flat surface for laying out your pieces

A blunt-tip tapestry needle is much easier to use than a sharp sewing needle because it slides between crochet stitches rather than splitting the yarn. If you are putting together a finishing kit, Amazon is handy for tapestry needle sets, locking stitch markers and small scissors. If you are planning a larger blanket or garment project, Mary Maxim is also worth checking for yarn, crochet kits and beginner-friendly yarn bundles.

Should You Use Matching Or Contrasting Yarn?

For most projects, use a yarn that matches one of the pieces you are joining. If the two pieces are different colours, choose the colour that will be least noticeable from the front.

For a practice swatch, use a contrasting colour. It will look odd, but it makes it much easier to see where your needle is going. Once you understand the movement, switch to matching yarn for your actual project.

This is one of those rare times when making a slightly ugly practice sample is actually useful. Think of it as the crochet version of testing paint behind the couch.

Before You Start: Block Your Pieces

Blocking is not always exciting, but it makes mattress stitch much easier.

If your crochet squares or panels are curling, stretching or sitting slightly wonky, the seam has to fight against all of that. Light blocking helps even out the edges, relax the stitches and make the pieces easier to line up.

This is especially important for granny squares, blanket blocks and garment panels.

If you are working on a square-based project, you might find inspiration in our granny square baby blanket crochet pattern or the classic Basic Crochet Granny Square on CraftBits. Both are the sort of projects where learning a neat invisible join really pays off.

How To Work Mattress Stitch Crochet

This method is worked with the right side of your crochet facing up. You will sew from side to side, picking up corresponding parts of the stitches on each piece.

Step 1: Lay Your Crochet Pieces Side By Side

Place the two crochet pieces flat with the right sides facing up.

The edges you want to join should be touching. Do not overlap them.

Line up the rows, stitches or corners carefully. If you are joining granny squares, make sure the corners match. If you are joining garment panels, match the shoulder points, armholes, hem edges or any shaping points first.

Use stitch markers to pin matching points together every few inches. This stops one side from mysteriously growing longer than the other, which is a very common crochet seam problem.

Step 2: Thread Your Needle

Cut a length of yarn about three times the length of the seam.

Thread it onto a tapestry needle. Do not use a piece that is too long or it will twist, fray and generally behave like it has somewhere better to be.

Leave a tail long enough to weave in securely later.

Step 3: Secure The First Stitch

Insert your needle through the first stitch or edge space on one piece, then through the matching stitch or edge space on the other piece.

Pull the yarn through gently, leaving a small tail.

You can tie a loose temporary knot if needed, but I prefer to avoid bulky knots where possible and weave the tail in firmly at the end.

Step 4: Pick Up The Inner Loops

On the first piece, insert your needle under the inner loop or inner strand of the next stitch along the edge.

Then move across to the second piece and pick up the matching inner loop or strand.

You are not sewing over the top like a whip stitch. You are working from side to side, catching a small part of each edge so the seam can pull closed neatly.

Think of it like lacing up a shoe, but much prettier and with fewer childhood flashbacks.

Step 5: Repeat From Side To Side

Continue moving from one side to the other:

  • pick up a loop or strand on the left piece
  • pick up the matching loop or strand on the right piece
  • pull the yarn through gently
  • move to the next matching point

Do not pull tightly after every stitch. Leave the seam slightly loose as you work for an inch or two.

You should see a loose ladder or zigzag of yarn between the two pieces.

Step 6: Gently Pull The Seam Closed

After working a few stitches, hold the fabric flat and gently pull the seaming yarn.

The two crochet edges should draw together and the joining yarn should disappear into the seam.

Do not yank. If you pull too tightly, the seam will pucker and the fabric may bunch. You want the seam to close, not gather like a drawstring bag.

Step 7: Keep Checking The Front

Every few inches, stop and smooth the seam with your fingers.

Check that:

  • the rows still line up
  • the seam is flat
  • the tension matches the crochet fabric
  • the join is not puckering
  • no stitches have been skipped

This tiny pause saves a lot of unpicking later. Ask me how I know.

Step 8: Finish And Weave In Ends

When you reach the end of the seam, secure the final stitch by passing through the last matching edge points once more.

Weave the tail back through the seam on the wrong side, changing direction once or twice so it does not slip out.

Trim the yarn neatly.

How To Join Crochet Squares With Mattress Stitch

Mattress stitch is lovely for joining crochet squares, especially if you want the front of the blanket to look smooth and uninterrupted.

For granny squares:

  1. Block all squares to the same size.
  2. Lay two squares side by side, right sides up.
  3. Match the corners first.
  4. Place stitch markers at the corners and halfway points.
  5. Work mattress stitch through the inner loops or matching edge strands.
  6. Pull the seam closed gently every inch or two.
  7. Join squares into strips, then join the strips together.

This works beautifully for blankets, cushions, bags and patchwork-style crochet projects.

For a small project to practise on, the Crochet Granny Square Pillow on CraftBits is a good example of a project where neat joining makes the finished piece look much more polished.

How To Mattress Stitch Crochet Row Ends

Joining row ends can feel a little trickier than joining neat stitch tops because the edge may not have obvious loops.

The key is consistency.

Choose one part of the row-end edge and stick with it all the way along. You might work under the turning chain bump, into the side of the first or last stitch, or slightly in from the edge if the edge is loose.

Tips for row-end seams:

  • Match row to row before you begin.
  • Use stitch markers every few rows.
  • Avoid working too close to a loose edge.
  • Keep your tension relaxed.
  • Check the right side often.

If one piece has more rows than the other, do not simply force them together at the end. Ease the extra fullness gradually across the seam by matching key points first, then distributing the difference evenly.

Mattress Stitch Crochet For Garments

For crochet garments, mattress stitch is often used for:

  • shoulder seams
  • side seams
  • sleeve seams
  • underarm seams
  • joining front and back panels
  • seaming rectangles into cardigans or tops

A flat seam matters more in garments because bulky seams can feel uncomfortable or sit awkwardly on the body.

For shoulder seams, use a firm but not tight mattress stitch. The shoulder area takes weight, especially in cotton or heavy yarn garments, so the seam needs to be secure.

For side seams, keep the tension flexible so the garment still has drape.

For underarms, make sure the seam is not too bulky. This is one place where a neat finish makes a big difference to comfort.

If you enjoy upcycling crochet blankets into wearable pieces, our guide on turning crochet blankets into cardigans talks more about planning seams and construction before you start cutting or joining.

Mattress Stitch Vs Whip Stitch Vs Slip Stitch Join

Here is the simple difference.

Mattress stitch creates a flat, nearly invisible seam. It is best when you want a polished finish.

Whip stitch is quick and easy, but it can be more visible. It is useful for casual projects, toys, simple seams and places where the seam will not be noticed.

Slip stitch join is crocheted with a hook rather than sewn with a needle. It is strong and neat but usually creates a visible ridge or line.

Single crochet join creates a decorative raised seam. It is great when you want the join to be part of the design.

So if the question is “Which crochet seam is the least visible?” mattress stitch is usually the answer.

When Not To Use Mattress Stitch

Mattress stitch is not always the best choice.

You may prefer another join if:

  • you want a decorative raised seam
  • the project needs a very firm structural edge
  • you are joining very open lace where there are few solid stitches to catch
  • you want the seam to be part of the design
  • you are making a quick project where a visible seam does not matter

For rustic blankets, chunky cushions or playful granny square projects, a visible join can be charming. Not every seam has to vanish. Sometimes the seam wants a little moment of glory.

Common Mattress Stitch Crochet Mistakes

Pulling Too Tight

This is the big one. Pulling too tightly causes puckering and makes the seam stiff.

Pull just enough to close the gap.

Skipping Stitches

Skipped stitches make the seam uneven and can cause one side to ripple.

Use stitch markers to match key points before sewing.

Using The Wrong Yarn

A yarn that is too thick can make the seam bulky. A yarn that is too weak can break when pulled.

Use the same yarn as the project where possible, or a smooth yarn in a similar weight.

Not Blocking First

Unblocked pieces can be harder to align, especially if the edges curl.

A quick block makes the seam much easier to manage.

Working Too Close To The Edge

If you sew through loose edge fibres only, the seam may gap or pull out.

Work into a stable loop or strand of the stitch.

Troubleshooting: Why Does My Mattress Stitch Seam Look Wrong?

The seam is puckering:
Your tension is too tight. Loosen the last few stitches and smooth the fabric flat before continuing.

The seam is visible:
You may be catching too much of the stitch, using a contrasting yarn, or working too far from the inner edge.

The pieces are not lining up:
Add more stitch markers. Match corners, centre points and shaping points before you sew.

The seam feels bulky:
Your seaming yarn may be too thick, or you may be catching too many loops on each side.

There are gaps between the pieces:
Pull the seam a little more firmly, or work slightly deeper into the edge stitches.

Best Projects For Practising Mattress Stitch Crochet

If you are new to mattress stitch, start with small, flat pieces.

Good practice projects include:

  • two crochet swatches
  • granny squares
  • dishcloth squares
  • cushion panels
  • simple blanket blocks
  • a basic hat rectangle
  • small bag panels

Avoid starting with a fitted garment if this is your very first try. Practise on a couple of scraps first so your hands learn the motion.

A simple square-based project is ideal because you can clearly see whether the edges are lining up.

Quick Mattress Stitch Crochet Checklist

Before you seam, check:

  • Are the pieces blocked?
  • Are the right sides facing up?
  • Are the edges touching but not overlapping?
  • Have you matched corners and key points?
  • Are you using a suitable yarn needle?
  • Is your seaming yarn the right weight?
  • Are you pulling gently, not tightly?
  • Are you checking the front as you go?

A few extra minutes here makes the finished project look so much better.

FAQ: Mattress Stitch Crochet

Is mattress stitch the same for crochet and knitting?

The idea is similar, but the exact place you insert the needle can differ because crochet stitches and knitted stitches are built differently. In crochet, you are usually catching loops, strands or stable edge points along the crochet fabric.

Is mattress stitch invisible?

Mattress stitch can be nearly invisible when worked with matching yarn and even tension. It may still show slightly on very bulky yarn, highly textured stitches or strongly contrasting colours.

Do you work mattress stitch on the right side or wrong side?

For crochet, mattress stitch is commonly worked with the right side facing up so you can see how the seam is closing as you go.

Can I use mattress stitch for granny squares?

Yes. Mattress stitch is a great way to join granny squares when you want a flat, subtle seam without a raised ridge.

Can beginners learn mattress stitch?

Absolutely. It may feel fiddly for the first few inches, but the movement is simple once you get going. Practise on two small swatches before using it on a finished project.

What needle do I need for mattress stitch crochet?

Use a blunt tapestry needle or yarn needle with an eye large enough for your yarn. A blunt needle helps you pass between stitches without splitting the yarn.

How much yarn do I need for mattress stitch?

A good starting point is about three times the length of the seam. For long seams, use shorter lengths and join new yarn as needed so the yarn does not fray.

Can I use mattress stitch on bulky crochet?

Yes, but be gentle with tension. Bulky yarn seams can become thick quickly, so catch smaller inner loops and avoid pulling too tightly.

A Neat Seam Is Worth Learning

Mattress stitch crochet is one of those quiet finishing skills that can completely change how your projects look. It does not shout for attention, it does not add a chunky ridge, and it does not distract from all that lovely crochet you spent hours making.

It simply pulls everything together neatly.

And honestly, that is sometimes the difference between “I made this” and “I made this and I am very smug about it.”

Once you have used mattress stitch on a few granny squares, cushion panels or garment seams, it becomes one of those techniques you will reach for again and again. Keep a tapestry needle, a few stitch markers and a little patience nearby, and your crochet seams will start behaving themselves beautifully.


Helpful Mattress Stitch Crochet Video Tutorials

Sometimes written instructions are enough, and sometimes you just need to see where that needle is meant to go. Mattress stitch is one of those crochet finishing techniques that becomes much easier once you watch the side-to-side movement a few times.

Here are a few helpful YouTube tutorials worth watching alongside this guide:

  • Seaming Crochet with a Mattress Stitch | Easy Tutorial — a beginner-friendly video showing how to seam crochet pieces together using mattress stitch. This is a good one to watch if you are joining flat crochet panels or motifs.
  • How to Crochet: Mattress Stitch Seaming — a clear visual tutorial showing how mattress stitch works for both crochet and knit-style seams. Handy if you like seeing the seam tighten as it closes.
  • How to Join Granny Squares with an Invisible Seam — especially useful if you are joining granny squares and want that neat, nearly invisible finish without a raised crochet ridge.
  • How to Use the Mattress Stitch for Side Seams | Crochet Tutorial — a good choice for crochet garments, side seams, cardigan panels and any project where you need two crochet edges to sit flat together.
  • How to Work Mattress Stitch for Granny Squares — another useful video for square-based projects, blankets and cushions where lining up corners neatly really matters.

If you are new to crochet seaming, I suggest watching one of the panel-seaming videos first, then trying the technique on two small swatches before moving on to your actual blanket or garment. It is much better to practise on scrap yarn than to discover halfway down a cardigan seam that you have been pulling far too tightly. Ask me how I know.

More Articles

Afghans, Blankets & Throws amigurumi Baby Hat Baby Patterns bags Beanies Beginner Book Reviews Christmas CHRISTMAS Clothing Crochet Patterns Crochet Techniques & Ideas Free Crochet Patterns Granny Squares Halloween Patterns Quick Scarfs shawls

RSS More Articles

  • Endrick Knitting During the World Cup? The Wholesome Moment Crafters Loved
  • How To Sew A Shirt Collar With A Collar Stand: A Step-By-Step Guide For Neater Shirtmaking
  • Learn about French Guiana for Kids
  • Crochet Rakhi Bracelets You Can Make, Gift, Or Buy Handmade
  • Book Review: Shadow Knitting by Vivian Høxbro
  • 10 Clever Ways To Upcycle An Odd Sock
  • Free Crochet Pattern: Evil Eye Rakhi Bracelet
  • Floret Farm’s Cut Flower Garden Review: A Dreamy Flower Book for Gardeners, Growers, and Bouquet Lovers
  • 12 Handmade Card Ideas with Bees
  • Beach Bag Knitting Patterns

Pick Your Blog

  • Sewing
  • Knitting
  • Quilting
  • Crochet
  • Home & Garden
  • Recycled Crafts
  • Scrapbooking
  • Card Making
  • Polymer Clay
  • Cross-Stitch
  • Edible Crafts
  • Felting
  • Glass Art
  • Indie Crafts
  • Kids Crafts
  • Jewelry Making
  • Lesson Plans
  • Needlework
  • Bath & Body
  • Party Ideas
  • Candle Making
  • DIY Weddings
  • Not Craft
  • Free Craft Projects

Copyright © 2026 · CraftGossip | Start Here | Contact Us | Link to Us | Your Editors | Privacy and affiliate policy