This is so ridiculously kitsch I just had to share it with you. I know for a fact that my Grandma would have proudly displayed something like this in her bathroom — and honestly, the more I look at it, the more I kind of want one too! It’s quirky, colorful, and full of retro charm.
Can’t you just imagine how adorable this would be in a kid’s en suite bathroom? (Yes, my kids are lucky enough to have their own!) It’s the kind of fun, cheeky decor that brings a smile every time you walk in.
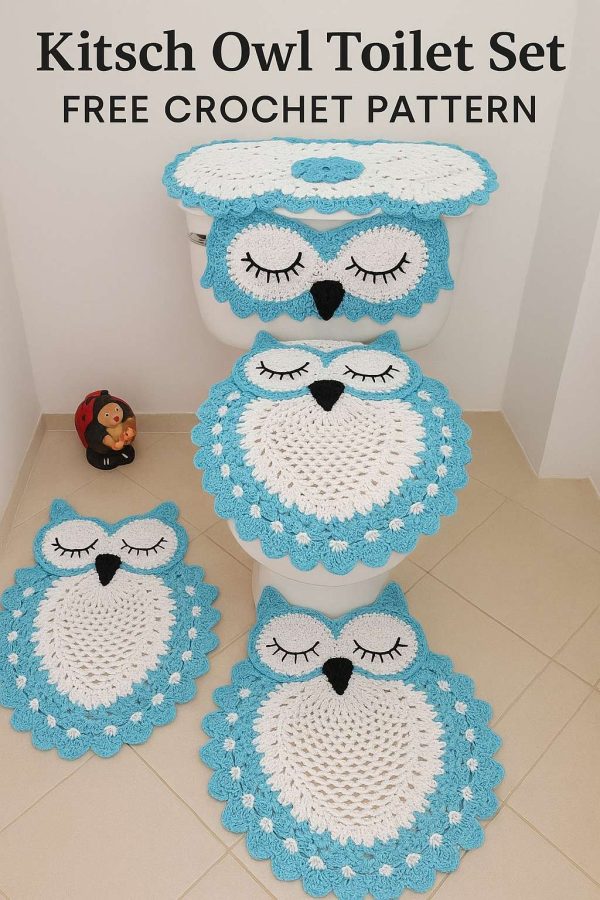
Free Crochet Pattern – Kitsch Owl Toilet Set
Whether you’re going full granny-core or just love adding whimsical handmade touches around the house, this owl toilet set is a hoot!
Free Crochet Pattern – Kitsch Owl Toilet Set Youtube video in Portuguese
English Version Below – Thanks to Marissa J. for translating this for us.
Owl Bathroom Rug – Body
Materials Needed:
Main Color (MC): Yarn of your choice
Contrast Color (C2): Yarn of your choice
Crochet Hook: Size 4 mm (G)
Tapestry Needle: For weaving in ends
Pinterest
+10
Blue Star Crochet
+10
thefunkystitch.com
+10
HiCrochet
Better Homes & Gardens
Body Pattern
With MC:
Foundation Ring:
Ch 10, join with sl st to form a ring.
Row 1:
Ch 3 (counts as first dc), 2 dc, ch 2, 3 dc, ch 5, 3 dc, ch 2, 3 dc into ring.
Note: A small gap in the ring is normal and will be used later.
Row 2:
Ch 3, 3 dc in ch-2 sp, ch 2, 3 dc in same ch-2 sp, 13 dc in ch-5 sp, 3 dc in next ch-2 sp, ch 2, 3 dc in same ch-2 sp; turn.
Note: Do not join to previous row; this creates the scalloped edge.
Row 3:
Ch 3, 3 dc in ch-2 sp, ch 2, 3 dc in same ch-2 sp, dc in each dc across (13 dc), 3 dc in next ch-2 sp, ch 2, 3 dc in same ch-2 sp; turn.
Row 4:
Ch 3, 3 dc in ch-2 sp, ch 2, 3 dc in same ch-2 sp, ch 1, (dc, ch 1) in each dc across (13 times), 3 dc in next ch-2 sp, ch 2, 3 dc in same ch-2 sp; turn.
Row 5:
Ch 3, 3 dc in ch-2 sp, ch 2, 3 dc in same ch-2 sp, ch 3, (sc in dc, ch 3) across (13 times), 3 dc in next ch-2 sp, ch 2, 3 dc in same ch-2 sp; turn.
Rows 6–16:
Repeat Row 5, decreasing the number of (sc in ch-3 sp, ch 3) repeats by 1 each row. For example, Row 6 will have 12 repeats, Row 7 will have 11, and so on, until Row 16 has 2 repeats.
Row 17:
Ch 3, 3 dc in ch-2 sp, ch 2, 3 dc in same ch-2 sp, ch 5, sc in ch-3 sp, ch 5, 3 dc in next ch-2 sp, ch 2, 3 dc in same ch-2 sp; turn.
Row 18:
Ch 3, 3 dc in ch-2 sp, ch 2, 3 dc in same ch-2 sp, 3 dc in ch-2 sp, ch 2, 3 dc in ch-2 sp. Fasten off.
Outer Rounds
With C2, starting at the bottom in the starting ring:
Round 1:
Ch 3, 2 dc, ch 2, 3 dc in starting ring, 3 dc, ch 2, 3 dc in ch-3 sp at the beginning of each row; repeat around the edge (19 fans total).
Round 2:
Sl st in first 3 dc, ch 3, 2 dc in ch-2 sp, ch 2, 3 dc in same ch-2 sp, 3 dc in next ch-2 sp, ch 2, 3 dc in same ch-2 sp, ch 1; repeat around (19 fans total).
Round 3:
Sl st in first 3 dc, ch 3, 2 dc in ch-2 sp, ch 2, 3 dc in same ch-2 sp, 3 dc in next ch-2 sp, ch 2, 3 dc in same ch-2 sp, dc in ch-1 sp, ch 1, dc in same ch-1 sp; repeat around, ending with 3 dc in ch-2 sp, ch 2, 3 dc in same ch-2 sp. Sl st in next 3 dc, fasten off.
Round 4:
Starting in the middle of the 3rd fan from the base, ch 2, 2 dc, ch 3, sc in middle of V, ch 1, 3 dc in ch-2 sp, ch 2, 3 dc in same ch-2 sp, dc, ch 1, dc in center of V, 3 dc, ch 2, 3 dc in center of fan; repeat around, ending with a half fan on the opposite side.
Round 5:
Repeat Round 4, placing 3 dc in the first and last half fans.
Round 6:
3 sc, ch 2, sc in ch section before fan, {ch 1, dc, picot repeat 6 times, sc in V}; repeat around to last half fan, ch 2, 3 sc in half fan. Fasten off.
? Eyes (Make 2)
With Black:
Make a magic circle, ch 3, 14 dc into circle, sl st to join. Fasten off.
With Eye Color:
2 dc in each dc around (28 dc total), sl st to join.
With Black:
2 dc in next st, 1 dc in next st; repeat around (42 dc total), sl st to join. Fasten off.
Better Homes & Gardens
With Black:
2 dc in next st, 1 dc in next 2 sts; repeat around, sl st to join. Fasten off.
Assembly:
Join eyes with 10 sc, leaving a small gap between them.
With C2, dc around the eyes, following the shape to create a smooth outline.
Beak
Starting at the top center between the eyes, use sc stitches to create a solid triangle shape for the beak. Adjust as needed to achieve the desired look.
Brow
Row 1:
Starting in the center above the beak, sl st up the side, then 4 dc.
Row 2:
Sl st up the side, then 7 dc.
Row 3:
Sl st up the side, then 15 dc.
Ears (Make 2)
From the brow section, count 14 dc to the side for the ear placement.
Start with 9 dc, decreasing by skipping stitches at each end in subsequent rows to create a tapering effect (9, 7, 5, 3, 1).
Finishing Touches
Attach the assembled face to the body securely.
Weave in all ends.
Block the rug if necessary to achieve the desired shape.
Better Homes & Gardens
Looking for more Crochet Owl themed patterns and projects? Check out these Crochet Owl themed patterns on Etsy.


This is so cute! I may have to make myself a set. Thanks for sharing, lol!
This is so kitsch’y’ it may just catch on!!! lol
Just clicked on the link for the pattern and my Kaspersky says the site is infected with a trojan. 🙁
My browser (Microsoft Edge) says the website where this pattern is has been reported to Microsoft because it is collected information like banking, etc. Just thought you should know.
Thanks for letting us know – I think they must have been hacked. Its working fine for me now.
Does anyone have this pattern they could share? I clicked on the link and it was in another language but it looks like it says it’s not available. Thanks
I can’t find the pattern either and the other page is in another language
yes please i cant find the pattern either, sorry…
So has anyone been able to find this pattern?
This is the link I found for the pattern.
http://fabartdiy.org/diy-crochet-owl-toilet-tank-seat-bathroom-set-cover-free-pattern/
Is there an English version of this pattern?