• Home
  • Suggest A DIY
  • DIY Newsletter

Crochet

Patterns, projects and techniques

  • About CraftGossip
  • Our Network
    • Bath & Body Crafts
    • Candle Making Ideas
    • Crochet Ideas
    • Cross Stitch
    • Edible Crafts
    • Felting Patterns
    • Glass Art
    • Home & Garden Ideas
    • Indie Crafts
    • Jewelry Making
    • Kids Crafts
    • Knitting Patterns
    • Lesson Plans
    • Needlework
    • Party Ideas
    • Polymer Clay
    • Quilting Ideas
    • Recycled Crafts
    • Scrapbooking
    • Sewing Patterns
    • Card Making
    • DIY Weddings
    • Not Craft Ideas
  • Giveaways
  • Roundups
  • Store
  • Search

Striped Ripple Afghan- Free Crochet Pattern

July 17, 2025 by Shellie Wilson

Let me just say, there’s something undeniably nostalgic about a ripple afghan. Maybe it’s the wavy lines that remind me of the blankets draped over the back of my Nan’s couch, or maybe it’s the simple rhythm of the stitches that feels like a crochet meditation. Either way, this Striped Ripple Afghan from Lion Brand has totally stolen my cozy-loving heart.

This pattern is one of those classic-with-a-twist types—bold, modern stripes laid over that beloved ripple texture. The downloadable PDF is clear and beginner-friendly, especially if you’ve tackled basic double crochet before. If you’re still working your way up to pattern confidence, don’t worry—this one walks you through with just the right amount of detail, and there’s no tricky shaping or fancy stitches.

It’s designed with Lion Brand Pound of Love, which makes sense if you’re after a soft, budget-friendly yarn with loads of yardage (less ends to weave in, yes please!). But honestly? You could easily raid your stash and go wild with color combos. I’m already imagining a muted earthy version with soft taupes, rust, and eucalyptus green—or something bright and beachy for a pop of summer on the couch.

What I Loved

  • Soothing stitch rhythm – It’s just the right amount of engaging without needing full brainpower. Great for Netflix nights or stitching on the back deck with a cuppa. 
  • Customizable – Make it baby blanket-sized or go full queen bed—just adjust the starting chain in multiples of 16 + 3. 
  • Minimal finishing fuss – Once you’re done crocheting, you’re basically done. No appliqués, no joining, just weave in those ends and snuggle up. 

A Few Tips from Me

Use stitch markers at the peaks and valleys of your ripple until the pattern becomes second nature. Trust me, it saves a lot of frogging.

If you want cleaner stripes, carry the yarn neatly up the side or plan for a tidy border to hide color changes.

Try using a slightly larger hook than usual for extra drape—especially if your tension runs tight like mine does when I’m on my third cup of coffee!


The Striped Ripple Afghan is a delightful mix of vintage vibes and modern flair. Whether you’re making it for your own lounge room, gifting it to a friend, or donating it to someone in need of handmade warmth, this is the kind of project that feels just as comforting to crochet as it does to wrap yourself in.

Have you made this ripple afghan? I’d love to see your color combos! Tag me or leave a comment over on CraftGossip so we can ooh and aah together.
 

«
»

Have you read?

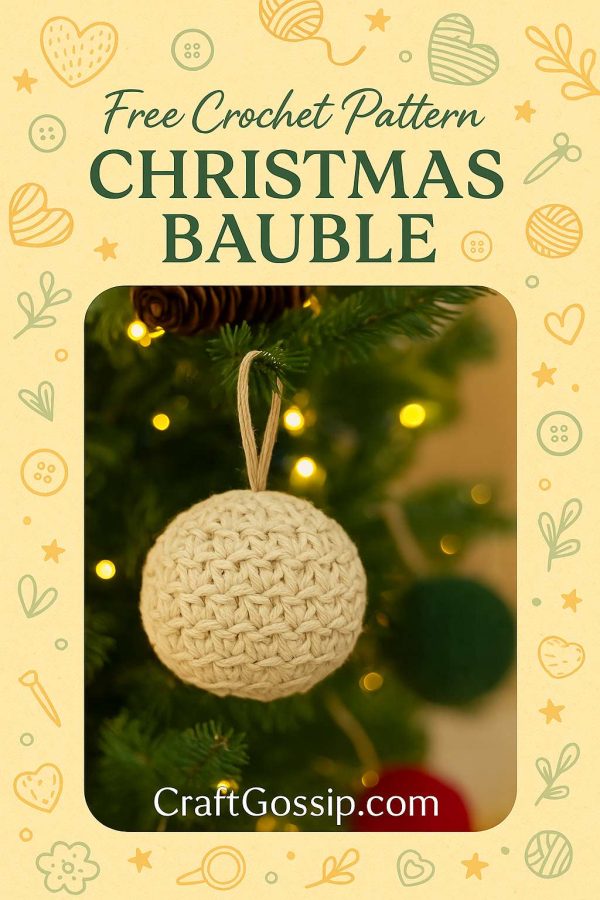
Cozy Crochet Bauble – A Scrap-Busting Holiday Ornament

Looking for a quick and festive little project to whip up during your favorite holiday movie? These plump and jolly baubles are the perfect way to use up those last bits of worsted weight yarn. You only need about 15 yards per ornament—and honestly, once you make one, you might find yourself reaching for your yarn scraps like a woman possessed. They work up in under 30 minutes, and you can customize them with ribbons, wooden beads, or even cinnamon sticks for that extra handmade charm.

They’re a hit as last-minute gifts, package toppers, or tree fillers. Pop a few in a bowl for a cheerful table display, or make a dozen to string across your mantel!

Materials You’ll Need:

  • Worsted weight yarn – around 15 yards per bauble 
  • A 5mm crochet hook (or the size that gives you a tight, tidy stitch) 
  • Tapestry needle 
  • Poly-fil or leftover yarn scraps for stuffing 
  • Optional extras: ribbon, twine, or wooden beads for hanging 

Techniques Used:

  • sc – single crochet 
  • sl st – slip stitch 
  • inc – increase (2 single crochets in one stitch) 
  • inv dec – invisible decrease (single crochet two stitches together using front loops only) 

You’ll be crocheting in a continuous spiral—so no need to join rounds unless you prefer it that way. Just use a stitch marker to keep track of where each round starts!

 Let’s Get Stitching!

Start:
Begin with a magic ring (or, if that’s not your jam, chain 2 and work into the second chain from the hook).

Round 1:
Place 6 single crochets into the center of the ring. Pull it closed tight. (6 sts)

Round 2:
Pop 2 single crochets into each stitch all the way around. (12 sts)

Round 3:
Work 1 single crochet into the first stitch, then 2 into the next. Repeat this pattern all the way around. (18 sts)

Round 4:
One single crochet into each of the next 2 stitches, then 2 into the third. Repeat the set across. (24 sts)

Round 5:
Single crochet into each of the next 3 stitches, then 2 into the fourth. Keep that rhythm going. (30 sts)

Rounds 6 to 10:
Just cruise along with one single crochet in every stitch around. These rounds give your bauble its lovely round shape. (30 sts per round)

Round 11:
Do 1 single crochet in each of the next 3 stitches, followed by an invisible decrease. Repeat that combo around. (24 sts)

Round 12:
Now go: single crochet in 2 stitches, then invisibly decrease the next two. Continue this pattern all the way. (18 sts)
 Tip: At this point, it’s a good idea to start adding your stuffing. Not too much yet—just enough to start shaping.

Round 13:
One single crochet in the next stitch, then an invisible decrease. Keep going. (12 sts)
 Add more stuffing now if needed—this is your last good chance before the top gets snug!

Round 14:
Work invisible decreases around the entire round. (6 sts)

Finishing Touches:

Snip your yarn, leaving a long enough tail to sew. Thread your needle and weave that tail through the last 6 stitches. Pull tight to cinch it shut like a drawstring pouch. Tuck the end inside the bauble and secure with a knot. Weave in any leftover yarn.

Add your hanging string, ribbon, or bead if you’d like—and just like that, your bauble’s ready to deck the halls!


More Articles

Afghans, Blankets & Throws amigurumi Baby Hat Baby Patterns Beanies Beginner Book Reviews Christmas CHRISTMAS Clothing Crochet Patterns Crochet Techniques & Ideas Easy Crochet Patterns Free Crochet Patterns Granny Squares Halloween Patterns Quick Scarfs shawls

RSS feed: More Articles More Articles

  • Free Christmas Tree Bauble Knitting Pattern: An Easy Ornament Knitted Flat
  • 8 No-Cook Keto Lunches for Days When the Stove Can Wait
  • Scandinavian Christmas Winter Lantern Review – A Beautiful Dollar Tree Craft with Cozy Nordic Charm
  • 15 Christmas Gifts You Can Sew in an Afternoon
  • Giant Coloring Pages for Kids and Adults: Free Printables, Posters and Classroom Ideas
  • Cozy Crochet Bauble – A Scrap-Busting Holiday Ornament
  • DIY Gift Tags Using Scrapbooking Supplies You Already Have
  • 5 Elegant Christmas Table Ideas Without Buying Flowers
  • Chaos at the Christmas Knit-Along: A Cosy Knitting Mystery to Watch
  • How To Make A Christmas Lace Bowl From An Old Doily

Pick Your Blog

  • Sewing
  • Knitting
  • Quilting
  • Crochet
  • Home & Garden
  • Recycled Crafts
  • Scrapbooking
  • Card Making
  • Polymer Clay
  • Cross-Stitch
  • Edible Crafts
  • Felting
  • Glass Art
  • Indie Crafts
  • Kids Crafts
  • Jewelry Making
  • Lesson Plans
  • Needlework
  • Bath & Body
  • Party Ideas
  • Candle Making
  • DIY Weddings
  • Not Craft
  • Free Craft Projects

Copyright © 2026 · CraftGossip | Start Here | Contact Us | Link to Us | Your Editors | Privacy and affiliate policy