• Home
  • Suggest A DIY
  • DIY Newsletter

Crochet

Patterns, projects and techniques

  • About CraftGossip
  • Our Network
    • Bath & Body Crafts
    • Candle Making Ideas
    • Crochet Ideas
    • Cross Stitch
    • Edible Crafts
    • Felting Patterns
    • Glass Art
    • Home & Garden Ideas
    • Indie Crafts
    • Jewelry Making
    • Kids Crafts
    • Knitting Patterns
    • Lesson Plans
    • Needlework
    • Party Ideas
    • Polymer Clay
    • Quilting Ideas
    • Recycled Crafts
    • Scrapbooking
    • Sewing Patterns
    • Card Making
    • DIY Weddings
    • Not Craft Ideas
  • Giveaways
  • Roundups
  • Store
  • Search

Giveaway:BLOGTEST #2 – WEEK #1 USE UP THOSE NOVELTY YARNS

February 1, 2010 by jd wolfe

This month, you can win TWO BOOKS!

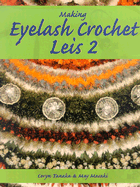
The one pictured above, Making Eyelash Crochet Leis 2 and the first book in the series, Making Eyelash Crochet Leis.

These books are by Coryn Tanaka and May Masaki and were published in 2004 – BUT they are brand, spanking new.  The authors are from Hawaii and offer some interesting and attractive necklaces.  Most of the patterns and techniques they describe can be adapted for other uses too.

QUESTION #1 FOR FEBRUARY:  What is the last thing you made using eyelash yarn?

Here are the rules:

Each item will be mailed to the winner by USPS – books by media mail.  For now, this contest will only be open to participants in the US.  Sorry, but international postal rates, customs forms, etc are just too much for me now.  That may change.

This is how it will work.  Each Monday, I’ll pose a question on my blog.  Everyone who answers the questions will be entered in the drawing on the last day of that month.  Some ‘answers’ may require you to post a link to a specific pattern or site.  The winner will be announced along with the next first Monday’s question.  The winner will have 48 hours to contact me with mailing information.  If the winner doesn’t contact me, the prize will be offered on another occasion.

RESPONSES MUST BE POSTED HERE AND NOT EMAILED TO ME PRIVATELY OR POSTED ELSEWHERE FOR ENTRY.

TO MAKE IT CRYSTAL CLEAR, THE WINNER WILL BE ANNOUNCED ON THE LAST FRIDAY OF EACH MONTH AND THE WINNER MUST EMAIL ME ([email protected]) WITHIN 48 HOURS OF THE ANNOUNCEMENT.  So, for sanity’s sake, that deadline will really mean that I need to hear from you no later than 8 PM the following Monday (so you have plenty of time to email me and I’ll get the email for sure even if I don’t sign on to my email on a Sunday).

Competiton Closes – February 26th

Competition Conditions – Open to US residents only.
«
»

Comments

  1. Ghost Wylder says

    February 1, 2010 at 9:16 pm

    I made an afghan with eyelash and another yarn together. It was so heavy but so soft and well recieved.

  2. Lisa says

    February 1, 2010 at 9:47 pm

    I made a scarf out of ww yarn, and then used ww yarn and eyelash yarn together to do the edging.

  3. Sandy Brown says

    February 1, 2010 at 10:15 pm

    I have never made anything using eyelash yarn. I have been afraid to try using it. It looks like it would be hard.

    NO – it’s not really hard to work with, especially if you carry along a strand of something else. I prefer to carry along a strand of
    #10 (bedspread weight) thread with it. Makes it MUCH easier to work with. jd

  4. Amber says

    February 1, 2010 at 10:24 pm

    Actually, this is too funny…the last thing I made with eyelash yarn was a lei. My friend’s parents were stationed in Hawaii for 3 years and his mother learned how to make leis, who taught him, who taught me how to make one using a straw. He said that his mom does these really involved ones!

  5. Malin says

    February 2, 2010 at 1:36 am

    I did socks with the top in eyelash and the rest in a variegated yarn. Can’t use them though, ticklish 🙂

  6. Bobbi jenkins says

    February 2, 2010 at 4:25 am

    To behonest I;ve only used the eye lash yarn on trimmings for doll clothes Idon;t have good sight to use eyelash yarn bobbijk

  7. Terri says

    February 2, 2010 at 4:26 am

    crocheted hat and sweatshirt trim with flowers for my mother

  8. lee ann beausejour says

    February 2, 2010 at 4:34 am

    I used eyelash yarn with complementary yarn to make hat and scarf sets to donate to homeless shelters-they work up warm and were fashionable at the time. I made 12 sets using different color combinations of yarns. I am still looking for patterns to finish using some of my stash of the very pretty eyelash.

  9. Judith Gellerstein says

    February 2, 2010 at 6:32 am

    I made matching hats and scarves for 4 of my nieces for Hannuka- the hats used the eyelash as the trim and I used the eyelash alone for the scarves. They loved them.

  10. Stephanie Deese says

    February 2, 2010 at 6:44 am

    I made a purse for each of my 2 young teenage nieces for Christmas that used eyelash yarn around the top of the purse, pastel Homespun for the body–they were thrilled with them!!

  11. Ronnie says

    February 2, 2010 at 7:04 am

    I last used eyelash yarn to trim a headscarf that I gave as an exchange gift at our Christmas party.

    I next plan on making a doll shawl for the girls…

  12. Ellie says

    February 2, 2010 at 7:36 am

    I last used it to make an elegant, wide, “fur” collar, tied with black ribbon. It goes with my gray “swing” coat. However, I have more- what to do?

  13. Kathryn says

    February 2, 2010 at 8:44 am

    I’m fairly new to crocheting so I haven’t actually used eyelash yarn. Looking forward to learning how though!

  14. Cathy says

    February 2, 2010 at 10:07 am

    I’ve used the furry type yarns for scarfs and trims on purses and hats for kids. They loved the feel of them.

  15. Jeanne M. Sprague says

    February 2, 2010 at 10:30 am

    I made a trim for a Santa’s hat using eyelash yarn.

  16. Kitten With A Whiplash says

    February 2, 2010 at 11:52 am

    I just fininshed a 6 1/2′ stole in Phentex Fashion Eight yarn, there’s a picture on my blog. I need more ideas to use up a lot of novelty yarns. Buying from thrift shops there always seems to be some novelty yarn mixed into each bag. At least that’s my excuse. I just can’t resist anything shiny, fuzzy, blue or all of the above. Please help me out here!

  17. Shawn says

    February 2, 2010 at 12:38 pm

    For Christmas, I made my daughter a poncho with bright neon colored furry type yarn – she loved it!! Wow is it bright!!

  18. melissa pierce says

    February 2, 2010 at 4:59 pm

    I made a scarf using a strand black eyelash yarn, with a strand of red acrylic yarn. It looked so “emo”, but I love it!

  19. Michele Bentley says

    February 2, 2010 at 5:23 pm

    The last thing I used eyelash yarn for was a trimming on a doggie blankie for my chihauhau. When he pasted away last month hubby put it in the casket with him before buring him.

  20. milai says

    February 2, 2010 at 5:24 pm

    I made a really cute scarf for my daughter in browns with colorful specks in the yarn.

  21. Karen says

    February 2, 2010 at 5:29 pm

    I made a scarf

  22. Karen Mokas says

    February 3, 2010 at 9:04 am

    I just made 3 Chemo hats to give to my local hospital cancer clinic. I like using the eyelash yarn as it looks hsiry.

  23. GJ Amber says

    February 3, 2010 at 1:20 pm

    I make little girl capelets with it. The most preferred colors are white, pink, purple, lavender. The last one I made was a deep purple. Love the fact that they wash so well and are not scratchy.

  24. Billie K says

    February 3, 2010 at 1:24 pm

    I’ve never used Eyelash yarn, but think it would be really cute for a scarf.

    Billie

  25. Chandra Batra says

    February 3, 2010 at 4:40 pm

    I’ve trimmed fingerless gloves with some random Lionbrand red eyelash yarn

  26. Linda G says

    February 4, 2010 at 6:30 am

    I just finished making a muff that I designed for my granddaughter. The trim and strap are made in eyelash yarn. I will be posting the pattern on my blogspot soon.

  27. Kasrol says

    February 8, 2010 at 10:02 am

    The last thing I made with eyelash yarn was a pair of wrist wasrmers. They were sagte Green for my granddaqughter.

Have you read?

How to Make a Crochet Vision Board – Plan the Crochet Projects You Actually Want to Make

If your saved crochet patterns are starting to resemble a small digital library and your yarn stash contains enough “future projects” to keep you occupied until approximately 2047, you might need a crochet vision board.

And yes, I absolutely understand the irony of spending craft time making a board about all the other crafts we intend to make.

But hear me out.

A crochet vision board isn’t simply a pretty collage of yarn photographs. It can be a genuinely useful way to decide which crochet projects you actually want to make, which techniques you’d like to learn and — perhaps most importantly — which yarn you already own that deserves to become something.

Instead of scrolling through hundreds of saved crochet patterns every time you feel like starting something new, you create one visual collection of your crochet plans for the next few months or the year ahead.

Think blankets, cardigans, granny squares, amigurumi, Christmas gifts, new stitches, beautiful colour combinations and those slightly ambitious projects you keep telling yourself you’ll tackle “one day.”

Let’s turn one day into an actual plan.

What Is a Crochet Vision Board?

A traditional vision board contains pictures, words and ideas representing things you’d like to achieve.

A crochet vision board simply gives that idea a yarn-loving makeover.

Your board might include:

  • Crochet patterns you’d like to make
  • Yarn colours you want to work with
  • Crochet stitches you want to learn
  • Wearable crochet projects
  • Blanket inspiration
  • Amigurumi projects
  • Handmade Christmas gift ideas
  • Crochet projects for your home
  • Stash-busting goals
  • Photos of yarn you already own
  • Crochet techniques you’d like to master
  • Bigger “dream projects” that challenge your skills

It can be physical, digital or a combination of both.

Personally, I rather like the physical version. There is something satisfying about seeing all that colourful crochet inspiration sitting above your craft desk — especially when the alternative is having 387 screenshots buried somewhere on your phone.

What You’ll Need to Make a Crochet Vision Board

You really don’t need anything fancy.

For a physical crochet project vision board, try:

  • Corkboard, magnetic board, foam board or large piece of cardstock
  • Printed crochet project photographs
  • Magazine clippings
  • Yarn labels
  • Small yarn samples
  • Colour swatches
  • Pattern thumbnails
  • Pins, tape or glue
  • Scissors
  • Marker pens
  • Sticky notes
  • Decorative stickers or scrapbook supplies

A simple cork noticeboard from Amazon works particularly well because projects can be moved, removed and replaced as your crochet plans change.

And they will change.

We are crocheters. A new yarn colour can derail six months of carefully organised plans in approximately three minutes.

Step 1: Decide What You Want From Your Crochet Year

Before printing gorgeous photographs of 27 blankets you couldn’t possibly finish, think about what you’d genuinely like to accomplish.

Try dividing your crochet plans into a few categories.

Projects I Really Want to Make

Start with the projects you’ve been thinking about repeatedly.

Maybe it’s:

  • A granny square cardigan
  • A beautiful crochet throw
  • A summer crochet bag
  • A chunky winter blanket
  • A handmade baby gift
  • A crochet sweater
  • A set of Christmas decorations
  • Your first amigurumi toy

If amigurumi has been sitting on your “someday” list, browse these 21 crochet amigurumi projects and choose one or two favourites rather than attempting to populate your vision board with an entire crocheted zoo.

Skills I Want to Learn

Your board doesn’t have to be purely project based.

Add techniques you’d like to learn, such as:

  • Tapestry crochet
  • Tunisian crochet
  • Mosaic crochet
  • Crochet cables
  • Corner-to-corner crochet
  • Colourwork
  • Garment construction
  • Blocking
  • Joining granny squares
  • Reading crochet charts
  • Invisible joins
  • Amigurumi shaping

If you’re still building your basic skills, our Crochet for Beginners stitch and project guide is a useful place to start.

Don’t make every goal difficult, either. One challenging project surrounded by several comfortable ones is far more likely to keep you crocheting than a board full of projects that require concentration, counting and complete silence from everyone in the house.

Step 2: Choose Your Crochet Colour Palette

This might be my favourite part.

Instead of choosing individual projects first, try choosing colours you’re drawn to.

Pin up snippets of yarn, paint chips, fabric scraps or printed colour palettes.

You might discover you’re repeatedly choosing:

Soft neutrals: oatmeal, cream, sage and dusty pink.

Retro brights: mustard, orange, avocado, turquoise and brown.

Coastal colours: aqua, navy, sand and white.

Cottage colours: faded rose, lavender, cream and soft green.

Jewel tones: emerald, plum, ruby and deep blue.

Once you’ve spotted a colour direction, finding projects becomes much easier.

It can also stop the classic craft-shop problem where you buy six beautiful balls of yarn individually and arrive home to discover none of them actually want to be friends.

Step 3: Photograph Your Yarn Stash

This is where a crochet vision board becomes genuinely useful rather than simply decorative.

Take photographs of yarn you already own.

Especially photograph those yarn purchases that were bought because:

“It was too pretty to leave behind.”

You know the ones.

Print small photographs and add them to your board with a note showing approximately how much yarn you have.

For example:

8 balls cream DK — cardigan

4 balls mustard worsted — cushion?

Mixed sock yarn — scrap project

Leftover cotton — market bag or coasters

Then match your existing yarn to potential projects.

If using up leftovers is high on your list, have a look at these scrap yarn crochet project ideas for inspiration.

Suddenly your crochet vision board becomes part inspiration board and part stash-management system.

Which, frankly, some of us desperately need.

Step 4: Add Your Dream Crochet Projects

Now you can indulge yourself.

Choose several crochet projects you would absolutely love to make, regardless of whether you’re quite ready for them yet.

Maybe you’ve always wanted to crochet:

  • An intricate heirloom blanket
  • A fitted cardigan
  • A floor-length coat
  • A large mandala
  • A detailed amigurumi collection
  • A beautiful textured bedspread
  • An elaborate Christmas blanket

For blanket inspiration, something like this Woodland Wonders Crochet Blanket makes a brilliant “stretch project” because it incorporates several textured crochet techniques.

Don’t put ten enormous blankets in this section.

Pick one or two dream crochet projects.

Otherwise it stops being a vision board and becomes evidence against you when someone asks why there are another twelve boxes of yarn arriving.

Step 5: Include Some Quick Crochet Wins

This is important.

Not every crochet goal should involve 2,000 metres of yarn and several months of your life.

Add quick projects too:

  • Crochet coasters
  • Scrunchies
  • Dishcloths
  • Headbands
  • Granny squares
  • Small bags
  • Baby hats
  • Crochet flowers
  • Cup cosies
  • Fingerless gloves
  • Small amigurumi
  • Christmas ornaments

Quick projects keep your crochet motivation going between larger makes.

They’re also wonderful stash-busters and handmade gifts.

I particularly like adding a little “Weekend Crochet” section to the board. These are projects you could realistically start on Friday night and have finished — or at least recognisably underway — before Monday rolls around.

Step 6: Create a Crochet Gift List

If you crochet gifts for birthdays and Christmas, dedicate one area of your board to recipients.

For example:

Mum: shawl
Grandchild: amigurumi
Teacher gift: crochet mug cosy
Christmas: four ornaments
New baby: blanket

Add deadlines underneath.

This is considerably better than suddenly remembering on December 17 that you’d planned to crochet eight handmade presents.

Ask me how I know.

Crochet kits can also be useful for gift projects because you’re not hunting around for matching yarn and supplies at the last minute. Mary Maxim crochet kits are worth browsing when you want a complete project ready to start rather than assembling everything separately.

Step 7: Add One Stash-Busting Challenge

Give yourself one goal that involves yarn you already have.

For example:

Crochet 12 projects from my existing stash before buying more yarn.

Or, if we would like to remain within the realms of reality:

Use three skeins before buying another six.

Your challenge could be:

  • Finish one WIP each month
  • Make a scrap blanket
  • Crochet only from your stash for 30 days
  • Use all your cotton scraps
  • Turn leftover yarn into granny squares
  • Make six gifts entirely from stash yarn
  • Finish three abandoned crochet projects

The goal isn’t to make yourself feel guilty about owning yarn.

Yarn collecting and crocheting are, after all, closely related hobbies.

The idea is simply to reconnect some of that beautiful yarn with the reason you bought it in the first place: to make something.

Step 8: Add a “Finish These First” Corner

Ah yes.

The WIPs.

Most crocheters have at least one project quietly judging them from a basket.

Take photographs of your unfinished crochet projects and create a small Finish These First section.

Don’t add everything.

Choose perhaps three.

A blanket needing twelve more rows feels far less intimidating when you can actually see how close it is to completion.

And there’s something deeply satisfying about removing a project from the board when it’s finished.

Step 9: Add Crochet Inspiration That Isn’t a Pattern

Not everything on your crochet vision board needs to link to a particular project.

Add things that simply make you want to create:

  • A beautiful cottage interior
  • Vintage crochet
  • Flowers
  • Fashion photographs
  • Interesting architecture
  • Traditional textiles
  • Colour combinations
  • Nature photography
  • Interior design
  • Old blankets
  • Crochet stitches
  • Favourite quotes

A photograph of autumn leaves might eventually inspire a rust-and-mustard blanket.

A vintage floral wallpaper might become the colour palette for granny squares.

You don’t always need to know why something appeals to you.

Pin it up and see where it takes you.

Try a 12-Month Crochet Vision Board

If a big board feels overwhelming, divide yours into twelve smaller monthly crochet goals.

For example:

January: finish an old WIP
February: crochet something red or pink
March: learn a new stitch
April: make a bag
May: stash-busting project
June: crochet something cosy
July: start a blanket
August: crochet a wearable
September: begin handmade Christmas gifts
October: Halloween crochet
November: Christmas decorations
December: finish gifts and choose next year’s projects

You don’t have to follow it religiously.

This is crochet, not military training.

Move things around when inspiration strikes.

Make a Digital Crochet Vision Board

Prefer everything on your phone or tablet?

You can make exactly the same style of board digitally using:

  • Pinterest
  • Canva
  • Google Slides
  • A photo collage app
  • Notes on your phone
  • A private Pinterest board

Create sections for projects, colours, yarn stash, techniques and gifts.

Pinterest is particularly dangerous — I mean useful — for this because one crochet blanket inevitably leads to another blanket, which leads to a cardigan, which leads to a granny square tote bag and suddenly it’s midnight.

The important part is to curate rather than continuously save.

Choose the projects that still excite you after you’ve looked at them several times.

Those belong on your actual crochet vision board.

Don’t Turn Your Crochet Vision Board Into Another To-Do List

This is probably the most important part.

Your crochet vision board should make you want to pick up your hook.

It shouldn’t make you feel behind.

Crochet is meant to be enjoyable.

If you lose interest in that enormous neutral-coloured blanket you pinned six months ago, take it off.

If you suddenly fall in love with ridiculously colourful crochet flowers, add them.

If your carefully planned beige-and-sage year becomes bright orange granny squares by March, congratulations — you’re a crafter.

Plans change.

Creativity should be allowed to change with them.

A Simple Crochet Vision Board Formula

If you’re not sure where to begin, try this:

1 Dream Project
Something ambitious that you’d love to accomplish.

2 Wearables
Cardigans, scarves, hats, bags or other crochet accessories.

3 Quick Projects
Projects you can finish when you need an easy win.

1 New Technique
A crochet skill that stretches you slightly.

1 Stash Project
Something made primarily from yarn you already own.

3 Handmade Gifts
Specific projects for specific people.

1 WIP to Finish
Because we both know it’s sitting there.

That’s enough inspiration to keep you interested without turning your craft room wall into a five-year production schedule.

Your Crochet Board Should Make You Want to Pick Up Your Hook

The best crochet vision board isn’t necessarily the prettiest one.

It’s the one you actually use.

Put it somewhere near your yarn or crochet chair. When you’ve finished a project, remove it, date it or add a little tick beside it.

Over time you’ll have a lovely visual record of what you’ve made — and probably a few projects that have stubbornly survived on the board for several years.

Those are allowed too.

Sometimes we need practical projects.

Sometimes we need to learn new things.

And sometimes we simply need a beautiful photograph of an absurdly complicated crochet blanket pinned above our desk so we can continue telling ourselves:

One day. I’m definitely making that.

More Articles

Afghans, Blankets & Throws amigurumi Baby Hat Baby Patterns Beanies Beginner Book Reviews Christmas CHRISTMAS Clothing Crochet Patterns Crochet Techniques & Ideas Easy Crochet Patterns Free Crochet Patterns Granny Squares Halloween Patterns Quick Scarfs shawls

RSS More Articles

  • 4 Crayon Cutable or Printable Files for Back to School
  • How to Make a Crochet Vision Board – Plan the Crochet Projects You Actually Want to Make
  • What to Serve with Rotisserie Chicken: 21 Delicious Sides You’ll Want on Repeat
  • Etsy Feature – Moth Pottery Template for Slab Building
  • Hubcap Creatures: Transforming Roadside Finds into Sculptural Wildlife
  • Learning about Georgia for Kids
  • How to Make a Moth Birthday Card
  • DIY Giant Eyeball Lanterns – Creepy Halloween Decoration
  • Designer Spotlight: Artmishka Cross Stitch
  • Freebie Friday – Grungy Pumpkins and Fall Tags Junk Journal Printables

Pick Your Blog

  • Sewing
  • Knitting
  • Quilting
  • Crochet
  • Home & Garden
  • Recycled Crafts
  • Scrapbooking
  • Card Making
  • Polymer Clay
  • Cross-Stitch
  • Edible Crafts
  • Felting
  • Glass Art
  • Indie Crafts
  • Kids Crafts
  • Jewelry Making
  • Lesson Plans
  • Needlework
  • Bath & Body
  • Party Ideas
  • Candle Making
  • DIY Weddings
  • Not Craft
  • Free Craft Projects

Copyright © 2026 · CraftGossip | Start Here | Contact Us | Link to Us | Your Editors | Privacy and affiliate policy