• Home
  • Suggest A DIY
  • DIY Newsletter

Crochet

Patterns, projects and techniques

  • About CraftGossip
  • Our Network
    • Bath & Body Crafts
    • Candle Making Ideas
    • Crochet Ideas
    • Cross Stitch
    • Edible Crafts
    • Felting Patterns
    • Glass Art
    • Home & Garden Ideas
    • Indie Crafts
    • Jewelry Making
    • Kids Crafts
    • Knitting Patterns
    • Lesson Plans
    • Needlework
    • Party Ideas
    • Polymer Clay
    • Quilting Ideas
    • Recycled Crafts
    • Scrapbooking
    • Sewing Patterns
    • Card Making
    • DIY Weddings
    • Not Craft Ideas
  • Giveaways
  • Roundups
  • Store
  • Search

Crochet Siamese Cat – Emotional Support Kitty

June 13, 2026 by Shellie Wilson

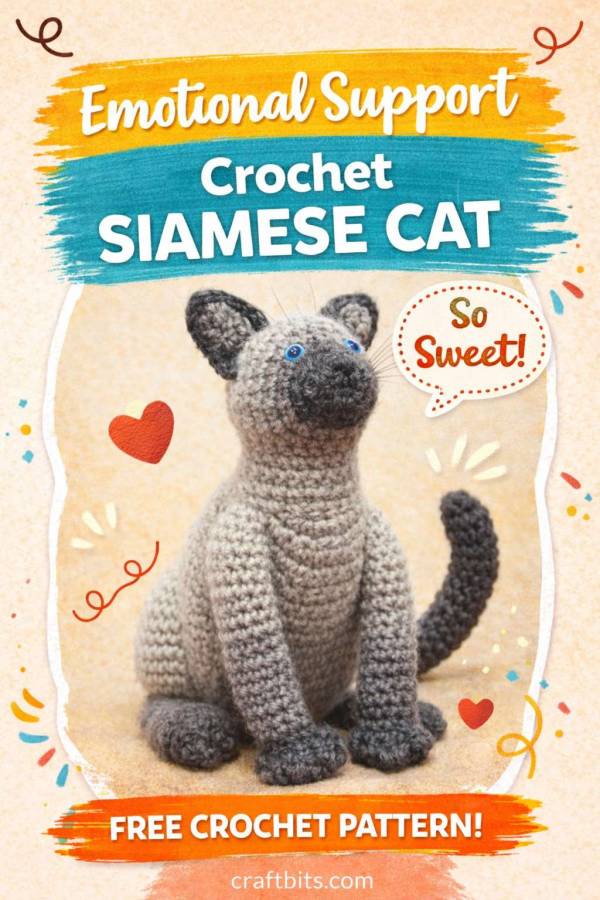
If you love amigurumi with a bit of personality, this free Crochet Siamese Cat – Emotional Support Kitty pattern is such a fun one to add to your make list. It has that sweet handmade charm CraftBits readers tend to love, but it also feels a little more detailed and character-led than a super basic beginner plush. The finished cat has a lovely sitting shape, soft shading through the face and legs, and just enough sculpting to make it feel special.

What makes this pattern stand out is the coloring. The graduated grey tones are used to create that classic Siamese-style look, giving the cat more depth than a one-color toy. It is worked in DK yarn with a 3.25 mm hook, and the finished size is approximately 13.5 cm long and 17.5 cm tall, so it is a nice displayable size without becoming a huge commitment.

The construction is a little more involved than a quick one-piece pocket project, but that is also part of the appeal. The head, neck, and body are worked as one shaped piece using rounds and rows, while the ears and tail are made separately. The shaping includes short rows, colour changes, bobble toes for the paws, and embroidered facial details, so this pattern is best suited to crocheters who already feel comfortable with the basics and want a more polished amigurumi project.

I also really like that the designer has included small finishing touches that bring the cat to life. The blue embroidered eyes, black nose details, and optional nylon whiskers give it a sweet realistic look without making it feel stiff or overly fussy. The hind legs are lightly stuffed so they can bend into the sitting pose, which is such a clever little detail for display.

This is the sort of crochet pattern that would make a gorgeous handmade gift for a cat lover, especially someone who appreciates soft neutrals and realistic animal-inspired projects. It would also look lovely on a shelf in a nursery, craft room, or reading nook. And honestly, the whole “emotional support kitty” vibe gives it that slightly quirky, comforting feel that makes handmade toys extra giftable.

It is not the fastest stash-buster in the world, since the shaping and assembly ask for a bit more concentration, but it is the kind of project that feels satisfying once it starts coming together. If you are someone who enjoys seeing a toy develop real character row by row, this one has plenty of that.

«
»

Comments

  1. Avi says

    June 14, 2026 at 12:21 am

    I did this pattern and the scarf row is my shoulder-to-shoulder width (kind of huge for a scarf).
    https://crochet.craftgossip.com/midnight-skulls-halloween-scarf-free-crochet-pattern/?utm_source=Pinterest&utm_medium=organic&epik=dj0yJnU9QUxVd1RNY2cyZGFCT2lIa1pXY2F6SWc5MU9MU1ZSNkwmcD0wJm49MEs5ejJZMmlrWWJRWklPazBBWldxdyZ0PUFBQUFBR29WMVY0

Have you read?

Free Crochet Pattern: Evil Eye Rakhi Bracelet

This crochet Evil Eye Rakhi is a small, beginner-friendly thread crochet project made with simple rounds of colour. It is perfect for Raksha Bandhan, especially if you want something handmade, meaningful, and quick enough to make in batches.

The centre motif is worked in traditional evil eye colours — black, blue, white, and turquoise — then finished with simple crochet ties. You can leave it plain for a soft handmade look, or add a tiny bead, sequin, or gold thread edging if you want a more festive Rakhi.

Finished Size

The evil eye motif measures approximately 1.5–2 inches wide, depending on your yarn, hook size, and tension.

Skill Level

Easy beginner to confident beginner.

You only need to know how to chain, slip stitch, single crochet, half double crochet, and double crochet.

Supplies

Small amounts of cotton yarn or crochet thread in:

Black
Dark blue
White
Light blue or turquoise
Red, gold, yellow, or blue for the bracelet ties

You will also need:

2.5 mm to 3.5 mm crochet hook, depending on yarn thickness
Yarn needle
Scissors
Optional beads, sequins, or gold embroidery thread
Optional fabric glue for securing knots

Abbreviations

ch = chain
sl st = slip stitch
sc = single crochet
hdc = half double crochet
dc = double crochet
st = stitch
sts = stitches
MR = magic ring

This pattern uses US crochet terms.

Notes Before You Start

Work the eye motif in joined rounds, changing colour at the end of each round.

For a neater finish, join each round with a slip stitch and fasten off before starting the next colour. This does mean weaving in a few ends, but because the motif is tiny, it is worth it for a cleaner eye shape.

If you do not like magic rings, chain 4 and join into a ring instead.

Evil Eye Centre Motif

Round 1: Black Pupil

Using black yarn, make a magic ring.

Ch 1, work 6 sc into the ring.

Pull the ring closed.

Join with a sl st to the first sc.

Fasten off.

You should have 6 stitches.

Round 2: Dark Blue Ring

Join dark blue yarn into any stitch.

Ch 1, work 2 sc into each stitch around.

Join with a sl st to the first sc.

Fasten off.

You should have 12 stitches.

Round 3: White Ring

Join white yarn into any stitch.

Ch 1.

Work 1 sc in the first stitch, then 2 sc in the next stitch.

Repeat from around.

Join with a sl st to the first sc.

Fasten off.

You should have 18 stitches.

Round 4: Light Blue Outer Ring

Join light blue or turquoise yarn into any stitch.

Ch 1.

Work 1 sc in each of the next 2 stitches, then 2 sc in the next stitch.

Repeat from around.

Join with a sl st to the first sc.

Fasten off.

You should have 24 stitches.

Shaping The Eye

To turn the circle into a soft eye shape, join dark blue or turquoise yarn to one side of the motif.

Ch 2.

In the next stitch, work 1 hdc.

In the next stitch, work 1 dc.

In the next stitch, work 1 hdc.

Ch 2 and sl st into the next stitch.

Fasten off.

Repeat on the opposite side of the circle to create the second pointed edge of the eye.

This gives the Rakhi that classic evil eye shape without making the pattern too fiddly.

Optional Decorative Edge

For a more festive Rakhi, join gold, yellow, or metallic thread anywhere around the outer edge.

Ch 1, then sl st loosely around the outside of the motif.

When you reach each pointed end, work ch 1 before continuing so the eye shape stays defined.

Join, fasten off, and weave in ends.

This little gold edge makes the Rakhi look much more finished, especially if you are gifting it.

Crochet Bracelet Ties

Join your bracelet tie colour to one pointed side of the eye.

Ch 25–35, depending on the wrist size.

Fasten off and knot the end.

Join the same yarn to the opposite pointed side.

Ch 25–35 again.

Fasten off and knot the end.

For children, shorter ties are usually enough. For adults, make the ties a little longer so the Rakhi can be tied comfortably.

Optional Beaded Ends

Before tying the final knots, thread a small bead onto each tie end.

Push the bead near the end of the chain and knot securely underneath it.

This helps weigh the ties slightly and gives the Rakhi a more polished handmade finish.

Finishing

Weave in all yarn ends carefully on the back of the motif.

If the motif curls slightly, place it under a heavy book for a few hours, or lightly block it with a mist of water and let it dry flat.

For extra security, you can add a tiny dab of fabric glue to the back where the ties are attached.

Colour Ideas

Traditional evil eye: black, royal blue, white, turquoise
Festive Rakhi: black, navy, white, turquoise, gold
Soft pastel Rakhi: navy, pale blue, cream, mint
Kids’ Rakhi: bright blue, white, yellow, red
Minimal Rakhi: navy, white, and gold

Shellie’s Tip

If you are making a few of these, crochet all the black centres first, then all the dark blue rounds, then the white rounds, and so on. It feels much faster than finishing one Rakhi completely before starting the next.

Also, don’t stress if the tiny circle isn’t perfectly round. Once the side points and ties are added, it looks handmade in the nicest possible way.

More Articles

Afghans, Blankets & Throws amigurumi Baby Hat Baby Patterns bags Beanies Beginner Book Reviews Christmas CHRISTMAS Clothing Crochet Patterns Crochet Techniques & Ideas Free Crochet Patterns Granny Squares Halloween Patterns Quick Scarfs shawls

RSS More Articles

  • 12 Handmade Card Ideas with Bees
  • Beach Bag Knitting Patterns
  • Mary Poppins Eyelet Tote Bag – Free Sewing Pattern
  • Mini Mending Mondays: Cover a Tiny Hole with a Sweet Embroidered Flower
  • Tropical Flower Cross Stitch Patterns
  • Mars Bar Dessert Cocktail – A Boozy Twist on a Classic Chocolate Bar
  • Quick and Easy Knit Baby Blanket Patterns for Beginners: Cozy Throws, Baby Blankets and Chunky Weekend Knits
  • Emotional Support Crochet Patterns You’ll Want to Make for Friends, Co-Workers, and Yourself
  • Pottery Lingo You Need to Know: A Beginner’s Guide to Talking Clay
  • Recycled Crafts That Sell: Eco-Friendly Ideas for Makers & Etsy Shops

Pick Your Blog

  • Sewing
  • Knitting
  • Quilting
  • Crochet
  • Home & Garden
  • Recycled Crafts
  • Scrapbooking
  • Card Making
  • Polymer Clay
  • Cross-Stitch
  • Edible Crafts
  • Felting
  • Glass Art
  • Indie Crafts
  • Kids Crafts
  • Jewelry Making
  • Lesson Plans
  • Needlework
  • Bath & Body
  • Party Ideas
  • Candle Making
  • DIY Weddings
  • Not Craft
  • Free Craft Projects

Copyright © 2026 · CraftGossip | Start Here | Contact Us | Link to Us | Your Editors | Privacy and affiliate policy