If Bluey is the adventurous one, then Bingo — her sweet, thoughtful little sister — is the heart of the Heeler family. Whether she’s playing “Featherwand,” dreaming up pretend games, or quietly pottering around with Mum and Dad, Bingo’s kind spirit has made her a fan favorite.
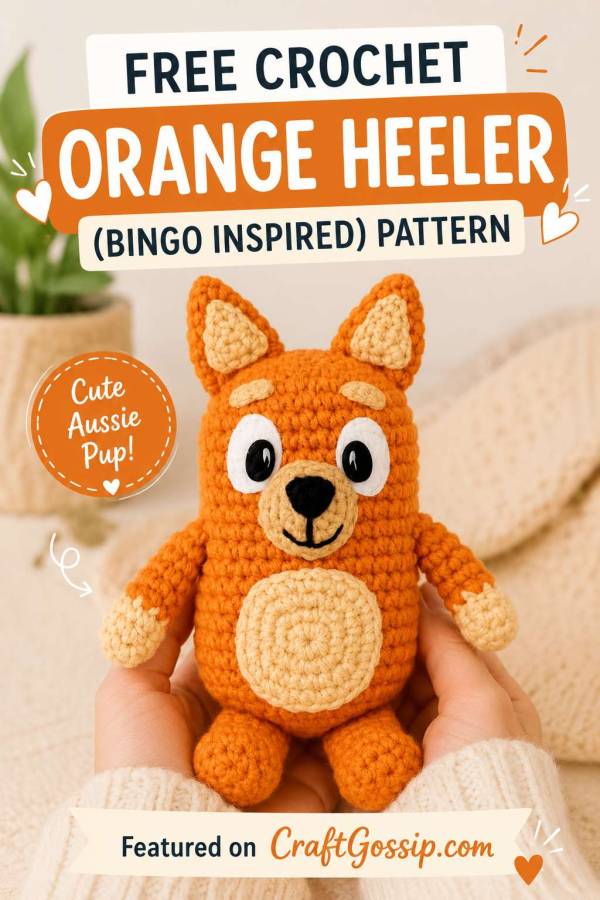
This pattern lets you bring that gentle energy to life with your own handmade Orange Heeler plush — lovingly inspired by Bingo herself. Crocheted from soft acrylic yarn in cheerful shades of orange, cream, and tan, this project is the perfect companion to your Blue Heeler pattern.
It’s a relaxing make that’s built piece by piece — each section comes together like a puzzle. You’ll crochet every part separately (body, arms, feet, ears, nose, belly, and tail) and then sew them together to form Bingo’s adorable round shape. The result? A cozy, squishy, perfectly sized plush toy that’s ideal for cuddling, gifting, or displaying.
Bluey Heeler Beanie – Free Crochet Pattern
Bluey Blue Heeler Toy- Free Crochet Pattern
Bluey Hexagon Cardigan – Free Crochet Pattern
Orange Dingo Heeler Toy – Free Crochet Pattern
Materials You’ll Need
To crochet your Orange Heeler-inspired plush, gather these supplies:
Yarn: Worsted weight acrylic yarn in:
- Medium Orange — main body, head, and ears
- Light Orange or Peach — arms, legs, and tail accent
- Cream — belly patch and optional facial details
- Tan — snout and eyebrows
- Darker Orange — optional embroidered back spots
Hook: 4 mm crochet hook
Eyes: 12 mm oval kawaii safety eyes
Nose: Safety nose, approx. 15 × 12 mm
Embroidery Thread: Black for the mouth
Stuffing: Polyester fiberfill
White Felt: Cut into two small ovals for the eye whites
Glue: Fabric glue or craft glue to secure the felt
Other: Yarn needle and scissors
Optional: Wire pet brush to fluff the tail tip
If you make a lot of little amigurumi toys, it is worth keeping a small basket of safety eyes, noses, stuffing, felt scraps, and yarn needles nearby. It saves you from that very familiar “I know I bought eyes somewhere” craft-room treasure hunt.
Stitches & Skills Used
US Crochet Terms
You’ll need to know:
- Magic Ring — MR
- Chain — ch
- Single Crochet — sc
- Increase — inc, meaning 2 sc in the same stitch
- Decrease — dec, meaning single crochet 2 stitches together
- Basic colour changes between rounds
- Basic sewing and embroidery for assembly
Pattern Notes
This pattern is worked mostly in continuous rounds. Use a stitch marker to mark the first stitch of each round.
Stuff the body firmly as you go, but stuff the arms, legs, and tail more lightly so they stay soft and flexible.
Finished size will vary depending on your yarn, hook, tension, and stuffing, but this pattern makes a small handheld plush.
Nose / Snout
Use Tan Yarn
R1: 5 sc in MR. (5)
R2: inc in each st around. (10)
R3: 2 inc, 6 sc, 2 inc. (14)
R4–R5: sc in each st around. (14)
Fasten off, leaving a long tail for sewing.
Attach the safety nose to the front center of the snout, between R1 and R2. Make sure it is secure before sewing the snout to the body.
Body / Head
Use Medium Orange Yarn
R1: 6 sc in MR. (6)
R2: inc in each st around. (12)
R3: (1 sc, inc) × 6. (18)
R4: (inc, 2 sc) × 2, inc, 2 sc, (inc, 2 sc) × 3. (24)
R5: (inc, 3 sc) × 2, inc, 3 sc, (inc, 3 sc) × 3. (30)
R6–R22: sc in each st around. (30)
Pause here to add the face.
Place the safety eyes between R10 and R11, about 5–6 stitches apart. Glue the white felt ovals behind or around the eyes before securing them, depending on the style of safety eyes you are using.
Sew the snout to the front center of the face, with the top of the snout sitting just below the eyes. Add a small embroidered smile beneath the nose using black embroidery thread.
Continue crocheting the body:
R23: (3 sc, dec) × 6. (24)
R24: (2 sc, dec) × 6. (18)
R25: (1 sc, dec) × 6. (12)
R26: dec × 6. (6)
Stuff the body firmly before closing. Fasten off and sew the opening closed. Weave in the end securely.
Ears
Make 2 — Use Medium Orange Yarn
R1: 5 sc in MR. (5)
R2: 1 sc, inc, 2 sc, inc. (7)
R3: sc in each st around. (7)
R4: 2 sc, inc, 3 sc, inc. (9)
R5: 3 sc, inc, 4 sc, inc. (11)
Fasten off, leaving a long tail for sewing.
Flatten the ears slightly before attaching. Do not stuff.
Arms
Make 2
Start with Light Orange or Peach yarn.
R1: 6 sc in MR. (6)
R2: (2 sc, inc) × 2. (8)
R3: (2 sc, dec) × 2. (6)
R4: sc in each st around. (6)
Change to Medium Orange yarn.
R5–R10: sc in each st around. (6)
Stuff lightly. Fasten off, leaving a long tail for sewing.
Feet / Legs
Make 2
Start with Light Orange or Peach yarn.
R1: 8 sc in MR. (8)
R2: inc in each st around. (16)
R3: dec × 8. (8)
R4: (2 sc, dec) × 2. (6)
R5: sc in each st around. (6)
Change to Medium Orange yarn.
R6–R11: sc in each st around. (6)
Stuff lightly. Fasten off, leaving a long tail for sewing.
Tail
Start with Medium Orange yarn.
R1: 6 sc in MR. (6)
R2–R4: sc in each st around. (6)
Change to Light Orange or Peach yarn.
R5–R10: sc in each st around. (6)
Fasten off, leaving a long tail for sewing. Stuff lightly.
If you would like a fuzzy tail tip, gently brush the light orange section with a clean wire pet brush. Go slowly — this is one of those steps where “just a little more” can very quickly become “oh dear, I’ve made a pom-pom.”
Belly Patch
Use Cream Yarn
R1: 4 sc in MR. (4)
R2: 3 sc in each st around. (12)
R3: (1 sc, 3 sc in next st, 1 sc) × 4. (20)
R4: 2 sc, 3 sc in next st, 3 sc, inc, 1 sc, inc, 2 sc, inc, 1 sc, inc, 3 sc, 3 sc in next st, 2 sc. (28)
Fasten off, leaving a long tail for sewing.
Note: The increases in R4 are placed unevenly to create a soft oval belly patch rather than a perfect circle.
Assembly Instructions
Once all pieces are crocheted, pin everything in place before sewing. This helps you check the face and body placement before committing with your yarn needle — because we have all sewn one ear on slightly wonky and pretended it was “personality.”
Sew the ears onto the top of the head.
Attach the arms to each side of the upper body.
Sew the feet to the lower front/base of the body.
Position the cream belly patch on the center front of the body and sew neatly around the edge.
Sew the tail to the back of the body.
With black embroidery thread, embroider a small smile beneath the nose.
With tan yarn, embroider two small eyebrows above the eyes.
Using darker orange yarn, embroider or surface crochet three small spots across the back.
Weave in all loose ends securely.
Optional Finishing Touch
To give your Orange Heeler plush a softer, fuzzier finish, use a wire pet brush to gently tease the yarn on the tail tip and sides. Brush lightly and slowly so you do not pull out too much fibre.
This step is optional, but it gives the toy a sweet, snuggly texture and makes the finished plush feel extra handmade.
Finished Plush & Pairing Idea
Your Orange Heeler-inspired plush is now ready for cuddles, display, or playtime. She pairs beautifully with the Blue Heeler-inspired pattern, especially if you want to create a handmade sibling duo for a Bluey fan.
This is also a lovely small crochet gift idea because it does not require a huge amount of yarn. It is a good stash-busting amigurumi project if you already have orange, cream, and tan yarn tucked away from past makes.
For best results, use a smooth worsted weight acrylic yarn so the shaping stays neat and the embroidered details are easy to add. A good 4 mm hook, quality stuffing, and safety eyes will make a big difference to the finished look.